When you create a list in Excel, do you start with a column that numbers the rows? I usually create an ID column and type the number, or use a formula to automatically number them.
simple formula for row numbers in Excel list
In the steps below, I’ll show you the simple numbering system. There’s a fancier formula too, if you’d like to see consecutive numbers when the list is filtered.
consecutive numbering for visible rows in filtered list
How can you make it easy for people to enter and edit data in Excel, but keep them away from the data storage worksheet?
Last year, I posted a Worksheet Data Entry Form in Excel, where users could enter and view Excel data. It was based on a worksheet data entry form that Dave Peterson created.
I’ve created a new version, where users can enter, view and edit the Excel data.
Version 1: Add New Records
In Dave’s original worksheet data entry form, users could add records on the data entry worksheet, and click a button to go to the database sheet, and review or edit the order records.
original Excel data entry form
Version 2: View Existing Records
In version 2, I added a few buttons to Dave’s workbook, to allow users to scroll through the existing records.
With the navigation buttons, you could go to the first, previous, next or last record, or type a record number, to go to a specific record.
Excel data entry form scroll
Version 3: Update Existing Records
In the latest version of the Excel Worksheet Data Entry form, I’ve added an update feature.
As in the previous version, there are data validation drop down lists, to select Item and Location.
The Price calculation is based on a VLOOKUP formula, and the Total formula multiplies the quantity by the price.
After you select a record, you can change its data, then click the Update button to copy those changes to the database.
Excel data entry form Update Existing Records
For example, in the record shown above, if you discovered that there was an error, you could change the quantity from 500 to 200. The Total formula would automatically recalculate, to show the new total of $200.00.
Then, click the Update button, and the revised quantity and total would appear in that record on the database sheet.
The Update Code
Before updating the database record, the Update code checks to see of all the data entry cells are filled in. If they aren’t, a warning message appears, and the macro stops running. This prevents you from accidentally overwriting an existing record with blank cells.
If all the data entry cells are filled in, the code:
writes the current date and time in the applicable row of the database
adds the User Name from the Excel application
copies the data to the database
clears the data entry cells
Then, with a cleared data entry sheet, you can go on to add, view and edit other records, or save and close the workbook.
Download the Sample File
The zipped sample workbook, in Excel 2003 format, can be downloaded from the Contextures website: Worksheet Data Entry Form
___________
An Excel workbook certainly isn’t Fort Knox, and the information you store there isn’t too secure. If someone opens your Excel workbook, and is determined to see everything in there, they’ll probably be able to.
However, if your goal is simply to make a workbook easier for people to use, you can hide some of the worksheets, so users don’t accidentally change their contents.
For example, if your data entry worksheet has data validation drop downs, you can store the lists on a different sheet, and hide that sheet.
Hide an Excel Worksheet
To quickly hide a worksheet in Excel 2007, right-click on the sheet tab, and click Hide.
If you’re using an earlier version of Excel, activate the sheet that you want to hide. Then, click the Format menu, then click Sheet, and click Hide.
Show an Excel Worksheet
To show the hidden sheet again, right-click any sheet tab, then click Unhide. (In earlier versions of Excel, click the Format menu, then click Sheet, and click Unhide.)
In the Unhide dialog box, click on a sheet name, and click OK.
Really, Really Hide an Excel Worksheet
If you want to hide a worksheet a little better, you can use a special technique that keeps it from appearing in the Unhide list.
Did you know that you can also create a custom list in Excel and use that to sort your data, instead of sorting in alphabetical or numerical order?
See how, in the written steps and video below
Sort by Custom List
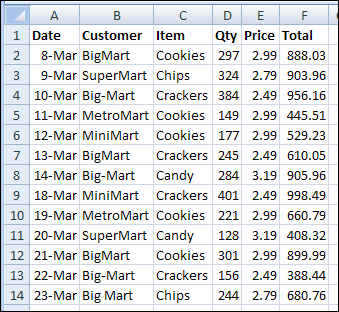
Instead of sorting the products in this table alphabetically, we’ll create a custom list of products, and use it when sorting the list.
Create a Custom List in Excel
You can create a custom list in Excel by importing a list from a worksheet, or by typing a new list. In this example, there is a worksheet named Lists, and it contains a product list.
We’ll import that list, to create the custom list.
To open the custom list window:
Select the cells that contain the list items
On the Ribbon, click the File Tab (or the Office Button in Excel 2007)
Then click Options.
Excel 2010 and later: Click the Advanced category, then scroll down to the General section
Excel 2007: Click the Popular category, then look in the Top Options section
Click Edit Custom Lists
To add a custom list:
In the Custom Lists dialog box, the list address — $A$2:$A$5 — should appear in the Import range box. If not, you can click in the Import range box, and type a range, or select a range on the worksheet.
To add the selected range as a custom list, click the Import button.
The list items will appear in the List entries section of the Custom List dialog box, and at the end of the list of existing Custom Lists.
Click OK to close the Custom Lists dialog box, and click OK to close the Excel Options window.
Use the Custom List
You can use the custom lists when sorting, and you can also use them with the AutoFill feature. Type any item from a custom list in a cell, then use the Fill handle to complete the list.
Sort Excel List in Custom Order
To sort your list based on your custom list, follow these steps:
Select a cell in the table that you want to sort.
On the Ribbon’s Data tab, click Sort
In the Sort dialog box, select a Column from the first drop down, and select Values from the Sort On drop down.
In the Order drop down, click Custom List
In the Custom List dialog box, select your custom list, and click OK
Sort Excel List in Custom Order
Click OK to close the Sort dialog box
The list is sorted in the order of the items in your custom list.
Watch the Excel Sort Video
To see the steps for adding an Excel Custom List, then sorting by that Custom List, watch this short Excel video tutorial.
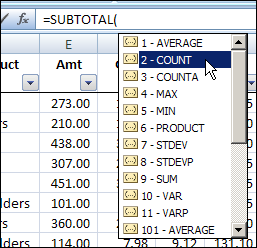
While working on a client’s sales plan last week, I had to count the orders for a couple of specific customers. This tutorial shows how to count cells with specific text in Excel.
If you’re having a party this weekend, you can plan your party seating with Excel. Get this sample Excel seating workbook, enter the guest names on the Lists sheet, then fill the tables by selecting names from data validation drop down lists. After you’ve assigned a guest to a table, that guest’s name disappears from the drop down lists, so you can’t accidentally assign a guest to two different seats.
This week I’m working on a client’s sales plans for the upcoming fiscal year. They forecast sales per month by product and customer, and we use some pretty complicated formulas to sort things out. Of course, anywhere that it makes sense to use a pivot table, I create one. It’s a great way to summarize all the details, and review the overall totals. Running totals are easy with Excel pivot tables!
A very nice email, from someone who visited the Contextures website, made me think about how long I’ve been using Excel.
My guess was that I’d started around 1987, so I fired up the old Mac laptop, and dug some old floppies out of the storage cupboard.
Excel 3.0 on Mac PowerBook
In the photo below, you can see my Mac PowerBook 170 laptop, from late 1991. It’s running the Mac version of Excel 3.0.
There’s a Mac 128K model in the back room too, but I didn’t have the strength to dig that out. (I hope the producers of the tv series, The Hoarders, don’t call me now.)
Mac PowerBook 170 running Mac Excel 3.0
Excel Files
As you can see, the application files were much smaller in Excel 3.0. Of course, that still took a good chunk out of my 40MB hard drive.
Do you remember the days when a Microsoft Office application was just over a megabyte in size?
Flashy Excel Charts
Even though the machine didn’t have colour, I was still able to make some pretty flashy 3-D charts in the old days.
I have no idea what this was supposed to show, but maybe it was the results of an Olympic ski jumping event.
Black and White Tetris
I’m sure that I never wasted any time playing TETRIS, when I was supposed to be working on Excel files.
And it must have been harder to play back then, when all the Tetris shapes were the same shade of grey!
Sorting a List
Way back then (and until Excel 2007), we were only able to sort by 3 levels, and we couldn’t sort by colour.
That didn’t matter much to me, since I didn’t have colour!
Sorting a List in Excel 3.0
My Oldest Excel File
There may be something older on a floppy disk at the back of the storage cupboard, but I finally found an Excel file that I’d worked on in April 1987. I was creating some Excel training files, to be used by Apple vendors.
The Excel 3.0 File and Excel Toolbar
Here’s what the file looked like, and it’s interesting to see the minimalist toolbar too. Do you remember what all those icons were for?
Excel 3.0 File and Excel Toolbar
How Long Have You Used Excel?
There’s an Excel poll on my Debra D blog, so if you have a minute, please go and answer the question – How Long Have You Been Using Excel?
[update: the poll is closed now]
Spreadsheet Demo From May 1987
In an episode of Computer Chronicles from May 1987, the guests talked about spreadsheets.
This video shows an Excel demo, by Mike Slade from Microsoft, using a Macintosh. He shows multiple worksheets open at the same time, links the sheets, creates a chart, and runs a macro.
You can use Excel VBA to show messages to someone who’s using your workbook. A message can be simple, with just an OK button, or give people options, with Yes and No buttons.
That lets you collect data from users, and then complete macro steps based on which button they clicked.


 An Excel workbook certainly isn’t Fort Knox, and the information you store there isn’t too secure. If someone opens your Excel workbook, and is determined to see everything in there, they’ll probably be able to.