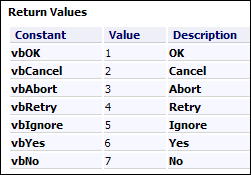
You can use Excel VBA to show messages to someone who’s using your workbook. A message can be simple, with just an OK button, or give people options, with Yes and No buttons.
That lets you collect data from users, and then complete macro steps based on which button they clicked.
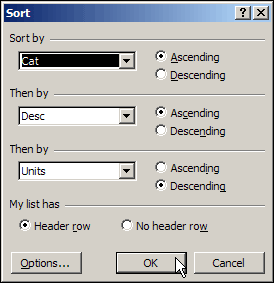
In the old days, the Sort dialog box in Excel only had 3 levels.
However, with a bit of planning, you could sort Excel data by 4 columns or more, and once you learned that trick, life was good. Or at least it was sort of good. 😉
I’ve never needed anywhere near that many – 5 or 6 fields is plenty for most tables that I’ve had to sort.
Sort By Colour
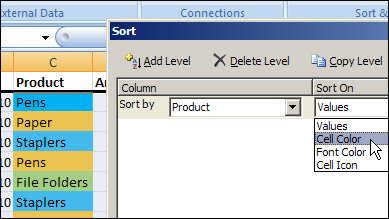
Another new feature in Excel 2007 is the ability to sort by cell or font colour, or by cell icon.
sort by cell or font colour
If you have different colours in a column, you can choose one to show up at the top or bottom of a sorted list.
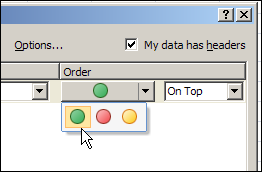
If you used conditional formatting to add cell icons, such as traffic lights, you can sort by those icons.
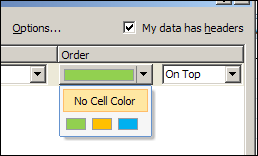
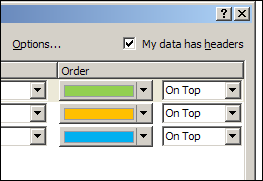
To put the colours or cell icons in a specific order, you can add the same field multiple times in the Sort dialog box, and choose a different colour or cell icon for each sorting level.
This won’t be too difficult if you have only a few colours in the list, but will be more challenging if you have lots of colours.
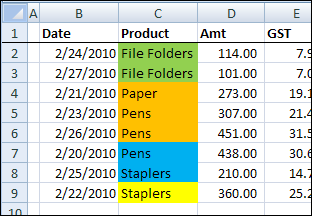
Worksheet List Sorted by Colour
The list on my worksheet, that was previously sorted by date, is now sorted by the colours, in the order that I selected above.
Yellow isn’t in the Sort level specifications, so it appears at the bottom of the list.
Worksheet List Sorted by Colour
Sort By Colour At Your Own Risk
Even though you can sort by colour now, I wouldn’t recommend it. I’ve seen too many rainbow coloured Excel worksheets, where nobody can remember what the colours mean.
Is yellow good? Is blue bad? Is there a colour code somewhere?
Sort By Text or Number
I’d rather add another column in the worksheet, and put a number code or text comment there. S
o, instead of marking the overdue accounts with a red fill colour, type “Overdue” in another column, or use a formula to calculate which accounts are overdue.
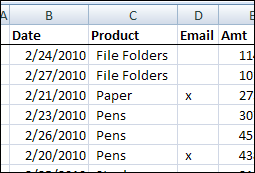
Or, instead of highlighting the customer names that you want to send an email to, type an X in an Email column.
Then, you can sort or filter the Overdue accounts or the Email column, to focus on the rows of interest.
Mark X in Email Column
Do You Sort By Colour?
Maybe I’m missing something, and the feature is working well for you. Some people must have asked for the feature, since they added it to Excel 2007.
In your Excel worksheets, do you ever sort by colour? In what kind of lists or situations is it most helpful for you?
_______________
You might not love the Ribbon in Excel 2007, but the user interface does have new features that are an improvement over Excel 2003.
The new features are useful when you’re working with large formulas or long names. There are written steps and a video below, that show those features
Change the Formula Bar Height
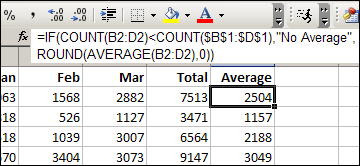
In Excel 2003, if you click on a cell that contains a long formula, it can spill onto the worksheet, hiding the column headings.
It’s nice to see the formula, if you want to edit it, but annoying if you’re trying to do something else.
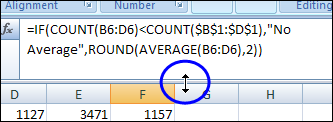
In Excel 2007, you can adjust the height of the formula bar, and the long formulas don’t cover the worksheet. To adjust the height:
Point to the bar at the bottom of the formula bar.
When the pointer changes to a two headed arrow, drag up or down, to change the formula bar height
Change Formula Bar Height
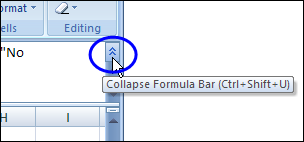
Restore Formula Bar Height
After you’ve adjusted the height, you can quickly restore it to its previous height, by clicking the Collapse Formula Bar button.
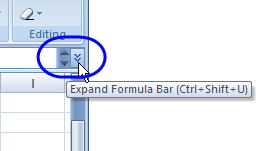
When the formula is collapsed, the button changes to Expand Formula Bar. Click that to return to the previous height setting.
Also, if the formula is too long to show in the formula bar at its current height, scroll buttons appear, as you can see in the screen shot above.
You can click the scroll buttons to view the formula, if you don’t want to change the formula bar height.
Widen the Name Box
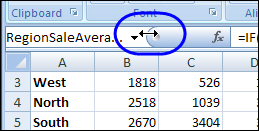
Another new feature that I find really helpful is the ability to widen the Name Box. Instead of just seeing the start of a long name, and three dots, you can widen the Name Box to see the entire name.
To adjust the Name Box width, point to the dividing line at the right edge of the Name Box, and drag to the right.
Widen the Name Box
Restore Name Box Width
To return to the default Name Box width, double-click the dividing line. (At least I think it’s the default width – I’ve changed my settings too many times to remember exactly.)
Excel’s Help says, “The maximum width of the name box is half of the width of the worksheet.” However, I’m able to widen the Name Box to the full width of the worksheet, and narrow it to nothing.
Maybe that restriction applied in the Beta version, and the Help wasn’t changed.
Do You Use These Features?
I’ve used Excel for so many years without these features, that I often forget they’re available. Long formulas can be hidden in the formula bar when condensed, because they don’t spill onto the worksheet, the way they used to.
If a formula is cut off in a logical place, you might not even realize that part of it is hidden. Those scroll buttons are very subtle, and are the only clue that a formula doesn’t fit.
Do you remember to use the new sizing features? Do you prefer them to the Excel static settings?
Watch the Video
Here’s a short video that shows the new features for adjusting the formula bar height and the Name Box width.
It also shows how to temporarily collapse the Ribbon, so only the tabs are visible. That gives you an extra inch of space, if you need it when working on a large worksheet.
Are you too old to compete in the Olympics? Maybe you’re not as bendy as those 16-year-old figure skaters, but there might be other sports with athletes about your age.
Olympic Athlete Data
Athlete bios are posted on the Vancouver 2010 Winter Games website, and I compiled that data, then created a few Excel pivot tables, to analyze the athletes’ ages.
Which Winter Olympic sports have the oldest athletes?
Which countries send the youngest participants?
Do similar age groups compete in different sports?
Who wears the wildest pants?
With our Excel pivot tables, and some pivot table grouping, we can find the answers to those pressing questions. Well, maybe not the pants issue, but let’s look at the age questions.
Create Excel Pivot Table
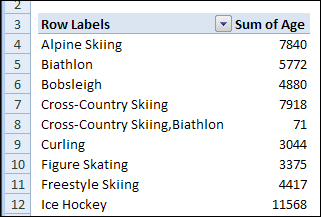
Using the Olympic athlete biographical data, I created an Excel pivot table with:
Sport in the Row Labels area
Age in the Values area
The pivot table default for the Age field is to show the Sum of Age, and that isn’t too helpful for this analysis.
Show Maximum Values in Pivot Table
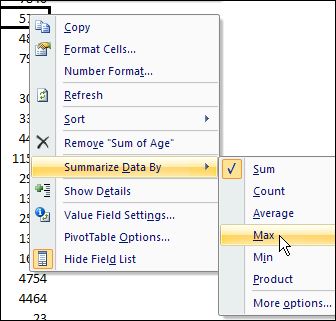
Instead of using the Sum function, I’d like to see the Maximum age for athletes in each sport. Fortunately, there is a quick way to change the summary function that is used for a pivot table value field.
Right-click on one of the values in the Age field.
Click Summarize Data By
In the pop-up menu, click click Max
Show Maximum Values in Pivot Table
Sort the Values
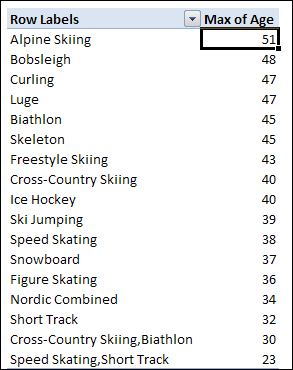
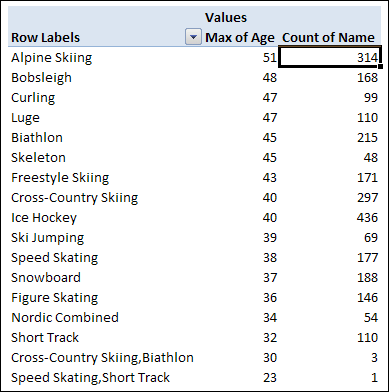
After changing the summary function to Max, the pivot table shows the highest age in each sport.
Next, I can sort the list in descending order by Age. That will highlight the sports with the oldest competitors.
Alpine skiing is at the top of the list – that was a surprise!
Short track speed skating has the lowest maximum age
Show a Count of Athletes
Maybe there’s only one Alpine skier, and they’re really old.
To compare the number of athletes in each sport, I’ll add the athlete’s name field to the Values area, and it will appear as Count of Name.
Show a Count of Athletes
Except for the last two items, there’s a good number of athletes in each sport, with Alpine Skiing as the second largest group.
See Athlete Age by Country
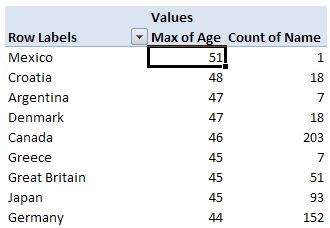
If we replace Sport with Nationality in the Row Labels area, we can see the maximum age and athlete count for each country.
That 51-year-old alpine skier is from Mexico, and is the only athlete from that country. Coincidentally, Great Britain sent 51 athletes, but the oldest is 45.
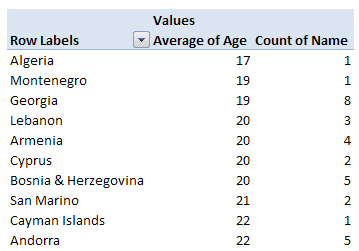
To see the average age per country, you can change the summary function to Average, then sort the ages in ascending order. The lowest average ages are from countries with a small number of athletes.
Filter by Count of Name
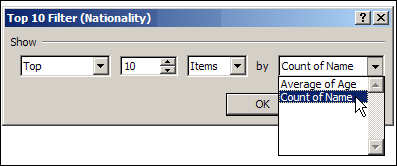
To see the average ages for the larger contingents, we can filter the countries by the Count of Name value. Click the drop down arrow for the Nationality field, click Value Filters, then click Top 10. I selected to see the Top 10 items by Count of Name.
Filter by Count of Name
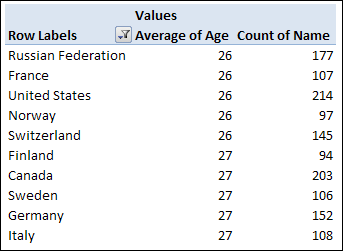
The pivot table now shows only the countries with the largest number of participants, sort by average age. There’s not much difference in the average ages among countries in the top 10 list.
That’s not too encouraging! If I want to compete in the next Winter Olympics, I should move to Mexico, and take up alpine skiing.
Age Range in Selected Sports
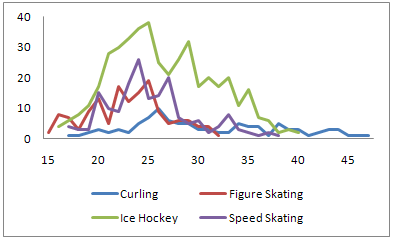
Finally, let’s see the age range in a few of the ice sports. I removed Nationality from the Row Labels, and added Sports. Then, I filtered the list, to show only four of the sports – curling, figure skating, ice hockey and speed skating.
Figure skating has the narrowest age range, and curling has the widest. Maybe I can stay in Canada, and learn how to curl.
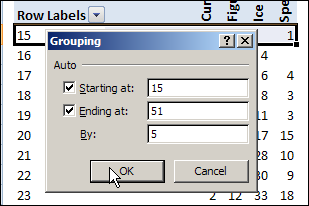
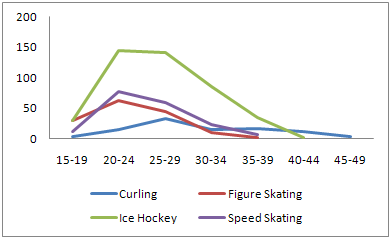
Instead of showing the individual ages on the chart, I can group the ages into 5 year bands. Right-click on an Age, and click Group. Then enter 5 in the By box, and click OK.
The chart looks less like the Rocky Mountains, and it’s easier to see the age ranges for each sport.
Download the Data
I’ve saved the athlete bio data in a zipped Excel file that you can download, and use it to create your own pivot table. Let me know if you make any surprising discoveries.
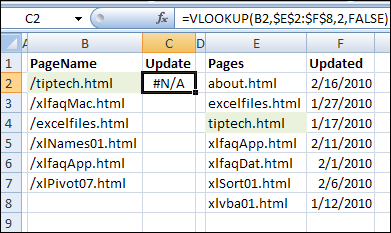
You have two Excel lists, and you’re trying to find the items that are in both lists. You know there are matching items, but if your VLOOKUP formulas can’t find any matches, you might need to clean Excel data with TRIM and SUBSTITUTE.
Yesterday, Seth Godin suggested that we should invent a holiday to celebrate the things that we love. For example, today is Family Day here in Ontario, Canada, a holiday that has only existed for a couple of years. It’s nice to have the day off, and that gave me the chance to think about other holidays.
How about a Spreadsheet Day, to honour Excel, and the other spreadsheets that people use? There are other spreadsheets, aren’t there?
I searched Google, and nothing relevant came up for the keyword phrase, “Spreadsheet Day”. That’s shocking!
Next, I checked a couple of sites that list all the obscure holidays and special days, but found nothing similar listed there either.
There are plenty of obscure holidays, including Pi Day on March 14th, and there’s even a Pickle Day, on November 14th. But no Spreadsheet Day.
What Day Would Work Best?
We should select a suitable day to celebrate spreadsheets, without conflicting with any of the other important holidays.
The first cell in an Excel worksheet is A1, so that could guide the holiday date selection.
The first “A” month is April, but April 1st is April Fools’ Day, and it would be best to avoid that. Also, April is tax month in Canada and the USA, so Excel users might not be in the mood to celebrate.
How about August 1st? There’s not much happening in August, and no other holidays on that date, that I can see. That would be a good date for Spreadsheet Day. Or maybe you have a better suggestion.
How Could We Celebrate?
What activities could we plan for Spreadsheet Day?
The 50 yard dashboard?
Rowing competitions?
All day cell-ebrations?
Sitting in a Lotus position?
Pie Chart eating contests?
Do you have any other ideas?
Spreadsheet Day 2010
There’s still time to organize a Spreadsheet Day for 2010, if we get started now. Let the hijinks, shenanigans and monkey business begin!
If you’ve wanted to try Tableau data visualization software, now’s your chance! They’ve just launched Tableau Public, where you can upload your data, and use the free Tableau tools to create amazing interactive charts, maps and dashboards.
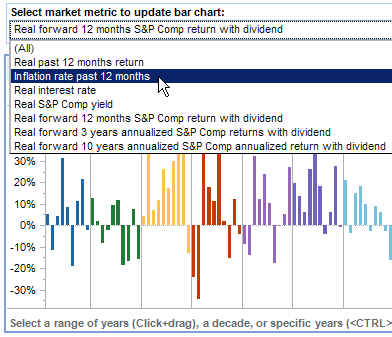
This example shows Economic Indicators & Stock Market Returns, and you can select from a drop down list of market metrics to update the chart.
Tableau Public interactive chart
As the product name implies, your saved data will be public, so it’s not the place to work with your top secret financial data. It’s a great opportunity to experiment with the Tableau software though, using dummy data, or data that you’re willing to share with the public.
With Tableau Public, you can connect to Excel, Access, and text files, with a limit of 100,000 rows of data per connection. You can save up to 50 Mb of content to the Tableau Public web servers.
Tableau Articles
There are other blogs where you can see dashboard examples, and see how people are using the software.
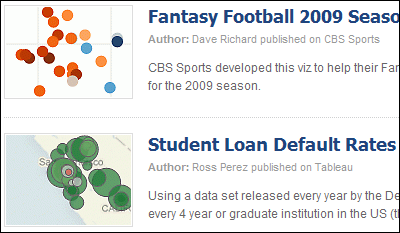
There’s also a gallery with dashboard examples, such as the Fantasy Football 2009 Running Backs and Student Loan Default Rates.
Use Tableau Public
To get started, go to the Tableau Public page, and click the Download Tableau Public button. Then, enter your email address, and click Submit. To help you understand the software, you can watch the brief Tableau Public Preview video and the Tableau Public training videos.
After you install Tableau Public, open it, and connect to your Excel, Access or text data file. It’s quick and easy to create a graph, and Tableau will help by suggesting chart types for your data.
Your work in Tableau Public desktop will be saved to the Tableau Public web servers, not on your computer. On the web servers, your data will be accessible by anyone on the internet, so don’t use Tableau Public for confidential or sensitive data.
Share Your Results
After you save your work, you can share it, by embedding it on your blog or website, or by sharing a link to your data.
If you create a dashboard, you can post the link in the comments here, so other people can go and take a look.
___________ Related Links:
Last fall I wrote a couple of articles about Tableau, and uploaded a short video:
I used a trial version of Tableau for a couple of weeks, which has all the features of the paid version. I was really impressed with what the software can do, and got in touch with the Tableau people, to see if I could participate in the Tableau Public beta.
The free version wasn’t available yet, so they provided me with a license for the paid version, so I could keep experimenting, and post my work in their public servers.
______________
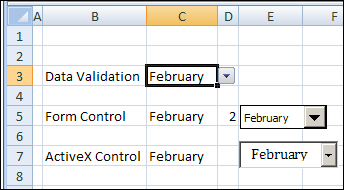
You added some data validation drop down lists to your Excel worksheet, to make it easier to enter the data. Later, you opened that workbook, and the data validation arrows are missing! What happened, and how do you get those arrows back?
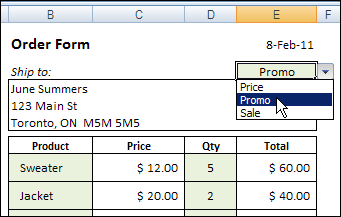
You can create order forms and price lists in Excel, and automatically show a price when a product is selected in the order form. But what happens if you want to give some customers special pricing, or offer sales pricing occasionally? Here’s how to customize your Excel price list with VLOOKUP and MATCH.