
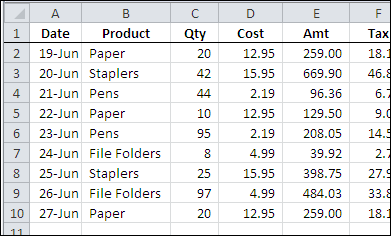
It’s finally summer, and you need to stay cool, even when you’re using Excel. Here’s an energy-efficient and fast way to find and delete Excel rows. You can select several rows that contain similar data, and delete them all at the same time.
Category: Excel tips
Resolve to Stay Safe in Excel

As the storm clouds rolled in yesterday afternoon, I tweeted about saving my Excel files more frequently, as a safety precaution.
There were a couple of responses, asking why I didn’t use Excel’s AutoSave feature, and Jon Peltier reminded me to use AutoSafe — Jan Karel Pieterse’s free add-in.
AutoSave Add-In
I mentioned AutoSafe in my Excel New Year’s Resolutions 2010 blog post, oh so long ago. Of course, I’ve kept all my resolutions — how about you?
Installing AutoSafe
Even though I’m a creature of habit, and like to manually save my files, or click my Backup macro button, I decide to install AutoSafe. Good timing too, since Jan Karel uploaded a new version on June 1st.
While downloading AutoSafe, I also grabbed a copy of the companion add-in, AutoSafe VBE. It backs up your Excel code, so that should also be handy to have.
I unzipped the download file, and double-clicked on the setup.exe file. The installation wizard warned me to close my Excel files, and the installation was quick and easy.
Setting up AutoSafe
When I opened Excel 2007, the add-ins appeared on the Ribbon’s Add-ins tab. Click the AutoSafe command to open a dialog box where you can change the settings.
Choose the folder where you want the backup files stored, and the interval for the saves, and select any other options you want. To check for new versions, click the Update button.

Setting Up AutoSafe VBE
The settings for AutoSafe VBE are similar, and you can also set the number of generations that you want to save. The CleanUp button clears out all the old files for you.

Old Habits
It’s hard to break old habits, so I’ll probably continue to press Ctrl + S every few minutes, to save my work. It won’t hurt to have some extra help though, especially when working on code revisions. Thanks Jan Karel, for this wonderful free add-in.
And I don’t know why, but typing “old habits” reminded me of The Flying Nun, starring Sally Field. Ah yes, the golden age of television! Here’s the opening segment, for those who don’t know what the heck I’m talking about.
____________
Unmerge Excel Cells
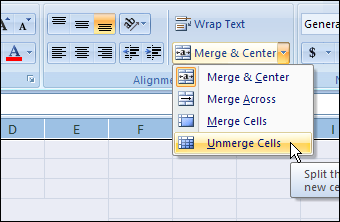
I saw this on Twitter yesterday: Wanted “Break Apart all merged cells in entire spreadsheet” button. If you’ve done much work in Excel, you’ve probably encountered problems that are the result of merged cells on a worksheet.
Merging cells can seem like a good idea at the time, but can interfere with sorting and filtering, and other things that make an Excel workbook useful. Here’s how you can unmerge Excel cells.
Drag a Text File Into Excel
Last month, I showed you how to drag information from a web browser into Excel.
Here’s the very short video that I posted, in case you missed it.
Drag Text Files Into Excel
You can also drag text files, to open them quickly in Excel.
I find this a really quick way to open a text file, especially if Windows Explorer is already open.
Drag Text File From Windows Explorer
Instead of using the Open command, or the Text Import Wizard, just drag a text file into the Excel window.
In the screen shot below, Windows Explorer is already open.
I’m dragging the text file, named MyDataFix.txt, onto the active Excel worksheet

Text File Data on Worksheet
After I drop the text file onto the worksheet, the text file opens automatically.
In the screen shot below, the data appears in separate columns in the worksheet, because the data was saved in a tab separated format.

___________
Dynamic Excel Named List Grows Automatically
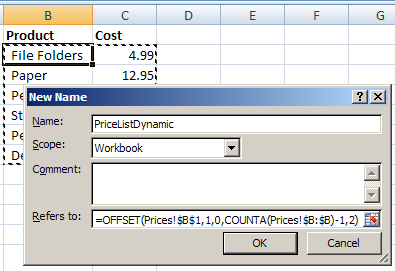
You can quickly create a named range in Excel, but it doesn’t automatically expand to include new items that are added at the end of the list.
However, a dynamic Excel named list grows automatically, so here’s how to create that type of list.

Continue reading “Dynamic Excel Named List Grows Automatically”
Copy Data From Browser to Excel
Instead of copying and pasting, you can quickly copy data from a web browser to Excel, by dragging and dropping.
Video: Copy Web Data to Excel
To see the steps in action, you can watch this 30 second video. The full transcript is below the video.
Video Transcript
If you want to copy something from a web browser, into Excel, you can just drag and drop
On my website, I’m just going to scroll down a little, and select some text, and links, and graphics
Then, just point anywhere, even if it’s the clicking hand
Instead of clicking, we’re going to just drag over here to Excel
Let go, and it copies the links, the text, the graphics, and you’re ready to go!
___________
Print Comments in Excel 2007
When you print an Excel worksheet, you can also print all the comments that have been added to the sheet.
You can print the Excel comments the way they appear as pop-ups on the worksheet, or print all the comments at the end of the worksheet.
If you’re using an older version of Excel, there are details here — Printing Comments in Excel 2003.
Print the Comments as Displayed
When printing Excel comments as displayed, you can either show all the comments, or just show one or more comments that you want to print.
To show all the comments, on the Ribbon’s Review tab, click Show All Comments.

Show Specific Comment
To show a specific comment, select a cell that contains a comment. Then, on the Ribbon’s Review tab, click Show/Hide Comment.

Arrange Comments for Printing
If necessary, rearrange the comments, so they don’t overlap, or cover the data.

Page Setup Dialog Box
Then, on the Ribbon’s Page Layout tab, click the More button for Sheet Options

In the Page Setup dialog box, on the Sheet tab, select As Displayed on Sheet from the Comments drop down.

Quick Check With Print Preview
If you want to see how the comments will look when printed, click Print Preview

Click OK to close the Page Setup dialog box.
Print Comments at the End
Instead of printing the Excel comments as displayed, you can print them at the end of the worksheet.
On the Ribbon’s Page Layout tab, click the More button for Sheet Options
In the Page Setup dialog box, on the Sheet tab, select As Displayed on Sheet from the Comments drop down.

If you want to see how the comments will look when printed, click Print Preview. The comments and their addresses will appear on a separate sheet, at the end of the worksheet’s data.

Click OK to close the Page Setup dialog box.
Watch the Video
This Excel Quick Tips video shows how to display all the worksheet comments, and then print the worksheet with the comments displayed.
____________
Trouble Unhiding Excel Row and Columns
It’s easy to hide rows and columns in an Excel worksheet, and you or your boss or co-worker might do that when setting up an Excel file.
Occasionally though, you might have trouble unhiding Excel row and columns. There are written steps and a video below, that show how to fix the problem
Excel Treasure Hunt Game
 If you have the day off, you can spend some time playing this Excel Treasure Hunt game. Or, if you celebrate Easter, give this to your kids — it’s cheaper and easier than hiding chocolate eggs!
Old Excel Dogs Learn New Tricks
 Yes, if your last name is Dalgleish, some people think it sounds like “Dog Leash”, and hilarity ensues. And no, I never get tired of that joke, thanks for asking. 😉
Anyway, unlike the proverbial old dog, those of us who have been using Excel for a long can CAN learn new tricks. Keep reading to discover which new Excel feature I recently discovered.
Long Time Excel Users
Maybe you’re a long time Excel user too. Last month I polled readers on my Debra D’s Blog, and asked How Long Have You Been Using Excel?
Almost half of the 80 respondents have used Excel for 16 years or more, and they shared some interesting stories in the comments.

Old Excel Habits
You learn a lot about Excel over the years, and appreciate both its strengths and limitations. You find workarounds for some of the features that don’t work the way you’d like, and accept that some things can’t be done in Excel.
Maybe you’ve even learned to love (tolerate?) the Excel Ribbon, despite all the years that you spent learning where the Menu commands were.
But occasionally, new features are added, without much hoopla, and you don’t even notice them. At least, that’s what happened to me!
Old Excel Header Tricks
Excel has customizable headers and footers, where you can place items like the date, or file name, in one of three sections — left, centre or right.
On the Excel Ribbon, click the Insert tab, and click the Header & Footer command, to change to Page Layout view, with the Header activated.

See Header and Footer Tools
While the Header or Footer are activated, there’s a Design tab on the Ribbon, with Header and Footer tools.
You can click on an Element, like Page Number, to add it to a section in the Header or footer.

Or, select one of the default options from the Header or Footer drop down lists.

The Page Layout wasn’t available in previous versions of Excel, but the Header and Footer Elements are pretty much the same as they’ve always been.
New Excel Header Tricks
After working with Excel 2007 for almost three years, I finally noticed that the Excel Header and Footer have some fancy new Options. (How embarrassing!)
Now you can have a different header/footer on the first printed page, and different header/footer on the odd and even printed pages.

So, you could show a title on the first page only, then have page numbers at the left on even pages, and on the right on odd pages.

Microsoft Word has always had these options, but Excel didn’t. We just accepted that “Excel isn’t a word processing program” and did without the header options.
Align Header and Footer
You can also align the Excel Header and Footer with the page margins, which is another nice feature. In the old days, the Header and Footer margins couldn’t be changed, so they sometimes looked a bit out of line with the rest of the printed page.
Here’s the Page Layout view, with the Align With Page Margins feature turned on.

I hope you found these new Excel Header and Footer options long before I did, and remember to use them in your printed worksheets.
__________