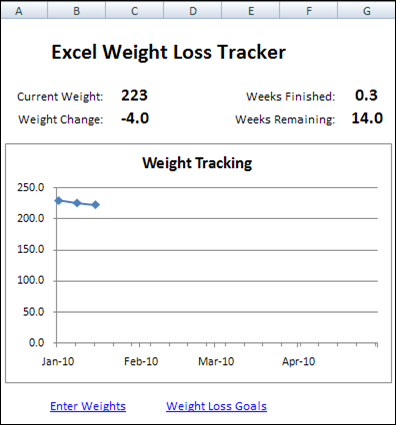
On Monday I described the horrible side effects of Christmas cookies, and posted an Excel Weight Loss Tracker workbook. Now, here is an Excel Calorie Counter to add to your tool kit.
Did you eat too many Christmas cookies over the holidays? An extra dessert or two?
If it’s time to get back into shape, use this Excel weight loss tracker. It can store weekly weight records, calculate your weight loss, and show your progress in a weight loss chart.
What will you do better in Excel next year? Do you have any Excel bad habits that you’ll break? Are there any Excel skill areas that you’ll improve?
Excel Resolutions
Based on the questions that I see in the Excel newsgroups and forums, lots of people could resolve to do one or more of these things:
Save your Excel files every few minutes as you work on them. Jan Karel Pieterse has a terrific (and free) Excel add-in – AutoSafe – that will automate the saves for you, and it’s way better than Excel’s built in autosave feature.
Make backup copies of every important Excel file, and update those backups regularly. Yes, something will go wrong eventually, and those backups are lifesavers.
Add an instruction sheet to your key Excel files and complex worksheets. Then, if you’re away for a holiday, your co-workers won’t have to call you with frantic questions, or mess things up on their own. Maybe that’s what happened to the banking industry.
My Excel Resolutions
Here are my Excel goals for 2010:
Spend a couple of hours each week working with the Excel 2010 beta, and PowerPivot for Excel add-in, so I’m ready to roll when the final version is released.
Make better notes when I write and edit code. Sometimes it’s clear what the code is doing, but I can’t remember why I decided to do things a specific way. A few notes could save time and frustration later.
Update my Pivot Table add-in so all the features work in Excel 2007. Jon Peltier is planning a series on creating Excel add-ins, so that could give me some ideas for improving my add-in.
Your Excel Goals for 2010
What about you? Do you have an Excel goals for 2010 that you’d like to share?
Making your Excel resolutions public might help you stick to them!
____________
A bit of Excel programming can help us save some time and paper. Our goal is to stop people from printing an order form if they forgot to enter a customer name.
Final Macro Changes
Last week, you created a macro to show a message if the customer name was missing in an order form.
Today, you’ll make a final change to the macro, so it will run automatically when someone tries to print the order form.
Sample File: You can download the Excel order form with last week’s message macro. Enable macros when the file opens.
Create the Event Code
To create Excel code that runs automatically, you can use Event procedures. Those are macros that run when something specific happens in Excel, such as changing a cell on a worksheet, or printing a worksheet.
To open the Visual Basic Explorer (VBE), right-click on the Order Form sheet tab, then click View Code.
Create the Event Code
In the VBE, find the order form workbook in the list of projects, and under Microsoft Excel Objects, double-click ThisWorkbook.
At the top left of the Code Window, select Workbook from the drop down list.
An event procedure for Workbook_open is automatically created, but that’s not the one we need, so just ignore it. At the top right of the Code Window, select BeforePrint from the drop down list.
The cursor should be flashing between the Sub and End Sub lines for the Workbook_BeforePrint macro. We want to check the order form before someone prints it, so type the following 2 lines of code, to check the name of the active sheet:
Next, copy the code from the CustomerMessage macro, on the Module1, and paste it between the If and End If lines.
Now, when someone tries to print or print preview, Excel will check the sheet name.
If OrderForm is the active sheet, it will check for a customer name in cell B5.
If the customer name is missing, our warning message will appear.
Test the Event Code
To see if the BeforePrint code is working correctly, you can test the code by using Print Preview.
On the Order Form worksheet, delete the Customer Name in cell B5.
Click the Office Button, point to Print, then click Print Preview.
The good new is that the warning message appears, because the Customer Name cell is empty. The bad news is that the Print Preview opens, even though the customer name is missing.
Fine-Tune the Event Code
You can see “(Cancel as Boolean)” at the end of the first line in the Workbook_BeforePrint macro. Some Excel events have a Cancel option, which allows you to cancel the event, if necessary.
We’ll add one more line of code, to cancel the printing if the customer name is missing.
In the Workbook_BeforePrint code, add a blank line, after the MsgBox line.
In the blank line, type: Cancel=true
Then, save the workbook, and try the print preview again.
Now the warning message should appear if the customer name is missing, and the print or print preview should be cancelled.
If the customer name is filled in, then no message will appear, and the order form will print, or show up in the print preview window.
_________________
How long is your attention span? It’s a short work week, so let’s start it off with a couple of quick Excel tips. And when I say “Quick,” I mean, “Don’t blink, or you’ll miss them.”
I recorded a few quick Excel tips, and posted them in the Excel Quick Tips playlist on my Contextures YouTube channel.
If you can’t sit still through a lengthy 2 minute video, this might be the solution!
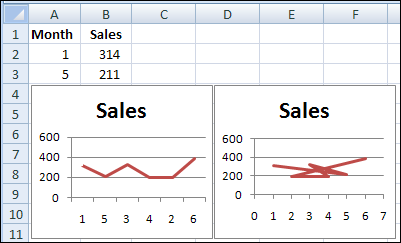
Select a Random Name
The first video shows you how to select a random name from a list. Enter the RAND function in the column adjacent to the list of name.
Then, sort the column with the RAND function, and the name at the top is the winner.
This is the same technique that I used to select winners in my Excel Summer Giveaway and Excel Fall Giveaway contests.
Keeping Excel users on the right path is a big job, but somebody’s got to do it!
Last week we created an Excel message box in an order form, to remind users to select a customer name.
However, we don’t want the message to appear in every order form – it should only show if the customer name cell is empty. We’ll modify the code so it checks for a customer name.
Sample File: You can download the Excel order form with last week’s message macro. Enable macros when the file opens.
Clear the Customer Name Cell
To see how to refer to the customer name cell, we’ll record a test macro.
Select any sheet in the workbook, other than the OrderForm sheet.
Start the Macro Recorder
Name the macro NameTest, and store it in This Workbook
Click on the OrderForm sheet tab, to activate that sheet
Select cell B5, where the customer name is entered
Stop the Macro Recorder
Clear the Customer Name Cell
To see the recorded macro:
On the Ribbon, click the View tab
Click Macros, then click View Macros
In the list of macros, click NameTest, then click Edit.
Here’s the recorded code, with the comment lines and blank lines removed. It shows you how to refer to a sheet and cell in Excel VBA code.
We’ll remove the Select in each line, and combine the two lines into one. At the end of the line, add: .Value = “”
The revised line of code will set the value of the customer name cell to an empty string.
Run the NameTest macro, and it should clear the customer name cell.
Check For a Customer Name
We’ll add the new code to the old code, that shows the message. To check for a customer name, we’ll create an IF…THEN section in the macro, similar to what you’d do in an IF formula on the worksheet.
In English, the instructions would be: IF the customer name cell is empty, THEN show the message. In the Excel VBA code, we’ll use these three lines:
Now, when you run the CustomerMessage macro, you should see the message box only if the customer name cell is empty.
The Next Step
Next week, we’ll add code to make the macro run automatically, when someone tries to print the order form.
_________________
Previous Excel VBA articles:


 What will you do better in Excel next year? Do you have any Excel bad habits that you’ll break? Are there any Excel skill areas that you’ll improve?