In the new version, I’ve added a few more features, to help you fill in the correct amounts.
Below the Budget Limit, in cell D3, you can see the amount that hasn’t been added to the budget yet.
In column D, you can see the maximum amount that can be entered in each row, based on the entries in other rows. This makes it easier to adjust individual items, while you finalize the budget.
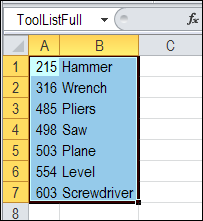
data validation in cell D2 limits budget amount
And remember, data validation isn’t foolproof, so you’ll still have to check those budgets, to make sure nobody is trying to get a little extra!
Download the Sample File
To see the formulas, and test the data validation, you can download the sample budget from my Contextures website.
Go to the Sample Excel Files page, and in the Data Validation Section, look for DV0058 – Limit Budget Entries with Data Validation.
Watch the Budget Limits Video
To see the steps for setting up the data validation and formulas, to set the budget limits, you can watch this short video tutorial.
Instead of selecting a product code in an Excel drop down list, it’s usually easier to select a product name instead.
However, your pricing calculations might use the product code, instead of the product name, so you need that information.
Show Description, Enter Code
With a bit of programming in Excel, you can show a description in a combo box, but enter the matching code for the selected item into the cell. You’ve seen other versions of my data validation combo box code:
Keep reading, to see how the new combo box codes example works.
Select From a Combo Box
I’ve uploaded a new sample file on the Contextures website, which lets you select a month name, or weekday name, from an Excel combo box.
Select From a Combo Box
When you leave the combo box, the month number, or weekday code is automatically entered in the cell, instead of the full description.
The Named Ranges
In the data validation cells, lists are allowed, and they refer to the named ranges – DayList and MonthList – where the short codes are stored.
Named Ranges on Worksheet
Another range is created for each list, to include the description column, and these names end with “Codes” – DayListCodes and MonthListCodes.
These “Codes” ranges are used to fill the combo box, which is formatted with 2 columns. The first column has a width of zero, so the codes aren’t visible.
Download the Sample File
To test the combo box codes example, and see how it works, you can download the sample file from the Contextures website.
Every two weeks he sets up a new workbook, and has to add two weeks to the previous end date.
Sometimes it’s easy to do that kind of math in your head, but if you’re rolling into a new month, the calculation can be trickier.
So, Dick changed the date cell to a formula, and just added 14 to that calculation every two weeks.
There were a few suggestions for solving the problem, but Dick wanted something simple and static — the date cell couldn’t change, if you opened the file on a different date.
Create a Dynamic List of Dates
My suggestion was to create a drop down list of Period End dates, and select the next date from that list. With some formulas in the background, the list of valid dates would update automatically.
However, when you select one of those dates in the Period End cell, it’s a static entry in that cell.
Create List of Dates
The first step is to create the list of dates, based on Dick’s original Period End date – October 13, 2010.
On Sheet2, put the starting date in cell C2: =DATE(2010,8,13)
In cell C3, enter a formula to calculate the current date: =TODAY()
In C6, enter this formula, to calculate the current pay period’s week end: =C2+INT((C3-C2)/14)*14
In C5, subtract 14 days, to calculate the previous period end date: =C6-14
In C7, add 14 days, to calculate the next period end date: =C6+14
Name the Date List
Next, you’ll name the date list, so you can use it in a data validation drop down.
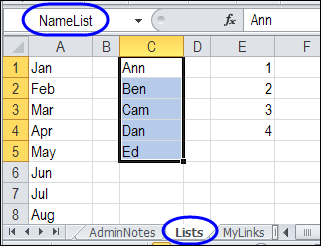
Select cells C5:C7, and click in the Name Box, to the left of the Formula bar
Type a one-word name for the list – DateList – and press the Enter key.
Create the Drop Down List of Dates
Back on the Time Sheet, you’ll add a data validation drop down list in the date cell.
On the Time Sheet, select the Period End date cell.
On the Excel Ribbon, click the Data tab, and click Data Validation.
From the Allow drop down, click on List
In the Source box, type an equal sign and the list’s name: =DateList
Click OK to close the data validation dialog box.
Test the Drop Down List of Dates
On the Time Sheet, the Period End date cell now has a drop down arrow.
Click the arrow, to see the current list of dates, and click on a date to select it.
The selected date is entered in the cell, as a value, not a formula. Even when the list of dates changes, the selected date will not be affected.
If your Excel file has many cells with data validation, it can be difficult to remember what restrictions you’ve put on the worksheet cells.
These tips show you how to find the data validation cells, and create a list of what rules are on the cells.
Select All the Data Validation Cells
If you just want to see where all the data validation cells are, you can use the command on the Excel Ribbon.
On the Excel Ribbon, click the Home tab
In the Editing Group, click Find & Select
Click Data Validation
Go To Data Validation
This command selects all the data validation cells on the active sheet.
Select Specific Data Validation Cells
If you have different data validation rules on the active sheet, you can select only the cells that have the same validation as the active cell.
In the example shown below, cell D6 is active, and it has a data validation drop down list, based on the named range — DaysList.
To select any other cells on the active sheet with the same validation rule:
With cell D6 active, click the Excel Ribbon’s Home tab
In the Editing Group, click Find & Select
Click Go To Special
In the Go To Special dialog box, click Data Validation
Click Same, then click OK
In the screen shot below, cell D7 was also selected, because it has the same validation rule as cell D6.
However, cell D4 was not selected, because its drop down list is not based on the same named range.
Create a List of Data Validation Cells
The Go To Special commands let you select the data validation cells, but they don’t show you the data validation rules. You would have to check each cell, or group of cells, to see its data validation rules.
On the Contextures website, there is a Data Validation Documenter page. On that page, you’ll find sample code that creates a list of data validation details for the active worksheet.
In the sample file, there are two macros –
DataValDocumenter and
DataValDocumenterSheet
Both macros create a list of the data validation cells on the active worksheet, with the following details:
Cell address
Data validation type
Data validation formula.
The DataValDocument macro creates the list in a text file, named Test.txt, in Excel’s default file location.
To see your default location, click the Excel Ribbon’s File tab, then click Options, and click the Save category. (in Excel 2003, choose Tools | Options, General tab)
In the DataValDocumenterSheet macro, a new worksheet is inserted at the front of the workbook, with a list of the data validation on the active sheet.
In the screen shot shown below, the original list is in the workbook at the left. The drop downs are in a different workbook, on the right.
There Is a Catch
My preference would be to keep the lists and drop downs in the same workbook, but if you need to have them in separate files, this technique will allow you to do that.
There’s one catch though, when using this data validation technique. The source workbook, which contains the original list, must also be open, when you are using the drop down lists.
So, it’s not a perfect solution, but it’s fairly easy to implement, as long as you remember to open the other workbook too.
Excel 2010 Instructions
I’ve just uploaded a video with instructions for this technique in Excel 2010, so you can see the steps for creating the named ranges and data validation drop down lists.
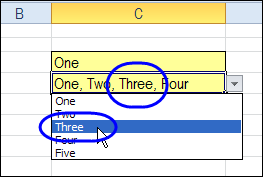
There’s a popular sample file on my website, that lets you select multiple items from a data validation drop down list. Since the original article, I’ve posted updates:
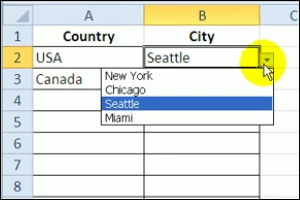
In Excel, you can use data validation to create drop down lists on a worksheet. Usually, a simple list is all that’s needed, to make it easier for people to enter the correct data. This example is a bit more complicated, and has 2 drop down lists, one for country and one for city.
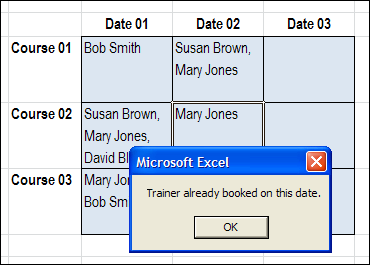
Leslie is scheduling training courses, and has a table with dates across the top, and course names down the side. One or more of the instructor names can be selected for each training session.
However, Leslie wants to prevent an instructor’s name from being selected twice on the same day. For example, on Date 01, in the screen shot above, Bob Smith and Mary Jones are each booked for 2 courses.
Check for Existing Names
To prevent the names from being selected twice, I changed the code, to include the COUNTIF function.
After a name is selected, the active column is checked for that name.
If the name is found, a warning message is shown, and the name is not added in the current cell.
Here is the revised section of the code, with the COUNTIF function:
Testing the Code
With the revised code, if I try to select a trainer who is already booked, I see this message, and the name is not added.
The file is in Excel 2007 format, and is zipped. When you open the file, enable macros, if you want to test the block duplicates feature.
_____________
I’ve done another update to the Data Validation Multiple Selection sample, thanks to a question from Pat, in a blog comment. He has 3 columns with different drop down lists, and wants to add new items to the applicable lists.
With Excel VBA programming, you can add a Combo Box to the worksheet, to show a data validation list. Usually a single column combo box is enough, like this list of weekdays, but sometimes a multi-column Excel combo box is better.


 There’s a story making the rounds, about a guy who rated all his online dating prospects, by using an Excel worksheet.