
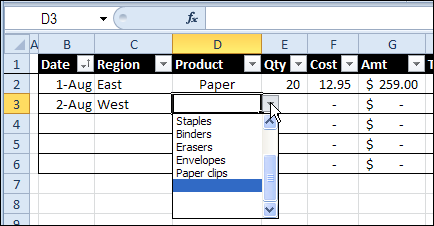
To make data entry easier, you can create a drop down list in an Excel cell, using data validation.
Category: Excel Data Validation
Limit Date Range with Excel Data Validation
Yesterday, one of my clients emailed to let me know that she was having trouble entering January dates in a file that I had created.
My first guess was that there was an issue with the regional settings, because her company uses the dd/mm/yyyy format.
But when I tried entering a January date, with my mm/dd/yyyy settings, I got an “Invalid date” message too.

Limit Dates with Data Validation
The date that I had entered – 1/3/13 – was a valid date and in a valid format, so I checked the data validation settings. And that’s where I found the problem.
The cell had been restricted to dates from 60 days prior to the current date:
=TODAY()-60
and up to 60 days after the current date:
=TODAY()+60

Fix the Problem
Those date range settings had made sense when we set up the file. The date range limits prevented people from accidentally entering strange dates, such as mistyping a year – 2031 instead of 2013, for example.
Do you ever find records like that in your database or workbook? It can really mess things up!
Anyway, a simple change to the data validation formula fixed the problem. Instead of 60 days, I changed the formulas to 120 days.
=TODAY()-120
and
=TODAY()+120
It still prevents those year typos, but gives my client a bigger window for entering data in the file.
Video: Prevent Invalid Dates
In this video, three different data validation methods are used to validate dates. From the Allow drop down in the data validation settings, the following options will be used:
- Specify a starting date and an ending date. (Date option)
- Show a drop down list of valid dates (List option)
- Create a rule in a custom formula (Custom option)
Video Timeline:
- 0:00 Drop Down List of Dates
- 3:04 Set a Date Range
- 5:43 Check the Year
- 6:55 Get the Sample File
More Data Validation for Dates
For more examples of data validation for dates, you can visit the Excel Data Validation – Dates page on my Contextures website.
_____________
Validate Entries in Excel Combo Box
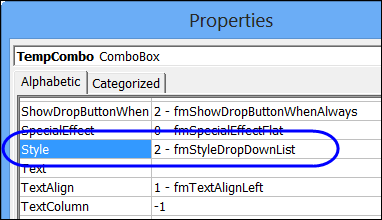
One of my Excel sample files lets you double-click on a cell that has a data validation list, and a combo box pops up. The combo box has advantages, because you can set the font size, and the number of rows in the drop down list, and the entry autocompletes as you type.
Excel UserForm with Dependent Combo Boxes
In an Excel UserForm, you can add combo boxes to make data entry easier.
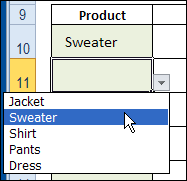
The UserForm in this example is used to enter parts information onto a hidden inventory sheet.
Before selecting a Part ID, you have to select a Part Type. When the Part Type combo box is updated, code runs, and creates a list of parts, for the selected part type.

How It Works
In the background, an Advanced Filter runs, to create a worksheet list of parts for the selected part type.
That list is set up as a named range, and the range name is used as the Part ID combo box row source.
Watch the Video
To see how the dependent combo boxes work, watch this short video.
Video Timeline
- 0:00 UserForm Demo
- 0:53 Lookup Lists Sheet
- 1:25 See How Macro Works
- 1:48 Named Range for Parts List
- 2:02 UserForm Macro Code
Download the Sample File
To test the dependent combo boxes on the UserForm, and to see the code, go to my Contextures website, and download the sample file.
_______________
Show Data Validation Message in Text Box
When you’re setting up data validation on a worksheet, you can include an Input Message, to help anyone who’s using the workbook.

You’ll have to get to the point quickly though – the message is limited to 255 characters.
There are other limitations too – you can’t control the size of the text box, and you can’t change its font size or fill colour, unless you change your Windows settings.
Show Input Message in a Text Box
As an alternative to the Input Message popup, you can show a message in a text box, at the top of the worksheet. In the text box, you can set the font type, font size, font colour, and fill colour, to suit your worksheet.

The Input Message display is turned off, but the Title and Message are entered in the data validation window.

There is a sample file on my website that you can download, and instructions for this technique on my Contextures website: Display Input Messages in a Text Box
Show Longer Messages
The original sample file uses the input message text, which is limited to 255 characters. In an email, Richard G. asked about showing a longer message in the text box.
So, I’ve created a new sample file, that uses most of the code from the original example, and adds a new feature. Now, you can create a list of Input Message Titles, and the message that you want to display for those titles.

Then, when you click on a data validation cell, its title is used as a lookup in the messages table. If there is an entry for that title, the Additional Message text is added to the end of any existing Input Message text. Then, the entire text string is shown in the text box at the top of the worksheet.

Download the Sample File
To download either the original sample workbook, or the Longer Message sample file, please visit my Contextures website: Display Input Messages in a Text Box
The files are zipped, and they contain macros, so remember to enable macros when testing the files.
___________________
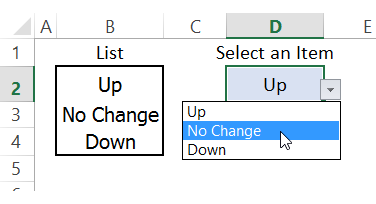
Allow Other Entries With Excel Drop Down List
To make data entry easier, add a drop down list on an Excel worksheet. That way, people can choose from the list, instead of typing a product name. If you want to allow other entries with Excel drop down list, follow the steps below, to enable that option.
Continue reading “Allow Other Entries With Excel Drop Down List”
Restrict Date Entries with Data Validation
With Excel’s data validation, you can restrict the dates that can be entered on a worksheet. For example, you could specify start and end dates on the worksheet, and only dates within that range can be entered.
Start and End Dates on Excel Sheet
In the screen shot below, start and end dates are entered in column E, and dates in column B must be within that date range.

Set Up the Data Validation
After entering the start and end dates on the worksheet, follow these steps to set up the data validation:
- Select the cells where the data validation will be applied – cells B2:B6 in this example.
- On the Excel Ribbon, click the Data tab, and click Data Validation
- From the Allow drop down, select Date
- From the Data drop down, select Between
- Click in the Start Date box, and click cell E1, where the Start Date is entered.
- Press the F4 key, to change the cell reference to an absolute reference — $E$1
- Click in the End Date box, and click cell E2, where the End Date is entered.
- Press the F4 key, to change the cell reference to an absolute reference — $E$2
- Click OK, to close the Data Validation window.

Watch the Video
To see the steps for applying this data validation, please watch this short video tutorial.
It also shows you how to set up a formula that will validate dates from today, to 6 days from now.
More Date Validation
Here’s another example of data validation for dates in Excel. This video shows 3 ways to validate dates.
- Specify a starting date and an ending date. (Date option)
- Show a drop down list of valid dates (List option)
- Create a rule in a custom formula (Custom option)
Written instructions, and the sample file, are on the Data Validation for Dates page, on my Contextures site.
______________________
Make Data Validation List Appear Larger
When you create a drop down list with data validation, you can’t change the font or font size. If you have reduced the zoom setting for a worksheet, it can be difficult to read the items in the list. And even at 100%, it can tough to read the tiny print, at the end of a long workday. Here’s how you can make data validation list appear larger.
Excel Drop Down Opens At End
To make data entry easier, you can create a drop down list of items in a worksheet cell. Then, instead of typing a product name in an order list, you can select a valid product name from the list. Sometimes the Excel drop down opens at end of the list, instead of the top. Here’s how to fix that problem.
Edit Excel List Data in Popup Form
If you’re working with a list of data in Excel, you can use Excel’s built-in Data Form to view and edit the data.
Displaying up to 32 fields, it lets you view and edit one record at a time. You can also find and edit records, or add and delete them.
Continue reading “Edit Excel List Data in Popup Form”