Do you know that just like us, paper has a good side, and a not-so-good side? And the good side is better for printing. Paper grain affects printing too, but we’ll save that excitement for another day. (Yes, I grew up in a paper mill town, thanks for asking.)
How do you figure out which is the good side?
If your paper is still in its package, look at the label on the end. There should be a small arrow that points to the good side. There might even be a label near the arrow that says, “Print this side” or something similar.
If there’s no label left on the package, or no arrow, you can check the curl of the paper. Hold a small stack of paper by the narrow edge, and either the sides or bottom edge should curl in a bit. That’s the curl side, and you should print on the other side.
In your printer, look for the symbols that show which side the paper will be printed on.
Load the paper so it prints on the good side.
If you’re printing on both sides, print on the good side first.
For even more fascinating paper facts you can read this Xerox publication (pdf), Helpful Facts About Paper.
___________________________________
Yesterday I posted a tip for adding the Refresh All button to the PivotTable toolbar, so you can quickly update all the pivot tables and queries in a workbook.
Move Toolbar Buttons
In the comments, Jan Karel Pieterse mentioned that he can press Ctrl+Shift, or hold the Alt key, then drag toolbar buttons to a different toolbar. I can’t get that Ctrl+Shift shortcut to work, but often use the Alt key to adjust toolbars on the fly.
In another comment, AlexJ described how he moves well-hidden menu commands, such as Show Formula Auditing Toolbar, to a toolbar, so they’re easier to use. Great idea!
See What Is Locked
Besides the Refresh All button, there are a few others that I add to my Excel toolbars.
For instance, when I’m creating data entry forms it helps to know if a cell is locked or unlocked.
I copy the Lock Cell button from the Protection toolbar to my Standard toolbar (Ctrl+Alt, then drag the button).
When I click on a cell, the Lock Cell button shows the cell’s current setting, and I can click that button to lock or unlock the cell. Very handy!
Move Lock Cell button to Different Toolbar
More Buttons for Toolbars
I also add the Record Macro and Visual Basic Editor buttons.
Those are copied from the Visual Basic toolbar, and Toggle Grid from the Forms toolbar.
Record Macro and Visual Basic Editor buttons
What Buttons Do You Add or Remove?
Are there any standard command buttons that you always add to your toolbars when you install Excel?
Any standard command buttons that you always remove, because you never use them?
If you’d like to share a screen shot of your toolbars, upload it somewhere like TinyPic.com, and paste a link in your comment.
Or, if you’re feeling adventurous, you can open this Google Spreadsheet, choose Insert>Picture, and paste the picture link in there. I have no idea how well this will work, but it might be an interesting experiment!
[Update] Bryony’s Excel Toolbars
Thanks to Bryony who uploaded a screen shot of her Excel toolbars. Here’s how she described them:
The colourful ones at the bottom in the middle are a few little macros, the toolbar to the left is my custom one. I have taken a load off the standard bars as I absolutely never use so many of those features. I have my screen resolution set quite high, so I have quite a bit of space left!
Wow, Bryony, that is amazing — the sign of a dedicated Excel expert!
In one of the Excel newsgroups last week, someone asked how they could update several pivot tables at the same time. They were tired of selecting each pivot table separately, and clicking the Refresh button.
Refresh All Button for Pivot Tables
In an Excel workbook you can refresh all the pivot tables and queries if you click the Refresh All button.
That button is on the External Data button, which appears automatically if you click in a cell that’s part of an external data range.
Refresh All Button External Data Toolbar
Add to PivotTable Toolbar
However, if you don’t have any external ranges in your workbook, you can add the Refresh All button to the PivotTable toolbar, so it’s easy to find and click.
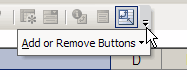
The quickest way to add this button is to click the Toolbar Options button at the end of the PivotTable toolbar.
Floating Toolbar
If the toolbar is floating, you’ll see a large triangle to the left of the Close button.
Click that triangle, then click the Add or Remove Buttons command
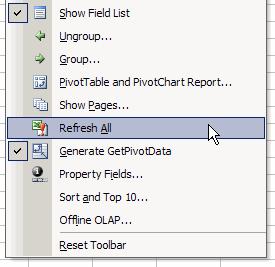
In the pop-up menu, click on PivotTable
Docked Toolbar
If the toolbar is docked, there’s a small triangle in the bar at the end of the toolbar.
Click that triangle, then click the Add or Remove Buttons command
In the pop-up menu, click on PivotTable
Add the Button
After you click the PivotTable command, you’ll see a list of all the standard commands that can be added to the PivotTable toolbar.
Click on Refresh All, to add it to the toolbar.
Now, when you want to update all the pivot tables, just click the Refresh All button.
When you’re searching in Google, by default it shows you 10 results per page. Sometimes you’re lucky and the item you’re looking for is right there on the first page. Other times you’re not so lucky, and have to look through a few pages before you find your answer.
To cut down on the page views, you can change your Google preferences and increase the number of results per page. I find that 20-30 per page works well for me. Then, use the space bar on the keyboard to quickly scan down the page.
Change the Number of Results
1. On the Google search page, click the Preferences link.
2. On the Preferences page, scroll down to the Number of Results section
3. Select a higher number from the drop down list.
4. At the bottom right or top right of the Preferences page, click Save Preferences. That will automatically return you to the previous Google Search page.
It’s been several years (decades?) since I studied Latin, so I can’t translate any of this, but when designers need a block of text they often use Lorem Ipsum.
This focuses attention on the design, rather than the text.
You could use this when setting up a web layout or Word template, to show a client how the end product might look with different fonts and styles.
There’s a handy website where you can specify exactly how much text you need, and it will generate it for you, in paragraphs or bulleted lists. Then, copy and paste the results to your document.
When testing layouts in Word, I usually use the RAND function to generate random text (type =RAND() and press Enter).
It creates English text instead of Latin, but is quick and easy to use.
Outlook has an Out of Office Assistant that will notify people that you’re not in the office, but unfortunately it’s only available if you’re using Exchange Server. What about me? I don’t have Exchange Server, and like to leave my office occasionally.
If I’ll be out of the office for more than a day or two, I notify most of my clients, but sometimes forget to tell a few people. If they email me, I don’t want them to think I’m ignoring them. Fortunately, if you don’t have Exchange Server, you can create your own AutoReply.
I keep forgetting how to do this, so next time I travel I can follow these AutoReply instructions for Outlook 2003 on the Microsoft website. First you’ll create a message template, then set up a rule in Outlook, to determine who gets the message, and when.
When you leave the office, turn on the rule. Outlook should be left open, and set to automatically receive and send messages. It will only send one notice per Sender during any session of Outlook, so if the same person sends you another message they won’t get another AutoReply .
When you insert a comment in Microsoft Excel, your user name is shown in bold at the top of the comment.
Perhaps your name has changed, or you’ve inherited a computer that has someone else’s name in it.
How can you change the name that appears when you add new Excel comments on a worksheet?
User Name in Excel Comment
Change the User Information
NOTE: The User Name is common to all the Office applications, so if you change it in one program, all the others will be automatically updates.
I like to change the user information in Word or PowerPoint, because those programs store the user’s initials as well as the user name.
Excel just stores the user name, but you can change the name there, if you prefer.
Open Microsoft Word
Click on the Tools menu, then click Options.
Click the User Information tab.
Change the User Name and Initials
Click the OK button, to close the dialog box.
Note: The revised information will be used in all of the Microsoft Office applications on your computer
Change the User Name and Initials
Updating Old Comments In Excel
In Excel a comment shows the user name by default, at the top of the comment.
After the comment is created you can edit the comment, to change or delete that name.
Comment Name in Status Bar
The status bar also shows the user name when you point to a cell that contains a comment.
If you edit a comment or change a user name, the name in the status bar does NOT change.
The status bar continues to show the user name from the time that the comment was inserted.
Excel Macro to Replace Name
To change the name in the status bar, you can run an Excel VBA macro, like the ChangeCommentName macro shown below.
NOTE: In the ChangeCommentName code, replace the text strings “New Name” and “Old Name” with the new and old user names on your computer.
strNew = "New Name"
strOld = "Old Name"
ChangeCommentName Macro Code
Store the following code in a regular code module in your Excel workbook. Run the macro when you need to change comment names.
Sub ChangeCommentName()
'replaces old names in comments
'deletes and reinserts comments
'  so new name appears in status bar
'www.contextures.com/xlcomments03.html
Dim ws As Worksheet
Dim cmt As Comment
Dim strOld As String
Dim strNew As String
Dim strComment As String
strNew = "New Name"
strOld = "Old Name"
Application.UserName = strNew
For Each ws In ActiveWorkbook.Worksheets
  For Each cmt In ws.Comments
    strComment = Replace(cmt.text, strOld, strNew)
    cmt.Delete
    cmt.Parent.AddComment text:=strComment
  Next cmt
Next ws

End Sub
Get the Excel Comment Workbook
To get the Excel sample file with several macros for working with Excel comments, go to the Excel Comment Macros page on my Contextures site.
Okay, maybe it’s more aggravating than traumatic, but a few times each day I accidentally hit the Caps Lock key when I meant to hit Shift or Tab. Then, if I’m not paying attention, I type a few words (or paragraphs) before I notice, and have to retype everything.
Fortunately, I finally found a way to prevent accidental Caps Locks, using ToggleKeys, one of the Accessibility features in Windows.
To turn on the ToggleKeys feature:
Open the Control Panel, and double-click on the Accessibility Options icon.
On the Keyboard tab, add a check mark to Use ToggleKeys, then click OK.
Now, when you hit Caps Lock, Num Lock or Scroll Lock, you’ll hear a beep. Hit the key again to turn it off, then hit the key you really wanted.
More Noise
There’s also a Feedback with Noise option in the Tools>Options dialog box for Excel and other Office applications. To activate this you can download an Office Sounds add-in for Office 2003 and Office XP.
After the add-in is installed, you’ll hear zooms and clicks as you work. It might help you stay awake and alert, or might just irritate you.
When you’re creating an application, such as a client’s database, or complex workbook, do you start with a prototype, or do you dive right in?
At the Unstructured Ventures blog there’s an article entitled How To Fail, which lists 25 business guidelines, and alternative idea for each guideline. Number 7 discusses prototypes, mockups and samples.
“7. Build prototypes, mockups and samples.
Instead: Start building in a format and medium as close to the finished product as possible, and iterate, iterate, iterate.”
I’ve read numerous books and articles that list the merits of prototypes and mockups, but I’ve never created one. I always start working in the actual application, where I can test as I go. I’ve got notes from my client meetings, or their list of specifications, and maybe a rough sketch of where I’m headed, but that’s it.
This approach works well for me, especially in a database, where I can build a little, then test it with sample data, before building the next piece.
What’s Your Approach?
Do you create prototypes? Always? Sometimes? Never?
What benefits do you get from your approach?