Excel Holiday Dinner Planner Template

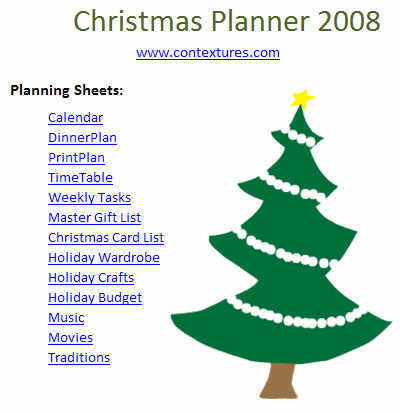
If you’re busy getting ready for a big family dinner today, you might find the dinner planner in this Excel workbook helpful.

When Will We Eat?

At the top of the worksheet, you can enter your target dinner hour.

The entire timetable will be based on that entry, so choose wisely!

Select dinner start time from drop-down list

What’s On the Menu

After you pick a dinner time, you can enter information for the dinner planning schedule.

  • First, enter a list of the food you need to prepare,
  • After that, enter how long each step takes.
Enter dinner items and times

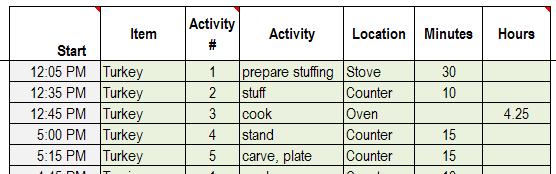
See the Step Start Times

When it has all the details, the Excel dinner planner calculates the start time for each item.

Then, sort the list by the Start Time column, to see all the preparation steps, in order that they need to be started.

Print Dinner Schedule

I use this dinner planner for our all of our family dinners, and it’s a big help in scheduling, and staying on track.

I like to print out the preparation schedule, and keep it on the kitchen counter while we get the dinner ready.

Print the Dinner Prep Schedule

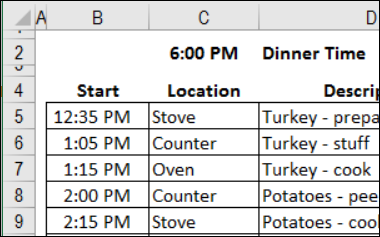
Dinner Prep Timeline Chart

There’s also a fancy Excel timeline chart, if you like to see visual overviews.

Who is going to peel the potatoes, and when should they start? That chore always takes way longer than you expect!

Plan Your Shopping

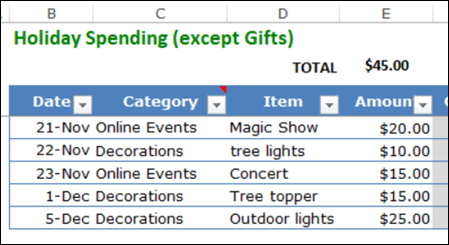
The Excel workbook also other helpful sheet, like this Holiday Spending tracker.

If you’re going to any of the Black Friday sales tomorrow, you can make a list of the items you want to buy, in column D

Then, when you get home from your successful shopping trip, enter the cost for each item in column E

And good luck out there — it can get wild in the malls at this time of year!

Holiday Spending Trackers

More Excel Holiday Templates

Here are a few more pages on my Contextures site, where you can find Excel files for help with holiday planning, or a bit of holiday fun and games.

Holiday Dinner Planner

Excel Weekly Planner Template

Excel Gift Ideas

Excel Advent Calendars

Chicken Dinner Planner

Excel Christmas Tree – scroll bar

Excel Christmas Tree – icons

Classic Menus Add-In for Excel 2007

Have you switched from Excel 2003, with its compact toolbars, to Excel with its Ribbons commands?

If you’ve switched, did you find it easy to adjust to the new User Interface?

Classic Menu Add-in

I’ve heard lots of complaints about switching from those toolbars to the Excel Ribbon.

So, when I noticed an Excel add-in called, “Excel 2007 Ribbon to old Excel Classic Menu Toolbar” recently, I decided to download the trial version and take a look.

Transition to Excel Ribbon

Maybe this add-in would help people make an easier transition to Excel 2007. The add-in was at an introductory sale price of $8.99, so it wouldn’t be too big an investment.

The download went smoothly, and the installation took a bit longer than I expected, but nothing too serious.

Annoying Pop-up Window

However, immediately after the installation, a pop-up window appeared, asking me to send my name and email address, and subscribe to a newsletter.

I didn’t want the newsletter, and tried to close the window, but there’s no way to get rid of it.

The X button has no effect, and the Send button demands that you fill in the boxes.

Finally, I was able to close it with the Task Manager.

Uninstalling the Add-In

Because of that bad experience, I haven’t even tried the product and I’ve decided that I don’t want anything to do with this company.

I’ll be uninstalling the trial version in a couple of minutes.

By the way, the trial version only installs two of the old style menus (File and Edit).

If you want the rest of the menus, you’ll have to buy the full version.

I won’t be buying it, but maybe it’s something you’d like to try.

Loved Those Tiny Toolbars

This Excel Toolbar add-in did make me realize one thing though.

It’s not the drop-down menus I miss, it’s the space-saving toolbars, with their tiny rows of efficient little buttons.

Old Toolbars with Space-Saving Menus

John Walkenbach’s PUP Add-In For Excel

[Update – John Walkenbach has sold his website and this product is no longer available]

About a week ago, John Walkenbach had a clearance sale for his PUP Add-In for Excel. PUP stands for Power Utility Pak, and that’s not an overstatement.

I’ve been using the latest version, PUPv7 for Excel 2007, for the past week, and am amazed by all its features.

When installed, PUPv7 adds a tab to the Excel Ribbon, with six groups of commands. The Ribbon tab’s groups don’t collapse if you make the Excel window narrower, like the built-in tabs do, but that’s a minor quibble.

There are too many features to list, but here are some of my favourites, so far.

PUP Bookmarks

Create a bookmark to mark a range in any Excel file, and you can quickly return to that file and location from the PUP Ribbon tab.

Create a bookmark
Create a bookmark

Create Workbook Contents Sheet

There’s a list of workbook tools, including the handy Create Workbook Contents Sheet command. This creates a cover sheet in your workbook, with a set of hyperlinks or buttons that link to the other sheets in the workbook.

Maybe the next version will add a hyperlink back to the contents sheet on each indexed sheet, in a specified cell.

Create Workbook Contents Sheet command

Customize a New Workbook

With the Customize a New Workbook command you can quickly create a workbook with a sheet for each month, each weekday, a numbered series or a list of items.

Customize a New Workbook

Text Tools

In the Modify Cells and Ranges drop down is a Text Tools command. With it, you can change the case of text in selected cells, add text within existing text, or remove text or spaces.

With this tool you won’t have to create formulas or macros when you want to modify text, just fill in boxes and click Apply.

Many More Features

Those are just a few of the features in PUPv7.

There are also worksheet functions, randomizer tools, workbook reports and many more features.

I highly recommend that you download the free trial (30 days) or purchase a copy ($40 US).

PUPv7 is a real time saver as as you work in Excel 2007, and it should pay for itself very quickly. PUPv6 is available for Excel 2003 or earlier versions.

__________________

Get Organized With Excel Holiday Planner

There are sites that offer Christmas Planner templates, usually in pdf format, which you can download and print.

Then, store the printed sheets in a binder, and write out your task list, holiday budget, gift list and calendar.

It’s Better in Excel

I’m sure that helps people who are trying to organize a hectic holiday season, but Excel would be a better tool for all those lists and budgets.

So, with my daughter’s help, I created an Excel Christmas Planner that you can download from my web site.

Instead of hand writing your lists, and doing your budgeting on a calculator, enter all the details in an Excel workbook, and let it do the heavy lifting for you.

ChristmasCover

Planning Sheets

There are 15 sheets in the planner, currently, and we’ll add more, if we have new ideas.

For example, there’s an extended weekly calendar, so you can see what’s happening on specific days.

You can also make a list of upcoming tasks, keep a master gift list, keep costs in line with a holiday budget planner, and many more sheets.

Dinner Planner

The workbook includes a dinner planner, which will help you schedule the preparation for any large meal.

The dinner planner is helpful for smaller meals too, if they have lots of preparation steps!

You can get organized for the American Thanksgiving this week, or Christmas next month, or a weekend dinner party, any time of the year.

What Should We Add?

It’s our first draft of our Holiday Planner, so there’s probably much more that we could add. If you have any suggestions for improving it, we’d love to hear from you!

Enter Excel Data Without Typing Decimals

Recently I helped someone who was having trouble entering data in a new installation of Excel 2007.

  • When he entered 100, the value was automatically changed to 1.
  • If he typed 1000, the value immediately became 10.

He found this very mysterious, and frustrating, as you can imagine.

It’s a Feature

What the user had discovered was a relatively unknown feature of Excel.

If you’re entering a long list of decimal amounts, you can turn on this feature, and the decimal points will be added automatically.

For example, if you’re entering hundreds of sales orders, where everything has two decimal places, it could save you hundreds of keystrokes.

However, this feature won’t be of help to anyone who’s entering a small amount of data. In fact, it will be the opposite of helpful!

Decimal point entered automatically

How to Change the Setting

I have no idea how this setting would have been turned on in Excel 2007, without the user knowing.

It’s certainly not a default setting when you take Excel out of the box.

Perhaps it was changed accidentally, or by a co-worker who has a strange sense of humour.

Change Setting in Excel 2007

To turn on the automatic decimal point setting in Excel 2007, follow these steps:

  • At the top left of the Excel window, click the Office button
  • Next, click Excel Options
  • At the left, click the Advanced category
  • Next, in the Editing options section, remove the check mark from ‘Automatically insert a decimal point’
  • Finally, click OK.
Excel Option Setting Automatically insert a decimal point

Change Setting in Excel 2003 or earlier:

To turn on the automatic decimal point setting in Excel 2003, or earlier versions, follow these steps:

  • On the Tools menu, click Options
  • On the Edit tab, remove the check mark from Fixed decimal
  • Finally, click the OK button, to close the Options window
automatic decimal point setting in Excel 2003

Entering Dates and Times in Excel

In yesterday’s post I showed formulas you can use to pull information from a date in Excel.

In some workbooks you’ll enter dates manually, but often you’d like a date to be calculated automatically.

Calculate the Current Date

To show the current date in a cell, use the TODAY function:

  • =TODAY()

This date will update automatically when you open the workbook on a different date.

Calculate Current Date and Time

To show the current date and time in a cell, use the NOW function:

  • =NOW()

This formula result will update automatically, when the workbook recalculates.

Manually Enter Current Date and Time

Instead of formulas, you can enter the date and time as values. These will NOT update automatically.

  • To enter the current date in a cell as a value, press the Ctrl key and type a semi-colon (Ctrl+;)
  • To enter the current time in a cell as a value, press the Ctrl key and type a colon (Ctrl+Shift+;)

To enter date and time as value, in the same cells:

  • Enter the date (Ctrl+;)
  • Then type a space character
  • Then enter the time (Ctrl+Shift+;)

Determine When Workbook Was Last Saved

In yesterday’s post on dates, Mariusz asked how to find the date that the workbook was last saved.

Unlike Word, excel doesn’t have a menu command that will insert the last saved date.

However, you can use a bit of programming to insert the date, assuming the workbook has been saved. There is sample code in the next section.

  • Note: You could also create a User Defined Function (UDF) to calculate the date. However, I find that UDFs can slow down a workbook, so avoid them, if possible.

Macro VBA Code – Last Saved Date

Here is the code that inserts the workbook’s last saved date. It’s entered on a sheet named Data Entry, in cell A1.

Tip: You could add an event procedure in your workbook, so this code runs automatically, any time the workbook is saved.

Sub GetLastSavedDate()
On Error Resume Next
Dim sSaveDate As String
sSaveDate = FileDateTime(ActiveWorkbook.FullName)
If sSaveDate = “” Then
MsgBox “Could not determine save date.”
Else
Worksheets(“DataEntry”).Range(“A1”).Value _
= “Last Saved: ” & sSaveDate
End If
End Sub

Working With Dates In Excel

This week I’ve been working on date formulas, from very simple ones, to complex formulas that calculate workdays per month, based on start and end dates that can span several months.

Extract Information from a Date

Many times I need to pull a bit of information from a date, such as the year, month or weekday.

In the section below, I’ve listed the sample Excel formulas I would use, to calculate specific dates in Excel.

  • For all formulas, the date — December 29, 2008 — is in cell A2.
Date Calculation Formulas

Date Calculation Formulas

Here are the formulas to extract information from a date in cell A2.

To Calculate

The Formula

The Result

Year =YEAR(A2) 2008
Month Number =MONTH(A2) 12
Month Name (short) =TEXT(A2,”mmm”) Dec
Month Name (long) =TEXT(A2,”mmmm”) December
Day of the month =DAY(A2) 29
Weekday Number =WEEKDAY(A2,1) 2
Weekday Name (short) =TEXT(A2,”ddd”) Mon
Weekday Name (long) =TEXT(A2,”dddd”) Monday
Year Month =TEXT(A2,”yyyy mm”) 2008 12

Using Calculated Dates in Pivot Table

If I plan to create a pivot table from data that contains a date field, I usually calculate the year and month in the source data.

Then I can add those fields to the pivot table, instead of the individual dates.

Yes, the pivot table could automatically group the individual dates by year and month, but that can limit other functions in the pivot table.

For example:

  • if two pivot tables are based on the same data, grouping one pivot table by month would cause the other pivot table to also be grouped by month.
  • if a field is grouped, you cannot add calculated items to the pivot table
pivot table error message - cannot add a calculated item
pivot table error message – cannot add a calculated item

Video: Pivot Table Grouping Tips

This video shows how to group pivot table dates by month and years, and how to group text items manually.

There are written steps, and an Excel workbook, on the How to Group Pivot Table Data page, on my Contextures site.

Pivot Table Grouping

For more information on Excel pivot table grouping, go to the How to Group Pivot Table Data page, on my Contextures site.

There are examples for grouping dates, number and text fields. You’ll also see solutions for fixing pivot table grouping problems, such as the error message, “Cannot group that selection”

Avoiding Shared Workbooks in Excel

Occasionally a client asks me to create a shared workbook in Excel, so two or more employees can work in it at the same time. It sounds good in theory, but I always try to come up with a different solution.

There are many reasons for avoiding shared workbooks in Excel.

Note: See a newer version of this article: Shared Workbook Limits in Excel 2010

Continue reading “Avoiding Shared Workbooks in Excel”

David McRitchie’s Excel Pages

For many years, David McRitchie has been collecting and posting Excel information on his web site.

With over 200 pages, your can find the answer to almost any Excel question on David’s site.

There’s a list of Excel articles, and many links to other sites which have Excel tutorials, downloads and advanced Excel topics.

David’s interests have shifted over the past couple of years, and he’s now documenting Firefox features. You can find his Firefox Lessons in a new section on his web site.

Meeting for Lunch

Last week David was visiting relatives in Canada and we met for lunch on Friday. We had a great chat, and I learned quite a bit about his very interesting work history.

I had previously met David at a Microsoft MVP Summit in 2001. That was the first year I received the award, and David had been an Excel MVP since 1999.

It was good to see him again, and I hope he enjoys the rest of his visit.

Excel expert, and former Microsoft MVP, David McRitchie

=============================

Create Quick Equations in Word 2007

Word 2007 has a new Building Blocks feature that lets you quickly add items, such as cover pages, text boxes, watermarks and page numbers. If you’re writing a scientific document, you can also insert equations.

Insert an Equation

  • On the Ribbon, click the Insert tab.
  • In the Symbols group, click on Equation, then click the equation that you want to insert.

WordEquationInsert

Save an Equation

After you insert an equation, you can modify it, then save it to use again later.

  • Click on the equation in the Word document, to activate it.
  • Click the arrow at the bottom right of the equation box, and click on Save as New Equation.

WordEquationSave

  • Enter the details for your equation, then click OK.
  • When you close Word, you’ll be prompted to save the changes to the Building Blocks template. Click Yes to save your changes.

Insert a Saved Equation

Saved equations are listed in the Building Blocks Organizer. Open it and select the item you want to insert.

  • On the Ribbon, click the Insert tab.
  • In the Text group, click on Quick Parts, then click Building Blocks Organizer

WordBuildBlocks

  • In the Building Block Organizer dialog box, click on the Gallery heading, to sort the list by type.
  • Scroll down to the Equations, and click on an equation to select it.

WordEquations

  • Click the Insert button.