This short video shows how to build an Excel Christmas tree. There’s a scroll bar on the worksheet, and you use that to add decoration, one layer at a time.
This technique is done with NO macros!
Get Christmas Excel Files
There are lots more holiday workbooks on my Contextures site, on the following pages:
Well, it’s Christmas Eve, and you’re probably too busy to read a long blog post today. So, here’s a quick tip that I discovered this week.
I use Firefox as my browser, and when I need a new tab, I right-click in the tab area, then click on New Tab.
Now, I realize that isn’t a terrible hardship, but it’s much easier to create a new tab in other browsers, that shall remain nameless.
I know there’s a New Tab button, and I even added that to my toolbar, but never remember to use it.
Double-Click For a New Tab
This week, I accidentally double-clicked in the tab area, to the right of the last tab (or in the sliver of space above the tabs, if your aim is good), and presto! A new tab was instantly created.
It’s still two clicks, but for some reason I find this quicker and easier. It’s the small things. 😉
On my website there are sample Excel files, many of which use VBA event programming to make things happen.
What is an Event?
For Excel VBA program, an event procedure is code that runs automatically, after an “event” occurs.
An event is something that happens in an Excel workbook or worksheet. For example:
Type something in a cell (worksheet change event)
Click on a cell to select it (worksheet selection change event)
Click on a worksheet tab to select it (worksheet activate event)
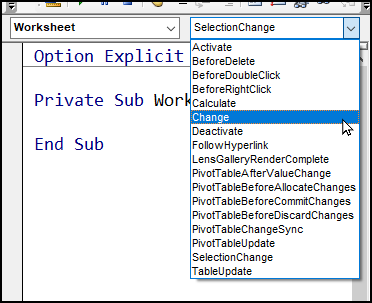
In the Excel Visual Basic Editor, if you’re working on a Worksheet module, you can see a list of the worksheet events.
Excel VBA Worksheet Events
Worksheet Event Code
With event programming, it’s easy to automate your worksheets and workbooks. People don’t have to remember to click a button, or run a macro from the Macro list.
Instead, your code runs automatically when a specific event occurs. People just need to change a cell, or refresh a pivot table, and the code for that event will run.
Event Programming Example
For example, on this worksheet there’s a data validation drop down list in cell B2, where a day of the week can be selected.
data validation drop down list with weekdays
Select a Weekday
When you select a weekday, that changes the worksheet.
If the worksheet has VBA code for the Worksheet_Change event, it will run automatically, if any cell on the worksheet is changed
In this example, the Worksheet_Change event code checks the address of the cell that was changed, to see if it was cell B2.
If it was cell B2, a message is displayed — “Please update the daily roster.”
If any other cell was changed, nothing happens
View the Worksheet Code
To see the code for a worksheet, right-click on its sheet tab, and click View Code.
The Visual Basic Editor opens, and shows the code for the active sheet.
Multiple Worksheet Events
What happens if you try to create multiple Worksheet_Change events on the same worksheet?
For example that message code for cell B2 works well, so you’d like to add a similar Worksheet_Change event, for a different cell.
If you make a change in cell B4, you’d like the date automatically entered in cell B5.
Visual Basic Error Message
Unfortunately, if you add another Worksheet_Change event, you’ll see an error message when you change a cell.
In the screen shot below, the VBA error message says:
Compile error: Ambiguous name detected: Worksheet_Change
That message appears if you use the same procedure name twice on the worksheet.
Compile error: Ambiguous name detected: Worksheet_Change
Combine the Event Code
Instead of creating separate events with the same name, combine both pieces of code into one.
For example, you could use Select Case, and specify what should happen when specific cells are changed.
Some situations will require a more complex solution, and if you experiment a bit, you should be able to include multiple outcomes within a single worksheet event’s code.
______________________
Most of my blog posts are about Microsoft Excel, but I use Microsoft Access every day too! I’ve got two big database for my own work, and I help several clients with their Access databases.
Save Your Access Files
If you use Access too, do you have Access databases open throughout the workday, with people entering and editing data?
A helpful feature in Access is that data is saved automatically as you work, as soon as you exit a record.
However, it’s a good precaution to have a backup of the entire file, so you can recover if something goes wrong.
Access Backup Tool
To make backups easy to manage, Jan Karel Pieterse has created the Access Backup Tool, available as a free download on his web site.
I tested it in Access 2007 and Access 2003, and it worked well in both version.
Getting Started
Open the Access Backup Tool and the Menu form will appear automatically.
Access Backup Tool Dialog Box
Access Backup Tool Settings
Next, click the Settings button in the Access Backup Tool Dialog Box.
That opens the Settings form, where you can enter the information about your databases.
Access Backup Tool Settings
In the Settings form, enter the file path to each database, and the location where you want the backup stored.
Timed or Manual Backups
At the top of the Settings form, you can enter the backup settings.
For automatic backups, add a check mark to Timed Backup, and set the time interval for the backups. Then the backup process will run automatically, at the specified interval.
For manual backups, remove the check mark for Timed Backups.
Suspend Backups Overnight
If backups aren’t required overnight, you can suspend them during specified hours.
To stop backups overnight, add a check mark to Suspend backup. Enter the stop and start times for the backups.
To run the backups around the clock, remove the check mark from Suspend backup
Start the Backups
After you’ve entered all the settings, close the Settings form and return to the Menu.
Timed Backups
On the Menu form, if you opted for Timed Backup, you’ll see the countdown to the next backup. At the specified interval, the backup will run, and you’ll see a notice on the menu.
Leave the Access Backup Tool running all day, and it will take care of the backups for you automatically.
Manual Backups
If you’d prefer to run the backups manually, click the Backup Databases button, and all the selected databases will be backed up.
“This is a great opportunity for me to summarize and share fifteen years of experience helping startup and early stage companies move from concept to operational status. The book combines important business concepts and practices with practical ‘how to’ information on financial modeling and analysis.”
Apress Alpha Book Program
Some chapters of the book are already available for purchase through the Alpha Books program at Apress.
In the Alpha Books program, you get immediate access to chapters of the book, as they’re being written and reviewed. You can provide feedback to the author, and help improve the final product.
Get 4 Chapters
There are four chapters available for download now, and more chapters will be added to the download as work progresses.
If you buy the Alpha Book, you’ll be notified when new material is ready.
Then, go back to the Apress site and download it.
________________
Do you write Excel macro, with VBA programming? Is your code clean?
Clean Code Wristband
While I was browsing the Internet recently, I saw someone promoting a “Clean Code” wristband, with donations going to a non-profit group.
Writing clean code is an idea worth supporting, and you could snap that wristband, to wake yourself up, if your coding starts to go off track.
Excel VBA Tutorials
If you’d like to get started with Excel VBA programming, there are several pages on my Contextures site, where you can find tutorials, sample files, and videos.
1 — How to Add Macro Code to Excel Workbook — How to copy Excel macro VBA code to your workbook, from website or sample file. Different types of code, where to paste it. Step-by-step videos, written steps
2 — Excel Macro to Save Sheets As PDF — Excel macro saves active sheet or sheets in PDF format, prompts for file name and folder. See macro code, get sample workbook with macro.
3 — How to Create Excel UserForm for Data Entry — See how to create an Excel UserForm for data entry, with text boxes and buttons. Follow step-by-step videos, detailed notes with screen shots, free Excel workbook
In an Excel file with lots of worksheets, how do you help users navigate through the workbook?
Here are a few of the methods I’ve used. and I’d be interested in hearing about them. I’m sure you’ve found your own creative ways to deal with the Excel workbook navigation problem.
A couple of years ago, a client sent me an invitation to LinkedIn, a business connection website. To be polite, I joined, but never visited the site again, and didn’t make any further connections.
A few months ago, I looked at LinkedIn again. I can’t remember why — maybe someone else invited me to connect, or I saw it mentioned in a blog post somewhere. I searched a few names, found people who I know, and sent them invitations to connect.
I still didn’t see much value in the website, but visited about once a week, to see what people were up to, and to try to find a few more old contacts.
New Features Added
LinkedIn also has groups that you can join. Some are invitation only, and others are public. The groups were an interesting way to find other people with similar interests, such as Excel Users, but not much use beyond that.
Recently though, discussions were added to the groups, so people can post a comment or question, and other members of the group can respond. Finally, there’s some value in belonging to the groups, if members are active in the discussions.
I’m in an alumni group, and a couple of Excel groups, and the discussions are lively and interesting. I visit a couple of times a week, and have made a few new contacts through the group discussions.
What will I do with all these contacts? Who knows? Maybe they’ll lead to consulting opportunities, or resources when I’m stuck on a project.
Do you choose Save As, and save the file with a different name?
Something else?
Macro to SaveAsCopy
I like to have different versions of a file, so I can go back to a previous version if something goes horribly wrong.
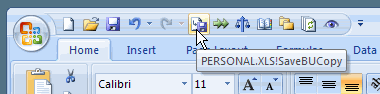
So, I created a macro to save my files, and added a button to the Quick Access Toolbar (QAT).
backup button on Quick Access Toolbar (QAT)
What the Macro Does
The macro saves a copy of the active file in a specified folder, adding the year, month, day, hour and minute to the file name.
For example, if the file I’m working on is named Budget2009.xls, the backup file would be named Budget2009_20081215_1008.xls if I saved it at 10:08 AM today.
NOTE: This macro does not make any changes to the active workbook, so it does NOT wipe out the Undo stack in my version of Excel. Test this on your own computer though, to make sure it’s the same for you!
In the code, you can change the Save directory to one that you prefer on your computer or network.
NOTE: I use C:\Backups\, but you could change that to another directory that you use.
Sub SaveBUCopy()
Dim strFile As String
Dim strName As String
Dim lExt As Long
Dim strDir As String
Dim strExt As String

strName = ActiveWorkbook.Name
strDir = "C:\Backups\"

If UCase(Right(strName, 4)) = ".XLS" Then
  lExt = 4
Else
  lExt = 5
End If

strFile = Left(strName, Len(strName) - lExt)
strExt = Right(strName, lExt)

ActiveWorkbook.SaveCopyAs strDir & strFile _
  & Format(Now, "_yyyymmdd_HhMm") & strExt
End Sub
Add Button to QAT
After you’ve added the SaveBUCopy macro to your workbook, and changed the directory name, make the macro easy to run.
To do that, follow the steps in this video, to add your macro to the Quick Access Toolbar.
No, you don’t necessarily need treatment just because you like using Excel. 😉 Today’s post shows an Excel workbook that you can download, to plan a sequence of treatments, prescribed by your doctor.
Excel Treatment Calendar Workbook
In response to a newsgroup posting, Roger Govier created a workbook to help patients plan a sequence of treatments.
For example, people taking Warfarin, might be prescribed to take doses of 2 mg, 2mg, 3mg, 2mg, 5mg and then go back to the start of the sequence.
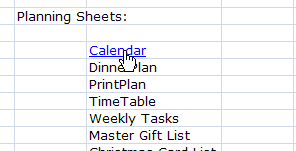
Sequence Setup Sheet
In the sample workbook, they would enter that sequence on the Setup sheet.
Treatment List on worksheet
Treatment Sites List
Muscular Dystrophy sufferers need to inject at different sites on the body each day.
They could list the sites on the setup sheet, in the Treatment_List column.
Then, after the sequence has been entered, click the “Fill Treatments Column” button.
That button runs an Excel macro, which has the sequence copied down, to fill the Treatments Column.
Macro button Fill Treatments Column
View Treatments on a Calendar
After the treatment list is created, switch to the Calendar sheet, to set up the current month.
First, from the drop down lists, select a year and month
Next, pick the first treatment for the month.
The calendar will fill in with dates and treatment sequence.
Select Month for Treatment Calendar
Download the Sample File
You can download Roger’s sample file from the Excel Sample Spreadsheets page on my Contextures site.
In the Functions section, look for FN0016 – Treatment Calendar
________________________________