
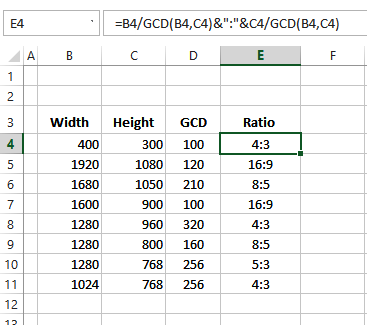
In Excel, if you divide 2 by 8, the result is 0.25. If you format the cell as a fraction, the cell might show 1/4 as the result. But how can you calculate a ratio in Excel? See the written steps and video below.
Quickly Split a Word Window
I’ve been reviewing Word documents recently, and sometimes I’m halfway down the document and have to check on something that was in an earlier part of the file.
I could scroll up, to check the text, then scroll back down to the current spot, but that’s not too efficient.
It’s easier, and more efficient, to split the Word window, so I can see two sections at the same time.
To split the window, you can choose Window|Split, then click where you want the split.
Another way to create a split it to point to the Split marker, at the top of the Vertical Scroll Bar, and drag it to the position you want.

Remove the Split
To remove the Split marker, double-click on it.

______________
Desktop Reference Books
What’s on your desktop bookshelf? I only have a few inches of space on the bookshelf above my computer, and it holds the books that I refer to most often. From left to right, they are:
- Roget’s Thesaurus
- French/English Dictionary
- Notebook
- Excel 2007 PivotTables Recipes
- Beginning Pivot Tables in Excel 2007
- Excel Pivot Tables Recipe Book
- Manual of Style for Technical Publications
- Oxford Canadian Dictionary
- Binder with Contextures Procedures

The thesaurus is about 100 years old, or at least looks that old. I’ve had it since university days, and like it much better than the newer style.
Microsoft Word has a built in thesaurus feature, which I use occasionally, but it’s no substitute for Roget’s version.
My books are there because I do lots of work with pivot tables and can’t remember all the obscure issues and workarounds that I covered in the books.
The binder doesn’t have too much in it yet, but I’m trying to add more checklists and procedures, to make monthly tasks a bit easier.
I’d have room for more books if I removed the CD storage rack that’s to the right. It holds music CDs and I can’t remember the last time that I listened to one on the computer.
Everything that I want to hear is in an MP3 file, so maybe these should go out to the car, or down to the stereo system.
_________________________
No All Day Events in Outlook 2007 To-Do Bar
At the right of the Outlook 2007 you can display a To-Do Bar that shows a navigation calendar, a list of upcoming appointments and a task list. Very handy!
When I open Outlook to check my email, I can see my calendar and tasks at a quick glance. Here’s what the top of the To-Do Bar looks like.

Unfortunately, it’s not as useful as I first thought, since the To-Do Bar doesn’t show all day events. So, if you’ve added a conference that will span a few days, or entered the birthdays for your friends and family members, those won’t show up.
Fortunately, my mom’s birthday is in February, so I noticed this problem just in time! And if you didn’t get a birthday card from me, it’s Outlook’s fault.
Show Outlook Today
I’ll keep using the To-Do Bar, because I have a wide monitor, and the To-Do Bar is useful for the non-event items and tasks. However, I decided to change my Outlook settings to show Outlook Today upon opening.
That sounded like an easy thing to do, but I couldn’t find a switch to turn it back on. Outlook Help said to go to the Outlook Today view, and customize the settings there.
Great advice, but how do I get to the Outlook Today view? Outlook Help said to look in the Navigation Pane.

Well, I couldn’t see that icon with the others, at the bottom of the Navigation Pane.

I hunted through the menus, checked Help again, and searched in Google, but couldn’t find any help on restoring my missing Outlook Today icon.
Then, I accidentally clicked on the top folder in my folder list, and Outlook Today miraculously appeared!

Oh, that icon. Maybe the Outlook Help could have mentioned the Folder list when describing where to look for the icon.
Outlook Today Icon on the Advanced Toolbar
Update: Thanks to Jon Frank, who commented that the Outlook Today icon is also on Outlook’s Advanced Toolbar. To show that toolbar, click the View menu, then click Toolbars, and click Advanced.
Change the Outlook Today Startup Setting
After that frustrating exercise, the rest of the process was easy. At the top left of the Outlook Today view, I clicked the Customize Outlook Today button.

Then I added a check mark to When starting, go directly to Outlook Today, then clicked Save Changes.

Now, when Outlook opens, I can see all my upcoming appointments and events.
It would be ever better if you could specify that you only wanted to see this the first time you open Outlook each day, but maybe they’ll add that to the next version.
__________________
Hide an Excel Macro
When you add a macro to an Excel workbook, users can see that macro in a list when they choose Tools|Macro|Macros.

Hide Your Macros
In some workbooks, you might want to hide one or more of your macros, to prevent users from running them.
Note: This technique won’t add any protection to your code, it will simply remove the macro from the list, so casual users won’t accidentally or intentionally run it.
Make the Macro Private
In this example, I have two macros – one that the users can run, and one that I’d prefer to keep hidden.
Here’s the original Excel VBA code:

Revised VBA Code
If I add the word Private at the start of the Sub MySecretMacro line, that macro will NOT be included in the macro list.

Private Macro Not in List
Now only the MyVisibleMacro appears in the list.

Run the Hidden Macro
Now that you’ve hidden the macro, so casual users won’t find it, how can you run it yourself? Here are a few ways you can run it
- Open the Visual Basic Editor (Alt+F11), click somewhere in the macro’s code, then click the Run button.

OR
- If you know the name of the macro, type it in the Name Box, at the left of the Formula bar.
- Press the Enter key, and the Visual Basic Editor will open automatically, with the cursor flashing in the macro’s code
- Click the Run button.

OR
- Before you hide the macro, choose Tools|Macro|Macros, select the macro, and click the Options button
- Type a keyboard shortcut (Ctrl + Shift + M in this example) then click OK

- Close the Macro dialog box.
- Add Private to the macro code, then use your keyboard shortcut to run it when required.
______________________
Print Excel Sheet On One Page
Often an Excel worksheet is just a bit too wide to print on one page.
You could change it to Landscape orientation, so more will fit across, but you may prefer to keep it in Portrait orientation, especially if it’s a long list.
Make It Fit Page Width
In Excel’s Page Setup dialog box, you can adjust the scaling so the sheet will fit across on one page.
- On the Page tab, click the ‘Fit to’ option for Scaling.
- Enter 1 as the number of page(s) wide.
- Clear the box for the number of pages tall, to leave that box empty
- Finally, click OK.

No Tall Setting
Those changes to the page scaling settings will :
- limit the file to printing one page across (wide)
- will NOT limit the number of pages down (tall)
You don’t have to guess the number of pages required. Just leave that setting blank ,and Excel will figure it out for you.
_____________
Create a Word Keyboard Shortcuts List
If you like to use keyboard shortcuts, you might have some of them memorized, in Word and Excel, or other programs.
If your memory isn’t too good, you can print a list of shortcuts and keep it near your computer as a reference.
A few months ago, I mentioned some sites where you can download lists of Excel keyboard shortcuts. It’s even easier to get a list of Word keyboard shortcuts. There’s a built in macro that you can run, to create the list.
Create a List of Word Keyboard Shortcuts
- In Word 2003, click the Tools menu, click Macro, then click Macros.
- In the Macros dialog box, click the dropdown arrow for ‘Macros in’ and select Word commands
- In the list of macros, click on ListCommands, then click Run.

- In the List Commands dialog box, click on Current menu and keyboard settings, then click OK

A new document will be created, with a table that lists all the keyboard shortcuts and menu commands.

______________________
Use a Web Graphic As Desktop Background
Here’s another Windows tip that I found while cleaning my office. If you find a picture while surfing the Internet, you can quickly add that photo to your Windows desktop as a background.
The desktop photo is usually covered with documents, but it’s nice to see a happy face or calming scenery when you close all your files.
Add a Graphic to the Windows Desktop
- Right-click on the graphic that you want to add to the desktop.
- Click on Set as Desktop Background
- From the Position drop down, select an option. (Center is my preference.)
- Click Set Desktop Background

__________________
Create Single Click Desktop Icons
One of my holiday projects was to clean out some old client files, and the five bags of shredded paper are evidence of my success. In one of the files, I found notes from Windows 98 training that I did for a client.
Obviously, a few things have changed, but most of the tips still work. I had forgotten that the desktop icons could be changed to work on a single click, instead of a double click. Here are the instructions, modified for Windows XP.
Create Single Click Icons
Note: This will also affect the files in your Window Explorer folders.
- Double-click the My Computer icon
- Click the Tools menu, then click Folder Options
- Click the General tab
- Under ‘Click items as follows’, click ‘Single-click to open an item (point to select)
- Select the formatting option that you prefer (I don’t like underlining, so I selected ‘Underline icon titles only when I point at them’)
- Click OK

______________________
Open a Second Window in Outlook 2007
Occasionally it’s useful to see two main windows in Outlook 2007 at the same time. For example, if you’re clearing out your Inbox, you might want to check your Contact list, to see if someone’s name is already in there.
Instead of flipping back and forth between views, you can open a second window.
Show the Navigation Pane
If the Navigation Pane isn’t visible, click the View menu, then click Navigation Pane and click Normal.

To open a second window:
- In the Navigation Pane, right-click on a button, such as Contacts.
Note: If the Navigation Pane is minimized, or the buttons are displayed as icons at the bottom of the Navigation Pane, you can right-click on those. - Click on Open in New Window

________________________