Have you tried Microsoft PowerPivot for Excel 2010 (formerly Gemini)? It’s a powerful data analysis add-in for Excel, and is part of the Office 2010 Beta.
If you haven’t downloaded the Beta, you can test PowerPivot in the hands-on Virtual Lab.
That’s where I tested PowerPivot last weekend, and hit a few snags, but was impressed by what PowerPivot can do.
Testing PowerPivot
On Friday, a surprise package arrived in my mailbox – a set of power tools! It was a promotion for last week’s release of PowerPivot, and the power tools had clever labels, like this one on the flashlight.
Did the power tools influence my decision to try PowerPivot?
Of course! Testing PowerPivot was already on my To Do list, and the power tools inspired me to move it to the top.
Will the gift influence my testing? Nope. I’ll still tell you exactly what I think.
The PowerPivot Add-In
I had trouble with the virtual lab on my desktop computer, and couldn’t get the ActiveX control installed.
Next, I tried on my laptop, which is newer, and everything went smoothly there. Both machines are Windows XP, and I used Internet Explorer 8 as the browser.
Start the Virtual Lab
Once the virtual lab was running, it was easy to get started, and work with PowerPivot in Excel.
The PowerPivot add-in creates a new tab on the Excel Ribbon.
PowerPivot tab on Excel Ribbon
Launch PowerPivot
Click PowerPivot Window, to launch the add-in, and open the PowerPivot client window. From there, you can connect to data from a variety of sources.
I’d normally connect to Access data, but in this example I used the SQL Server connection.
Select a Table in Data Source
Next, select a table from the data source, and PowerPivot can automatically select related tables. You can also filter the selected data, before importing it.
In the virtual lab, I connected to a Sales table that had almost 4 million records, and it took just a couple of minutes to import.
The Imported Data
In the PowerPivot client window, each table is on a separate tab.
You can change the tab names, and add calculated fields in the tables.
The formula bar looks just like Excel’s, and the field names appear automatically when you start typing.
Create a Pivot Table and Pivot Chart
You can create a pivot table and pivot chart from the data, using the PowerPivot Task Pane (called the Gemini Task Pane in the virtual lab).
The pivot table and pivot chart weren’t connected though – adding fields to one, didn’t affect the other.
I’m not sure if that was a bug in the virtual lab, or a Beta feature that will be fixed later.
Add Slicers
You can also add horizontal and vertical Slicers to the pivot table and pivot chart, to filter the data that’s displayed.
Try PowerPivot Yourself
This was just a quick overview of the PowerPivot test in the PowerPivot virtual lab. If you don’t have the Office 2010 Beta installed, I’d recommend this as a great way to see what PowerPivot can do.
It took me about an hour to go through the 3 modules, while making notes and taking screenshots.
Read the PowerPivot Instructions
There’s a button to download a PDF file with the instructions, but that didn’t work, so I copied the instructions and pasted them into Word.
It was easier to read the instructions in Word, where I could increase the Zoom level. Also, the instructions disappeared at one point, and I would have had to start over, if I hadn’t made a copy.
The virtual machine hung on me a couple of times, and I don’t see a way to start anywhere except the beginning.
Restarting was annoying, but it was pretty quick to go through the steps the second time.
_______________
For more information on PowerPivot, see the PowerPivot Team blog.
For more information on Excel Pivot Tables and Excel Pivot Charts, see the Pivot Table FAQs on my Contextures website.
You have an Excel order form with a long list of products to select. After a customer enters quantities for the products they want to order, you want to print an invoice for the selected items.
Select the Products
Here’s the OrderForm sheet, where quantities have been entered for four of the products, in column E.
Excel Order Form with quantities entered
Formula Adds Numbers
Formulas in column B check the quantity column (E).
If the quantity is filled in, then the next available number is calculated.
=IF(E6>0,MAX($B$5:B5)+1,””)
Print the Order
On the Invoice sheet, formulas pull the data from the Order form. For example, this formula shows the name of the first product that was ordered:
[Update Nov. 15, 2015 – Adapx, Inc. has ceased operations]
I loved the idea of a pen that could magically send my data to Excel, but it didn’t work out as well as I’d hoped. 😉 Anyway, here’s my review of Capturx Forms for Excel, made by Adapx, Inc.
For the past couple of years, I’ve worked with a client that has factories around the world. As part of their safety program, employees fill in printed checklists, then send them to the Safety Officer, who enters the data in Excel. As you can imagine, this takes time, and is prone to data entry errors.
An Enticing Offer
Recently, I was asked if I’d like to test a digital pen and Capturx Forms for Excel. With it, I could create and print blank forms in Excel, then use the pen to fill them in. Later, that data could be imported into Excel, with one click of a button.
That sounded good, so I accepted the offer, and the pen and software arrived a few days later. If the product worked well, my client could test it in their plants, and possibly save some time and headaches.
Well, it took a while, but I’m finally done testing. I loved some of the features, but there were frustrations and disappointments along the way.
Stalling on the Installation
Installation was the first obstacle to overcome. Several components had to be installed before the Capturx program, and it took several tries before everything finally worked.
I won’t bore you with all the details, but I seriously considered putting everything back into the box and returning it.
I’m not sure if there was a problem with my hardware, or conflicting software, or something else. The documentation didn’t provide any tips for installation problems, nor did the company website. There’s product information online, but no search feature that I could find.
It’s Not You, It’s Your Printer
Thrilled at finally getting the program to work, I created a simple form, and was ready to test the digital pen. Oops! You need to print the forms on one of the compatible printers. I have a black and white laser printer, not one of the colour postscript laser printer on the list.
When I told the company rep about the problem, she sent some sample forms by courier. I was able to keep testing, without buying a new printer. Whew! Here’s one of the sample forms that I used for the test.
Also, while reading the printer information, I noticed that the dot pattern that’s printed on the forms “gets used up as you print.”
When the dot pattern is gone, you need to purchase more from the Adapx website. So, if you use this solution, you’ll have some ongoing costs.
The Good News
Once I was up and running, my mood definitely improved. I filled in a couple of forms with the digital pen, then docked the pen in its base. In Excel 2007, a Capturx tab appeared on the Ribbon, and with a single click, I imported the forms’ data.
I could compare the imported data to the original writing, and easily make changes where necessary.
From the Master Template sheet, I could create a summary of all the imported forms.
summary of all the imported forms
The summary cells are linked to the original sheets, so they’ll update if you change the forms’ data. However, new sheets aren’t added automatically. You have to delete the summary sheet, and create a new one.
A Few More Problems
I hit a few more snags while working with the Capturx Forms for Excel add-in. For example, it was painfully slow to move through the workbook. When I clicked on a different sheet tab, it took several seconds for the sheet to activate.
Excel has crashed a few times while using it, especially when trying the Sort Worksheets feature. When I deleted the Summary sheet, the sort feature worked, but it took more than 10 minutes to complete.
The sample workbook has 95 completed forms in it, which seems like a reasonable number. In a real life situation, you’d probably have many more forms than that.
Maybe the features work well in a smaller workbook, but that somewhat defeats the purpose of digital input.
The Final Word on Capturx Forms for Excel
I had high hopes for the digital pen and Capturx Forms for Excel, and some of those dreams came true. The pen worked like a charm, and even with my bad handwriting, there was a good recognition rate for the imported data.
For me, the main drawback is the slow performance. If you’re collecting lots of data, how could you manage it with this software? Maybe you could use Excel to import the data, then export it to Access, or another database.
Also, the Help could be better, with a search function on the website. For example, I couldn’t figure out how to create a Summary sheet, and nothing in the notes or built-in help provided any clues.
After several experiments, I finally got it working. The company is currently offering online training sessions, so that might help with some of the confusing features.
There’s potential for a great product, but Capturx Forms for Excel needs some improvement before I can recommend it to my clients.
The Movie
If you’d like to see the digital pen and Capturx Forms for Excel in action (I cut out the inaction bits), you can watch this short video.
Naming Excel sheets – how hard can it be? Last month, we looked at sheet names, and saw the problems that were caused by using an apostrophe. This week, I found another sheet name problem.
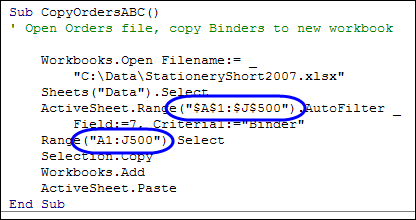
The file has a macro that creates individual sheets for each sales rep, filtering data from a master sheet, like the one shown below.
List of orders with sales rep names
Second Time Around
Mr. X said he could run the macro once, then got an error the next time he tried to run it. His email also included those dreaded words, “I made some changes.”
Unfortunately, there was no clue as to what those changes were, but at least he attached the problem file.
Instead of Rep names, he wanted to created a worksheet for each customer ID.
Sheets with Number Names
Sure enough, the macro created all the sheets, without problems, the first time it ran.
Then, as promised, I got an error the second time that it ran.
And mysteriously, the Data sheet had been cleared.
The Numbers Game
What happened? Well, the code runs though the list of Customer ID numbers, and if a sheet doesn’t exist for that number, it creates one.
If the sheet does exist, it clears the sheet, then adds the new data.
When the code got to customer ID 1, instead of clearing the “1” sheet, it cleared the first sheet, Data, which has an index number of 1.
To fix the problem, I changed the c.Value reference in the code to CStr(c.Value)).
Now, instead of looking for the sheet with an index number of 1, it looked for a sheet with a name of “1”.
Watch the Numbers
If you use numbers as sheet names, such as a sheet for each day of the month, be careful how you refer to those sheets in your code.
You don’t want to end up like Mr. X, with blank sheets, and error messages!
______________