
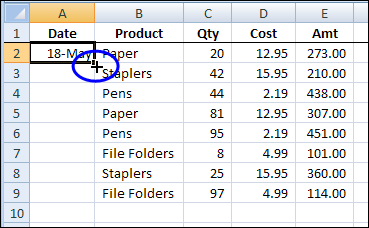
If you’re entering dates on an Excel worksheet, you don’t have to enter each date individually. Just enter the first date, in the top cell. Then, if there is data in the next column, you can use the Fill handle to quickly enter the rest of the dates. See how to AutoFill Excel dates in series or same date, with just a couple of clicks.
Continue reading “AutoFill Excel Dates in Series or Same Date”
Author: Debra Dalgleish
Drag a Text File Into Excel
Last month, I showed you how to drag information from a web browser into Excel.
Here’s the very short video that I posted, in case you missed it.
Drag Text Files Into Excel
You can also drag text files, to open them quickly in Excel.
I find this a really quick way to open a text file, especially if Windows Explorer is already open.
Drag Text File From Windows Explorer
Instead of using the Open command, or the Text Import Wizard, just drag a text file into the Excel window.
In the screen shot below, Windows Explorer is already open.
I’m dragging the text file, named MyDataFix.txt, onto the active Excel worksheet

Text File Data on Worksheet
After I drop the text file onto the worksheet, the text file opens automatically.
In the screen shot below, the data appears in separate columns in the worksheet, because the data was saved in a tab separated format.

___________
Pivot Table Formatting Old Style
Today, we’ll look at pivot table formatting, old style, but first, here’s an update. In the last blog post, you saw how to turn off buttons and drop downs in an Excel 2007 pivot table, and there are a couple of updates on that topic.
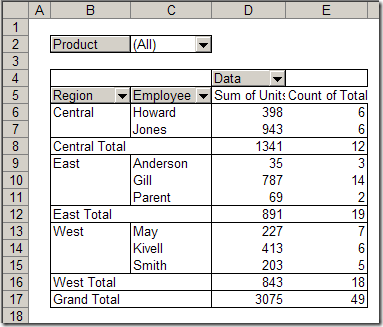
Hide Pivot Table Buttons and Labels
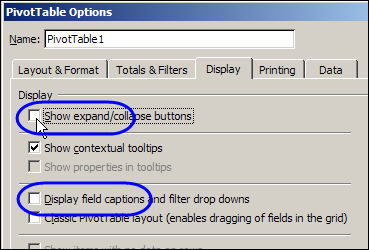
If you’re sharing an Excel pivot table with colleagues who aren’t too skilled in Excel, you might want to hide some of the pivot table buttons and labels before you send it.
Continue reading “Hide Pivot Table Buttons and Labels”
Trouble Aligning Excel Currency Symbols
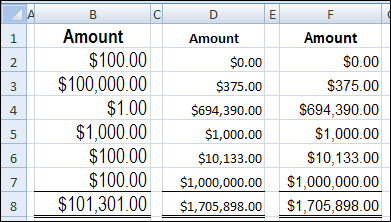
Every now and then I get a workbook from a client with numbers in Accounting format. If all the numbers are the same length, the currency symbols line up nicely. However, if the numbers are different lengths, we have trouble aligning Excel currency symbols.
Shorten Data Validation List With Excel Filter Macro
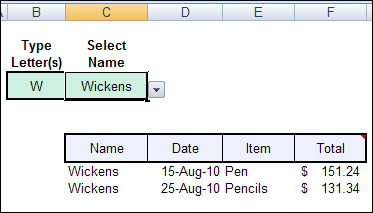
An Excel data validation drop down list only shows 8 items at a time, and with a long list of items, it might take you a while to scroll through that long list.
To make data entry easier, see how to shorten data validation list, by using a macro.
Continue reading “Shorten Data Validation List With Excel Filter Macro”
Excel Weight Loss Tracker in Stone
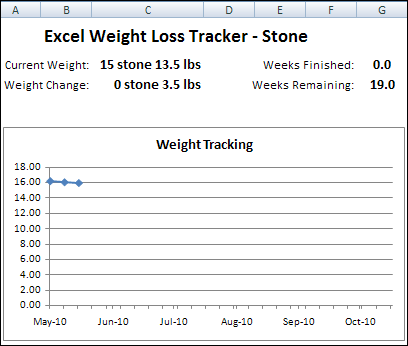
In January, you read about the Excel Weight Loss Tracker in which you could enter your current height and weight, and record your weekly weight loss. That version was in pounds.
A couple of people asked about a stone/pound version, so I’ve finally created one — just in time for swimsuit season!
Add a Macro Button to the Excel QAT
As part of the Excel programming series, I described how to run an Excel macro by adding a button to the Quick Access Toolbar (QAT).
Video: Add Macro Button to QAT
If you use a macro frequently, you can add its icon to the Quick Access Toolbar (QAT). There are written instructions below the video
Add Macro Button to QAT
In this example, there is a macro named ToggleR1C1. that I use frequently. The macro toggles the worksheet reference style from letters (A1 style) to numbers (R1C1 style)
The ToggleR1C1 macro is stored in my Personal Macro Workbook, which is named Personal.xlsb.
- Tip: Further down this page, there’s a video that shows how I recorded and edited the ToggleR1C1 macro
To add that macro to the QAT, I followed the steps below.
- First, at the right end of the QAT, click the drop down arrow
- Click More Commands
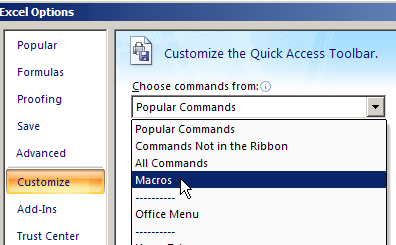
Excel Options Window
When the Excel Options window opens, the Customize category, at the left, is automatically selected.
- In the window pane at the right, near the top, click the drop down arrow for the “Choose commands from” setting
- In the drop down list, click on Macros
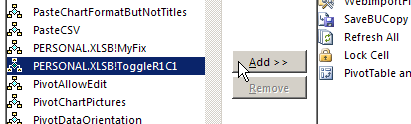
Select a Macro
- Next, in the list of macros, click the PERSONAL.XLSB!ToggleR1C1 macro
- PERSONAL.XLSB is the file name for the Personal Macro Workbook
- Then click the Add button, to move the selected macro to the Quick Access Toolbar
Choose Macro Button Icon
Next, follow these steps to add a picture (icon) to the Macro button
- At the right, in the QAT list, click the PERSONAL.XLSB!ToggleR1C1 macro
- Next, below the list, click the Modify button
- When the Modify Button dialog box opens, look for an icon will remind you of what your macro does.
- Next, click on the icon you want to use for the macro
- I used the 8-ball, because the macro switches headings from letters to numbers, or vice versa.
- Then, click the OK button, to close the Modify Button dialog box
- And finally, click the OK button, to close the Excel Options window

Use the Macro Button
When you’re back in Excel, the macro icon now appears on the QAT.
When you want to run your macro, just click its icon on the QAT.
New I can I click the 8 Ball icon, when I want to toggle the worksheet reference style from letters (A1 style) to numbers (R1C1 style)

Video: Record & Edit Macro to Toggle Styles
Watch this video, to see how to record your own macro, to change between R1C1 style (column numbers) and A1 style (column letters). Then, add a button for the macro on the Quick Access Toolbar.
Video: Add Excel Options to QAT
If you use the Excel Options window frequently, you can add a command to the Quick Access Toolbar, to open that window quickly.
In this video, I show how to turn off the Excel Option Boxes, with a setting in the Excel Options window. Next, I show how to add an Options command to the QAT, so the window opens with a specific tab activated
More Quick Access Toolbar Tips
Visit my Contextures site for more tips for using the Quick Access Toolbar with your macros, such as adding QAT buttons that run macros for a specific workbook only.
___________
Excel VBA Edit and Test a Macro
 In the Excel VBA Edit a Recorded Macro article, you saw the steps for making changes to an Excel macro that you had recorded.
The original range was 50 rows, and I increased both references, to make them each 500 rows.

Video: Edit & Test Excel Macro
I’ve uploaded a new video that shows the steps for editing the Excel macro, and stepping through the macro code by using the F8 key.
The full transcript is below the video
Video Transcript
I recorded a macro in Excel and now we’d like to make a little change to that macro and test it.
Here’s the workbook where I store the macro
And to get started, there’s a security warning here.
I’m going to click Options and click, Enable this content, and OK
Now the macros will run.
See Macro Code
To see that macro, I’ll go to the Developer tab, click Macros
Select my macro in the list, and click Edit
That opens the Visual Basic Editor, and I can see all the workbooks that are open.
Most of these are hidden and just working in the background, but here’s the workbook where I recorded and stored the code.
And those are the sheets, and here’s the module where the code is stored
See Recorded Macro Steps
In this macro, I can see all the steps that were recorded.
- It opens a workbook
- Goes to a sheet
- Range A1 on that sheet
- Turns on an AutoFilter
- Filters for Binders
- Selects range A1 to J50
- Copies it
- Adds a new workbook
- And pastes what we copied
The change I want to make is just making this a bit bigger range.
- Right now, it’s going to row 50, which is where the orders stop now
- I know that I’ll be adding more orders every month, so I’m going to change the 50 to 500
Change the Code and Save
I’ll change it there, and in the next line of code, that also had a 50
I’ve made the change, and to save that, I’ll go up to the toolbar, and click the Save button
Test Revised Macro
Now, to test this revised macro:
- I’m going to just click somewhere between the Sub, and the End Sub row
- I’ll click here, and on the toolbar, I’ll click Debug
- There’s a Step Into command, and the keyboard shortcut is F8
- I’ll click Step Into, and it highlights the first row in the macro
- I’ll press F8 on the keyboard, and that takes me down to the first line of code, which is Workbooks.Open
It’s highlighting the row in the code that it’s about to run
- When I press F8, it opens that workbook, and moves down to the next line of code
Here’s the workbook in the background now
- And it will go to the Data sheet
- I press F8, and it was already on the Data sheet, so nothing happened
- Then it’ll go to range A1, and turn on the AutoFilter
- I press F8 again, and you can see the filter arrow there now
The next line of code tells it to filter for Binder orders
- So F8, and now you can see the row numbers are blue, and some rows are hidden, so the filter has been applied
- Now it will select A1 to J500, when I press F8
- Then it copies, and F8 again, to add a new workbook
And you can see the blank sheet in the background now
- And now it will paste when, I press F8
- And I’m at the last row here, so when I press F8 again, it’ll just take me out of the macro
We have made a revision to the macro, we saved it, tested the macro, and it works fine.
We can just close our macro workbook now, and know that our revised macro works fine
____________
Track Golf Scores in Excel Annual Statistics
 I’d need wider columns to hold my golf scores, but this Excel template for golf scores might help you keep track of your annual progress.

Annual Summary
There’s also an annual summary sheet, that calculates your average score and best score for the year.

Conditional Formatting for Scores
The golf scores template uses conditional formatting to highlight the holes where you shot par or below par, so you can see at a glance how things are going.
You enter the course pars on the Summary sheet, and the conditional formatting is on the Scores sheet.

Name the Cell
Because conditional formatting won’t allow you to refer to cells on another sheet, I named cell B8 as CoursePar, and use that name in the conditional formatting formulas.
For example, the formula for par is:
- =B2=OFFSET(CoursePar,0, COLUMN()-1)

Download the Golf Scores Template
To download the Golf Scores template, go to the Excel Template – Golf Scores page on my Contextures website.
he zipped Excel workbook does not contain any macros — Excel formulas so all the work, after you enter the scores.
More Golf With Excel
If you’re organizing a golf tournament, you can organize the tee off times with another one of my Excel Golf templates.
Go to the Golf Tee Off Times page on my Contextures site, to download the Excel workbook.
The video below shows how the Tee Off Times file works.
______________