If you like to use keyboard shortcuts, you might have some of them memorized, in Word and Excel, or other programs.
If your memory isn’t too good, you can print a list of shortcuts and keep it near your computer as a reference.
A few months ago, I mentioned some sites where you can download lists of Excel keyboard shortcuts. It’s even easier to get a list of Word keyboard shortcuts. There’s a built in macro that you can run, to create the list.
Create a List of Word Keyboard Shortcuts
In Word 2003, click the Tools menu, click Macro, then click Macros.
In the Macros dialog box, click the dropdown arrow for ‘Macros in’ and select Word commands
In the list of macros, click on ListCommands, then click Run.
In the List Commands dialog box, click on Current menu and keyboard settings, then click OK
A new document will be created, with a table that lists all the keyboard shortcuts and menu commands.
Here’s another Windows tip that I found while cleaning my office. If you find a picture while surfing the Internet, you can quickly add that photo to your Windows desktop as a background.
The desktop photo is usually covered with documents, but it’s nice to see a happy face or calming scenery when you close all your files.
Add a Graphic to the Windows Desktop
Right-click on the graphic that you want to add to the desktop.
Click on Set as Desktop Background
From the Position drop down, select an option. (Center is my preference.)
One of my holiday projects was to clean out some old client files, and the five bags of shredded paper are evidence of my success. In one of the files, I found notes from Windows 98 training that I did for a client.
Obviously, a few things have changed, but most of the tips still work. I had forgotten that the desktop icons could be changed to work on a single click, instead of a double click. Here are the instructions, modified for Windows XP.
Create Single Click Icons
Note: This will also affect the files in your Window Explorer folders.
Double-click the My Computer icon
Click the Tools menu, then click Folder Options
Click the General tab
Under ‘Click items as follows’, click ‘Single-click to open an item (point to select)
Select the formatting option that you prefer (I don’t like underlining, so I selected ‘Underline icon titles only when I point at them’)
Occasionally it’s useful to see two main windows in Outlook 2007 at the same time. For example, if you’re clearing out your Inbox, you might want to check your Contact list, to see if someone’s name is already in there.
Instead of flipping back and forth between views, you can open a second window.
Show the Navigation Pane
If the Navigation Pane isn’t visible, click the View menu, then click Navigation Pane and click Normal.
To open a second window:
In the Navigation Pane, right-click on a button, such as Contacts.
Note: If the Navigation Pane is minimized, or the buttons are displayed as icons at the bottom of the Navigation Pane, you can right-click on those.
Well, it’s Christmas Eve, and you’re probably too busy to read a long blog post today. So, here’s a quick tip that I discovered this week.
I use Firefox as my browser, and when I need a new tab, I right-click in the tab area, then click on New Tab.
Now, I realize that isn’t a terrible hardship, but it’s much easier to create a new tab in other browsers, that shall remain nameless.
I know there’s a New Tab button, and I even added that to my toolbar, but never remember to use it.
Double-Click For a New Tab
This week, I accidentally double-clicked in the tab area, to the right of the last tab (or in the sliver of space above the tabs, if your aim is good), and presto! A new tab was instantly created.
It’s still two clicks, but for some reason I find this quicker and easier. It’s the small things. 😉
Most of my blog posts are about Microsoft Excel, but I use Microsoft Access every day too! I’ve got two big database for my own work, and I help several clients with their Access databases.
Save Your Access Files
If you use Access too, do you have Access databases open throughout the workday, with people entering and editing data?
A helpful feature in Access is that data is saved automatically as you work, as soon as you exit a record.
However, it’s a good precaution to have a backup of the entire file, so you can recover if something goes wrong.
Access Backup Tool
To make backups easy to manage, Jan Karel Pieterse has created the Access Backup Tool, available as a free download on his web site.
I tested it in Access 2007 and Access 2003, and it worked well in both version.
Getting Started
Open the Access Backup Tool and the Menu form will appear automatically.
Access Backup Tool Dialog Box
Access Backup Tool Settings
Next, click the Settings button in the Access Backup Tool Dialog Box.
That opens the Settings form, where you can enter the information about your databases.
Access Backup Tool Settings
In the Settings form, enter the file path to each database, and the location where you want the backup stored.
Timed or Manual Backups
At the top of the Settings form, you can enter the backup settings.
For automatic backups, add a check mark to Timed Backup, and set the time interval for the backups. Then the backup process will run automatically, at the specified interval.
For manual backups, remove the check mark for Timed Backups.
Suspend Backups Overnight
If backups aren’t required overnight, you can suspend them during specified hours.
To stop backups overnight, add a check mark to Suspend backup. Enter the stop and start times for the backups.
To run the backups around the clock, remove the check mark from Suspend backup
Start the Backups
After you’ve entered all the settings, close the Settings form and return to the Menu.
Timed Backups
On the Menu form, if you opted for Timed Backup, you’ll see the countdown to the next backup. At the specified interval, the backup will run, and you’ll see a notice on the menu.
Leave the Access Backup Tool running all day, and it will take care of the backups for you automatically.
Manual Backups
If you’d prefer to run the backups manually, click the Backup Databases button, and all the selected databases will be backed up.
A couple of years ago, a client sent me an invitation to LinkedIn, a business connection website. To be polite, I joined, but never visited the site again, and didn’t make any further connections.
A few months ago, I looked at LinkedIn again. I can’t remember why — maybe someone else invited me to connect, or I saw it mentioned in a blog post somewhere. I searched a few names, found people who I know, and sent them invitations to connect.
I still didn’t see much value in the website, but visited about once a week, to see what people were up to, and to try to find a few more old contacts.
New Features Added
LinkedIn also has groups that you can join. Some are invitation only, and others are public. The groups were an interesting way to find other people with similar interests, such as Excel Users, but not much use beyond that.
Recently though, discussions were added to the groups, so people can post a comment or question, and other members of the group can respond. Finally, there’s some value in belonging to the groups, if members are active in the discussions.
I’m in an alumni group, and a couple of Excel groups, and the discussions are lively and interesting. I visit a couple of times a week, and have made a few new contacts through the group discussions.
What will I do with all these contacts? Who knows? Maybe they’ll lead to consulting opportunities, or resources when I’m stuck on a project.
I’m reviewing Word files and inserting comments for the author. I’d like to see show Word comments in balloons along the sidebar, but Word won’t cooperate, and shows them in a Reviewing Pane, at the bottom of the window. Here’s how to fix the problem
Recently, I read a business article that said you should “become a Roman” to succeed in business. By that, the author meant, “be disciplined and willing to keep fighting”.
Excel ROMAN Function
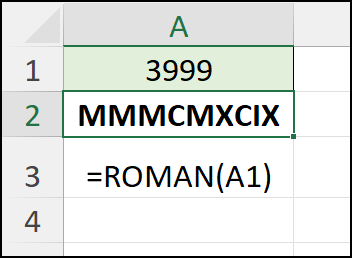
Maybe that’s why we have the Excel ROMAN function! It will quickly convert a worksheet number into Roman numerals.
That frees up our time, so we can “keep fighting” to fix other problems in our Excel files.
In the sections below, I’ll show you how the ROMAN function works. And I found a couple of fun facts about ROMAN, that might impress your friends and co-workers. (Or not!)
Excel ROMAN Function Syntax
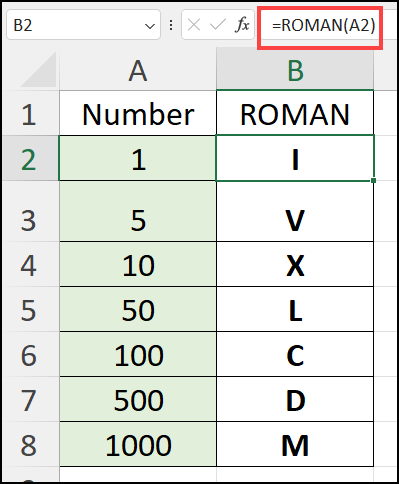
Here are the two arguments in the ROMAN function:
number: an Arabic number, between 0 and 3999, that you want to convert to Roman numerals.
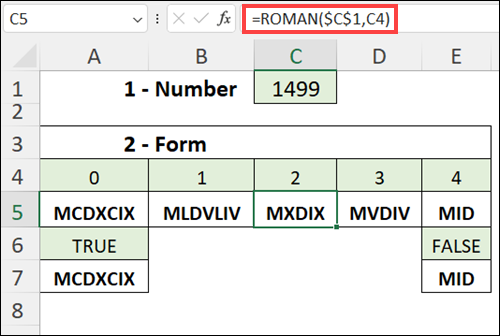
form: (optional) the type of conciseness that you want to display.
Last weekend a friend, aka Chauncey, who has some gardening knowledge, came over to help trim the trees and shrubs in the back yard.
About an hour later, much of the lawn was covered with branches, twigs and leaves.
It took another couple of hours to stuff everything into yard waste bags, and bundle the big pieces.
This week it’ll be taken to the city recycling centre, where it will be turned into compost or mulch.
It was way more work than I expected, but the catalpa tree, which was overgrown, now looks much better.
Chauncey claims it will flourish in the spring, without all the extra branches.
Clear the Office Too
When I got back to my office, I realized that I should do the same thing there.
So, next weekend I’ll clear out more of the deadwood in the office — old paper files, computer programs that I’m no longer using, RSS feeds that I never read, links to time-wasting web sites, and old email with large attachments that I don’t need.
All that stuff is slowing me and my computer down, and a few hours of work should make other things go faster when I’m finished the cleanup. I hope!