Excel Conditional Formatting Examples

image This week, there were a couple of Excel conditional formatting questions in the blog comments.

  • Ron asked about changing the font colour for the highest, second highest and lowest values.
  • Guido wants to highlight values that aren’t multiples of another cell’s value.

I’ll answer the questions here, so they’re easier to find. Maybe you’ve encountered similar conditional formatting problems, and this will help.

Change Font Colour for Top 3 Values

The first question is from Ron, who wants to change the font colour, instead of the fill colour:

I am trying conditional format a range of three cells where the FONT of the highest value in the range will be in Red follow by Blue and Green. I know it can be done using cell fill but, with a large spread sheet, it will look like dog’s breakfast. Any help would be appreciated. Also can this be done across worksheets (i.e. three different worksheet in the same file)

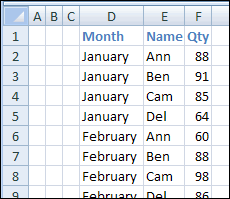
Ron didn’t say that the three cells were adjacent, in the same row, but I made that assumption in my example, shown below.

CondFormatFont01

To find the highest, second highest, and lowest values for cells C2:E2 with a worksheet formula, you could do the following:

  • To find the highest value, use MAX =MAX($C2:$E2)
  • To find the second highest value, use LARGE =LARGE($C2:$E2,2)
  • To find the lowest value, use MIN =MIN($C2:$E2)

The column references are absolute, so that all 3 cells in the row will refer to the same range.

You can use the same formulas in conditional formatting, compared to the active cell, and add the font formatting for each formula.

Format the Highest Value

To set up the conditional formatting for the highest value:

  • Select cells C2:E6, with C2 as the active cell
  • On the Excel Ribbon’s Home tab, click Conditional Formatting, and click New Rule
  • In the New Formatting Rule dialog box, under ‘Select a Rule Type’, click ‘Use a formula to determine which cells to format’
  • In the formula box, type the MAX formula: =C2 = MAX($C2:$E2) The first reference to C2 is relative, so each cell will check its value compared to the MAX in the $C2:$E2 range.
  • Click Format, and on the Font tab, select Red as the font colour, then click OK, twice, to close the dialog boxes.

CondFormatFont02

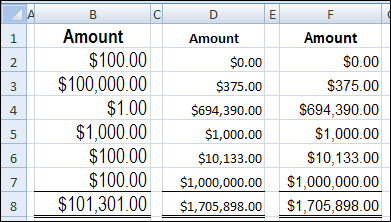
Now the highest values are highlighted in each row.

CondFormatFont03

Format the Second Highest Value

To set up the conditional formatting for the second highest value:

  • Select cells C2:E6, with C2 as the active cell
  • On the Excel Ribbon’s Home tab, click Conditional Formatting, and click New Rule
  • In the New Formatting Rule dialog box, under ‘Select a Rule Type’, click ‘Use a formula to determine which cells to format’
  • In the formula box, type the LARGE formula: =C2 = LARGE($C2:$E2,2)
  • Click Format, and on the Font tab, select Blue as the font colour, then click OK, twice, to close the dialog boxes.

Format the Lowest Value

To set up the conditional formatting for the second highest value:

  • Select cells C2:E6, with C2 as the active cell
  • On the Excel Ribbon’s Home tab, click Conditional Formatting, and click New Rule
  • In the New Formatting Rule dialog box, under ‘Select a Rule Type’, click ‘Use a formula to determine which cells to format’
  • In the formula box, type the MIN formula: =C2 = MIN($C2:$E2)
  • Click Format, and on the Font tab, select Green as the font colour, then click OK, twice, to close the dialog boxes.

Now the highest value in each row is highlighted in red, the second highest is blue, and the lowest is green.

CondFormatFont04

Conditional Formatting From Another Worksheet

To answer the second part of Ron’s question — conditional formatting won’t let you refer to cells on a different worksheet, or in a different workbook.

However, you can refer to a workbook level named range that’s on a different worksheet, but that wouldn’t help in the example shown above.

For example, you could highlight all the cells on Sheet1 that are higher than the maximum allowed, if the maximum is on Sheet2, in a range named MaxAmt.

=C2>MaxAmt

And here’s another example of referring to a named range in conditional formatting.

Highlight Cells That Are Not a Multiple of Another Cell

The next conditional formatting question came from Guido:

need conditional formatting based on the multiple of the number oin another cell. How to do that?
For ex: in the formatted cell can only be the multiple of the number in the other cell, otherwise it colours for ex red

To check this on the worksheet, you could use the MOD function:

=MOD(D2,C2)

The MOD function returns the remainder after a number is divided by divisor. If the result is zero, then D2 is a multiple of C2.

Highlight the Non-Multiples

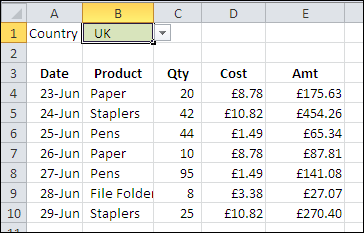
Shown below is the sample data for this conditional formatting example.

CondFormatMult01

To add the conditional formatting, and highlight the non-multiples in column D:

  • Select cells D2:D6, with D2 as the active cell
  • On the Excel Ribbon’s Home tab, click Conditional Formatting, and click New Rule
  • In the New Formatting Rule dialog box, under ‘Select a Rule Type’, click ‘Use a formula to determine which cells to format’
  • In the formula box, type the MOD formula: =MOD(D2,C2) <> 0
  • Click Format, and on the Fill tab, select Red, then click OK, twice, to close the dialog boxes.

Now the non-multiples in column D highlighted in red.
CondFormatMult02

More Excel Conditional Formatting Examples

There are more Excel conditional formatting examples on the Contextures website.
______________

Highlight Current Month Birthdays in Excel

August seems to be a very popular birthday month among my Excel friends. I won’t mention any names here, because most of them are quite elderly, and the shock might upset them. 😉 Anyway, to all of them, and you, if you’re celebrating this month — happy birthday!

Continue reading “Highlight Current Month Birthdays in Excel”

Conditional Formatting for Currency Symbol

If you sell products in several countries, you might want to show the prices in different currencies.

In Excel 2010 and later, you can use conditional formatting for currency symbol changes.

See how to use those settings, you can change the number format based on a cell’s value, to show a specific currency for the country that’s selected.

There are written steps and a video below

Continue reading “Conditional Formatting for Currency Symbol”

Temporarily Hide Excel Conditional Formatting

To highlight specific cells on an Excel worksheet, you can use conditional formatting.

In the example shown below, orders with a quantity greater than 50 are highlighted with green fill colour.

cells highlighted with green fill colour

Conditional Formatting Rule

This was the result of simple conditional formatting, based on the cell value.

Sometimes though, the conditional formatting can be distracting, and there’s no built in way to temporarily remove it.

Edit Formatting Rule dialog box

Create an On/Off Switch

Instead of removing the conditional formatting, you could add an On/Off switch to your worksheet. Then, adjust the rules, so you only show the conditional formatting when the switch is on.

In the screenshot below, there’s a cell named CondF_Show, and it has a data validation drop down for Yes and No.

cell named CondF_Show

Change Conditional Formatting Rule

I changed the conditional formatting to a formula that checks both the Quantity cell value, and the value in the CondF_Show cell.

Change Conditional Formatting Rule

On/Off Switch Set to No

After you revise the rule, when the CondF_Show cell is changed to No, the conditional formatting is temporarily hidden.

On/Off Switch Set to No

More Conditional Formatting Info

For more Conditional Formatting rules and advanced examples that use a formula, go to the Conditional Formatting Examples page on my Contextures site.

And here are a few more pages on my site, where you can learn more about Excel Conditional Formatting:

Fix Conditional Formatting Extra Rules

Conditional Formatting – Currency

Conditional Formatting – Documentation

Conditional Formatting – Data Bars

____________

Trouble Aligning Excel Currency Symbols

Every now and then I get a workbook from a client with numbers in Accounting format. If all the numbers are the same length, the currency symbols line up nicely. However, if the numbers are different lengths, we have trouble aligning Excel currency symbols.

Continue reading “Trouble Aligning Excel Currency Symbols”

Excel Irish Flag St Patrick’s Day Excelebration

Sometime in the 1840s, probably because of the famine, my dad’s ancestors left Ireland, and boarded a ship to Canada.

The details are sketchy, but I’m sure they had first class accommodations, and sat at the Captain’s table every night.

Continue reading “Excel Irish Flag St Patrick’s Day Excelebration”

Go Undercover With Hidden Excel Worksheets

hiddenAn Excel workbook certainly isn’t Fort Knox, and the information you store there isn’t too secure. If someone opens your Excel workbook, and is determined to see everything in there, they’ll probably be able to.

However, if your goal is simply to make a workbook easier for people to use, you can hide some of the worksheets, so users don’t accidentally change their contents.

For example, if your data entry worksheet has data validation drop downs, you can store the lists on a different sheet, and hide that sheet.

Hide an Excel Worksheet

To quickly hide a worksheet in Excel 2007, right-click on the sheet tab, and click Hide.

SheetHide01

If you’re using an earlier version of Excel, activate the sheet that you want to hide. Then, click the Format menu, then click Sheet, and click Hide.

SheetHide05

Show an Excel Worksheet

To show the hidden sheet again, right-click any sheet tab, then click Unhide. (In earlier versions of Excel, click the Format menu, then click Sheet, and click Unhide.)

SheetHide02

In the Unhide dialog box, click on a sheet name, and click OK.

SheetHide03

Really, Really Hide an Excel Worksheet

If you want to hide a worksheet a little better, you can use a special technique that keeps it from appearing in the Unhide list.

  • First, to open the Visual Basic Editor (VBE), press the Alt + F11 keys.
  • In the Project Explorer, at the left of the VBE window, locate your workbook.
  • In the Microsoft Excel Objects folder for your workbook, click on the sheet that you want to hide
  • If the Properties window is not showing, press the F4 key to open it
  • At the bottom of the Properties window, in the Visible property, change the setting to -2 – xlSheetVeryHidden
  • Close the VBE and return to Excel

SheetHide04

The sheet is now hidden, and its name won’t appear on the Unhide list.

Watch the Excel Hidden Sheets Video

To see the steps for hiding Excel worksheets, you can watch this short Excel video tutorial.

______________

Excel Codes Change to Scientific Notation

Let’s call this installment, “The Mysterious Case of the Vanishing Parts.” (Read carefully — that’s paRts, not paNts.)

Strange Formatting

Last Friday, I was working on a client’s Excel file, revising some VBA code.

The code splits a list of manufacturing parts into multiple columns, strips a couple of characters off the front of the part name, and copies the results to another column.

What Happened?

It seemed to be going well, until I got an email from my client, saying that some of the part numbers looked funny.

He included a screenshot, and indeed, those part numbers did look odd. Here’s an example, using some dummy data.

ScientificNotation01

Scientific Notation Formatting

“Aha!” I thought. (Yes, I actually talk to myself like that. 😉 )

Those parts were all numbers, so Excel just formatted them as Scientific Notation.

I could simply format the column as General at the end of the macro, to make them look right.

Unfortunately, it wasn’t that simple. When I clicked on one of the affected cells, the formula bar showed 220 as the actual part number.

So, if I changed the formatting to General, 220 is the part number that would be copied to other cells, later in the macro.

That would cause problems, because all the codes should have two digits, then a letter, and then numbers

Scientific Notation Formatting

Why Part Number Was Changed

After a bit more investigation, I found that the original part number wasn’t 220, it was 22E1.

Close, but manufacturing might be adversely affected if Excel starts making up new part numbers!

Because the original part number (22E1) started with numbers, followed by the letter E, then another number, Excel interpreted it as a number in Scientific Notation.

It converted that number to Excel’s style of Scientific Notation (exponential) formatting – 2.20E+02.

I’m sure Excel was trying to help, but that creates problems, just as it does when Excel changes 6-10 to a date for you, without asking.

The workaround to this unsolicited help is to force the data to be recognized as text, as Microsoft explains in its article:

Text or number converted to unintended number format in Excel.

Fixing the Problem

In my client’s macro, instead of formatting the parts column after copying the part names, I added an apostrophe at the start of each part name.

The apostrophe doesn’t show on the worksheet, but it tells Excel that the cell contents are text.

That solution left the “E” parts in their original format, and the problem was solved.

VBA Code Revision

Here’s the formula that is added in the VBA code:

.Range(“D2?).Formula = “=IF($A2<>$A1,””‘”” & $U2,””””)”

ScientificNotation03

Scientific Notation Explained

If you’d like to know how scientific notation works, in fairly simple terms, you can read this article: Scientific Notation

And for an even shorter and simpler description, here’s a short video in which a math teacher explains scientific notation.

And remember to do your homework!

_______________

Hide Duplicate Headings in Excel Report

A few weeks ago we looked at a way to fill blank cells in an Excel report, so you’d be able to filter or sort a table of data.

The downside of that technique is that it’s harder to pick out the sections in a report. The headings don’t pop off the page — they’re buried in a long list of items.

Continue reading “Hide Duplicate Headings in Excel Report”