Create an Excel UserForm

This week, I’ve been working on a client’s Excel file, and we’re using a UserForm for data entry, instead of worksheet cells.

image

Data Entry and Storage

Data can be entered in the UserForm, and stored in a worksheet, when the form is closed.

The UserForm could open automatically when the file opens, or put a button on the worksheet, and click that to open the form.

On the Contextures website, you can find instructions and sample workbooks, for creating a simple UserForm, or a UserForm with drop down lists.

Watch the Excel UserForm Videos

To see the steps for creating an Excel UserForm, you can watch this 3-part Excel Video Tutorial series.

You’ll see how to add a UserForm to your Excel file, then put text boxes and buttons on the form.

Demo – Excel UserForm for Data Entry Demo

Creating a UserForm – Part 1

In part 1, you’ll see how to create a blank Userform. Then you’ll name the UserForm, and next you’ll add text boxes and labels.

Users will be able to type data into the text boxes. Labels are added beside the text boxes, to describe what users should enter into the text box

Creating a UserForm – Part 2

In Part 2, you’ll learn how to add buttons and a title on the UserForm.

With buttons on the UserForm, a user can click to make something happen.

For example, click a button after entering data in the text boxes, when you’re ready to move the data to the worksheet storage area

Creating a UserForm – Part 3

In Part 3, you’ll learn how to add VBA code to the controls, and you’ll see how to test the UserForm.

The VBA code runs when a specific event occurs, such as clicking a button, or entering a combo box. In this example, the user will click a button, and the VBA code will move the data to the worksheet storage area

Creating a UserForm – Part 4

In Part 4, you’ll see the code that adds the items to the combo boxes.

____________

Drill to Detail With Excel Slicer Filters

With Slicers in Excel 2010, you can easily filter several pivot tables with a single click. In the screen shot below, the Slicers are filtering the Severity and Priority fields in the pivot table.

However, there is a problem with Drill to Detail with Excel Slicer Filters, in some version.

Continue reading “Drill to Detail With Excel Slicer Filters”

How to Spot the Old Excel File

imageI’m going cross-eyed this week, working with an Excel workbook that is full of rating tables.

Last week, I converted the rating manual from PDF format to an Excel file.

Setting Up Formulas

Now I’m setting up the formulas, to pull the correct rating data for the selected criteria.

Many of the tables have changed in structure from the previous version, so there are lots of adjustments required in the workbook.

While I work on the new version of the Excel file, occasionally I need to check the previous version, to see how things were set up there.

Don’t Edit the Wrong File

The danger in having multiple copies of an Excel file open is that you might accidentally make changes to the old file, instead of the new one. Of course, that’s never happened to me, but a close friend had that problem once. 😉

But seriously, as you flip between files, and click on different sheets in those files, it is easy to forget where you are.

You change a few formulas, add items to a list, and save your work. And that’s when you realize the you spent time editing the old file. Sigh.

Spot the Old File

Today, while working with the old file and the new one, I wanted a foolproof way to know which file was active. First, I thought about adding fill colour to the first few rows of each worksheet in the old file.

That wouldn’t work too well though, because there was colour coding in some of those cells already.

Then it dawned on me – I could colour all the sheet tabs in the old file. The file didn’t use tab colouring, so that would make it easy to tell the files apart.

Change Tab Colour

To add the tab colour in the old Excel file, I did the following:

  • Right-click on any sheet tab, and click Select All Sheets
  • Right-click on one of the tabs, and click Tab Color.

TabColourOld00

  • Click on the colour that you’d like to use for your old file – I picked bright pink – then click OK.

TabColourOld01

  • Right-click on one of the sheet tabs, and click Ungroup Sheets.

TabColourOld02

Now, it’s certainly easy to see which file is the old one. Don’t make any changes in the file with the pink tabs!

TabColourOld03

__________

Convert PDF File to Excel

pdftoexcelconverter00 When I got back to my office after a recent vacation, there was an email from Una, about a PDF to Excel conversion service, that she asked me to try.

There was also a big pile of emails from family, friends and clients, with more urgent requests. So, Una’s email got dropped into the Follow Up folder, with little chance of being looked at again.

Until today. And I’m very glad that I read that email – it saved me a few hours of work, and that will save my client some money!

Avoiding Data Entry

Today I met with a client who needs an insurance quote calculator updated. In the new version, we need to add a long list of motorcycle makes and models.

They gave me a printed copy of the manual, and it has several pages of lists that we need to add in the update. I asked if they could get an Excel or Word version of the manual, so we could copy the data from there, into our calculator file.

Even a PDF file would be better than nothing, so I asked for that, as a third option. I figured that I could use Adobe Acrobat to extract the text somehow, if a PDF file was all that we could get.

And, of course, a PDF file was the only option available.

Convert a PDF File

When my client sent the PDF file, I remembered Una’s email, and dug it out of the Follow Up pile. Here’s what she said about the PDF to Excel conversion service that she is promoting.

It is a free online PDF to Excel conversion service – http://www.pdftoexcelconverter.net  .

There are only few similar tools around and this tool has following advantages over them:

  1. It has no significant file size limitations (documents of up to 30MB can be converted)
  2. It’s web based and it requires no installation on the computer
  3. The table data in the PDF will be accurately represented
  4. As stated in our Privacy Policy user documents and email addresses are 100% safe.

Hmmm…Free…and safe…and free.

So, I clicked the link to the website, and uploaded the motorcycle manual. For some reason, I had to click the Browse button twice, before it worked.

pdftoexcelconverter01

In Step 2, I entered my email address, and click the Send button.

pdftoexcelconverter05

The file was about 3 MB and uploaded in about one minute.

pdftoexcelconverter02

Less than a minute later, there was an email from the website, with a link where I could download my converted file.

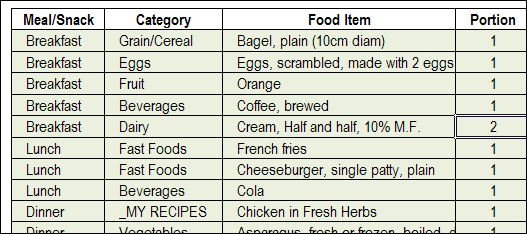
Data Converted to Excel from a PDF File

The email told me to click on the link below, and I did.

pdftoexcelconverter04

However, I didn’t notice that the first link was within the “Advertisement” section, and it took me to a product page for Investintech. They showed some of their fine paid products, like Able2Extract Pro, which I have used in the past, to convert PDF files to Excel. I didn’t want to buy anything though – I wanted to download my file.

I went back to the email, and scrolled down a bit further. There was the download link, for my converted Excel file. Clicking that took me to a page with a download link.

The instructions say to click the link, but it should tell you to click the button – that link isn’t clickable.

pdftoexcelconverter03

The file downloaded quickly, and when it opened, I was very impressed with the results. The tables were in good shape, and the lists will be easy to copy and paste into our Motorcycle Calculator file. I won’t have to spend a few hours typing those lists in the Excel file, or trying to convince someone else to do it!

Desktop PDF to Excel Converter

The http://www.pdftoexcelconverter.net website states that your privacy will be protected, but if you’re trying to convert confidential documents, you can use a desktop PDF converter instead. You’ll sleep better at night, knowing that all your files are securely locked up, with no possibility of accidentally going astray.

As I mentioned, I’ve used Able2Extract Pro, and found it easy to use, with excellent conversion results. Unfortunately, I didn’t have a copy available today, but this file wasn’t confidential, so the online version was fine for this conversion.

Able2Extract Pro

Convert PDF to Word Failure

As a side note, I also tried converting the PDF file to Word, to see if the lists would be easier to copy and paste. I used the PDF to Word site, operated by Nitro, and the upload went well.

pdftoexcelconverter06

About 6 hours later, I got an email that said, “Sorry, an unexpected conversion failure occurred when converting your file.” Good thing that I wasn’t depending on that site for a quick solution to my problem!

_____________

Separate Excel List with Automatic Lines

When you create a table in Excel, you can use the built-in styles, to add bands of colour.

ConditionalFormatSections

The colour bands can make the table easier to read, because you can follow each line across, using the colour as a visual guide.

Separate the Days in the List

If you’re working with a list of tasks or orders, sorted by date, those coloured bands don’t help you see where each day’s data starts and ends.

To make it easy to separate the days, you can add conditional formatting to the table. We’ll add a line at the start of each date, to highlight those rows.

  • Select all the cells in the body of the Excel table. In this example, cell A2 is the active cell, and A2:F9 are selected.
  • On the Ribbon’s Home tab, click Conditional Formatting, then click New Rule

ConditionalFormatSections02

  • In the New Formatting Rule dialog box, click Use a Formula
  • In the formula box, enter this formula, which compares the values in cells A1 and A2. There is a $ before each A, because we need an absolute reference to column A.
    • =$A2 <> $A1

ConditionalFormatSections05

  • Click the Format button
  • In the Format dialog box, click the Border tab
  • Select a border pattern and colour, to separate the dates. Unfortunately, you can’t select a thickness for the border line.
  • Click the top border in the preview window, and click OK

ConditionalFormatSections03

  • Click OK to close the New Formatting Rule dialog box.

There will be a border at the start of each date in the table, and you’ll see at a glance where the dates start and stop.

ConditionalFormatSections04

More Conditional Formatting Examples

You’ll find many more conditional formatting examples and tutorials on the Contextures website.

Watch the Excel Video Tutorial

To see the steps for adding lines between the dates, you can watch this short Excel video tutorial.

___________

Data Validation Documenter

If your Excel file has many cells with data validation, it can be difficult to remember what restrictions you’ve put on the worksheet cells.

These tips show you how to find the data validation cells, and create a list of what rules are on the cells.

Select All the Data Validation Cells

If you just want to see where all the data validation cells are, you can use the command on the Excel Ribbon.

  1. On the Excel Ribbon, click the Home tab
  2. In the Editing Group, click Find & Select
  3. Click Data Validation
Go To Data Validation

This command selects all the data validation cells on the active sheet.

datavaldocument02

Select Specific Data Validation Cells

If you have different data validation rules on the active sheet, you can select only the cells that have the same validation as the active cell.

In the example shown below, cell D6 is active, and it has a data validation drop down list, based on the named range — DaysList.

datavaldocument05

To select any other cells on the active sheet with the same validation rule:

  1. With cell D6 active, click the Excel Ribbon’s Home tab
  2. In the Editing Group, click Find & Select
  3. Click Go To Special
  4. In the Go To Special dialog box, click Data Validation
  5. Click Same, then click OK

datavaldocument03

In the screen shot below, cell D7 was also selected, because it has the same validation rule as cell D6.

However, cell D4 was not selected, because its drop down list is not based on the same named range.

datavaldocument04

Create a List of Data Validation Cells

The Go To Special commands let you select the data validation cells, but they don’t show you the data validation rules. You would have to check each cell, or group of cells, to see its data validation rules.

datavaldocument06

If you want the details on each data validation cell for the active sheet, you can use a macro that compiles a list of details.

On the Contextures website, there is a Data Validation Documenter page. On that page, you’ll find sample code that creates a list of data validation details for the active worksheet.

In the sample file, there are two macros –

  1. DataValDocumenter and
  2. DataValDocumenterSheet

Both macros create a list of the data validation cells on the active worksheet, with the following details:

  1. Cell address
  2. Data validation type
  3. Data validation formula.

The DataValDocument macro creates the list in a text file, named Test.txt, in Excel’s default file location.

datavaldocument08

To see your default location, click the Excel Ribbon’s File tab, then click Options, and click the Save category. (in Excel 2003, choose Tools | Options, General tab)

datavaldocument07

In the DataValDocumenterSheet macro, a new worksheet is inserted at the front of the workbook, with a list of the data validation on the active sheet.

datavaldocument09

Download the Data Validation Documenter

You can download the data validation documenter file from the Contextures website.

To run one of the macros:

  1. Click the Ribbon’s View tab, then click Macros (In Excel 2003, choose Tools>Macro>Macros)
  2. Select DataValDocumenter or DataValDocumenterSheet
  3. Click the Run button

_______________________

Select Actual Used Range in Excel Sheet

It’s easy to select the current range in Excel – just press Ctrl + A. That shortcut selects all the cells in the block that surround the active cell. The selection stops at the first blank row and blank column. But how can you select actual used range in Excel sheet?

Continue reading “Select Actual Used Range in Excel Sheet”