
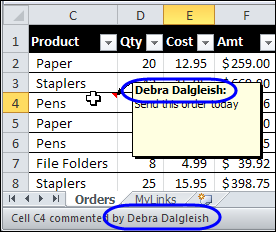
When you add a comment to an Excel worksheet, your name is added at the top of the comment. Your name also appears in the status bar, when you point to the cell that contains the comment.
Category: Excel VBA
Find Last Row With Excel VBA
 Recently, I complained about having trouble getting Excel VBA to correctly find the last row with data in a column, when using Excel tables. Thanks for the suggestions on solving that problem!
Jim Cone was intrigued by the find last row challenge, and from previous Excel adventures, Jim knew that Excel tables aren’t the only obstacle to finding the last row.
Universal Last Row Function
Jim decided to write a universal LastRow function for a…
- Worksheet
- Range (selection)
- Specific column – in a worksheet or range.
- List/Table
- Filtered data
Last Row in Selection
For example, the LastRow function shows that row 40 has the last value in column E, even though that row is hidden by a filter.

How to Find the Last Row
Covered with dust, and bits of Excel VBA code, Jim has finally emerged from his basement workshop. He sent me his Find Last Row sample workbook, which you can download at the link below.
Here’s what Jim had to say about writing the code:
- The (A) Find function and (B) Iteration of each column have advantages and disadvantages.
- The find function is faster, works on List/Tables but fails on a filtered range and occasionally throws up an unexpected error.
- The iteration method seems to be generally reliable but fails on both Lists/Tables and filtered ranges.
And Jim added more details:
- In the past, I’ve used different pieces of code to find the last row as different circumstances dictate, but finally decided to put together a one size fits all answer. The following code is what I came up with.
- Note that it is actually two functions (both are required).
- Use of the second function avoids a compile error in Excel versions prior to the 2003 version.
- The approach is to search using find and switch to iteration if an error occurs.
Thanks Jim!
Download the Sample Workbook
To see Jim Cone’s Excel VBA code, you can download the Find Last Row in a Column sample workbook. The file is in Excel 2003 format, and zipped. Enable macros when opening the file, if you want to test the code.
Jim has added a few Excel tables to the worksheet, which you’ll see in Excel 2007 and Excel 2010. In Excel 2003, those will appear as lists.
Click the button on the worksheet, to find the last row with data in the current selection.
Or, you can modify the “DoesItWork” sub, so it will find the last row on a worksheet or specific column.
________________
Move ListBox Items In Excel UserForm
Last week, we saw how to move items from one listbox to another on an Excel worksheet.
Now I’ve added a page on the Contextures website, with similar instructions for listboxes on an Excel UserForm.
Thanks to Dave Peterson, who provided both sets of sample code.
ListBoxes in Excel UserForm
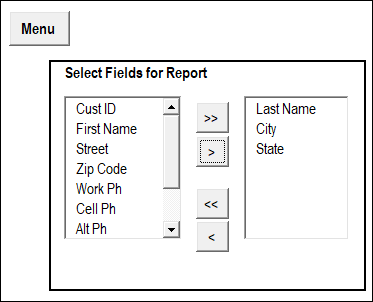
In the screen shot below, there is an Excel UserForm with two ListBoxes, and four command buttons, down the centre.
- The buttons with 2 arrows move ALL items from one list to the other, in the direction that the arrows are pointing
- The buttons with 1 arrow move the SELECTED items from one list to the other, in the direction that the arrow is pointing

Download the Move Listbox Items Sample File
To see the code, and test the ListBox move items code for a UserForm, you can download the ListBox UserForm Move Items sample workbook.
The file is in Excel 2007 format, and is zipped. It contains macros, so enable them if you want to test the code.
Related Excel VBA Tutorials
If you’re looking for a fun and exciting way to fill your holiday Monday, here are links to a few other UserForm and Excel VBA tutorials on my Contextures website:
Create an Excel UserForm Video
Excel VBA Edit Your Recorded Macro
______________________
Move Excel Listbox Items
To select specific items from a long list, you can create 2 ListBoxes on a worksheet.
Then, use arrow buttons to move all the items from one list to the other, or move selected items only.
ListBoxes on Worksheet
In the screen shot below, there are 2 ListBoxes, and 4 buttons with arrows, on a worksheet named CreateRpt.
- In the ListBox at the left, you can select one or more items that you’d like in a report.
- Then, click the 2nd button, with one arrow that point to the right.
- The selected items will move to the ListBox on the right.
OR
- You could click the. top button, to move all the items to the right-hand ListBox.
Items List on Worksheet
When you get started, the list at the left is filled with items. Those items come from a named range, on a worksheet named Admin.
You could modify that list, to include the items that you need in your ListBox.

Use the ListBoxes
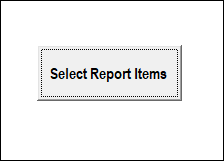
In the sample file that you can download, there is a Menu worksheet, with a navigation button, “Select Report Items”.
Click that button to go to the CreateRpt worksheet, where the ListBoxes are located.
Macro Runs Automatically
When the CreateRpt sheet is activated, an event procedure (macro) runs automatically.
The VBA code in that event procedure does the following steps:
- Clears both ListBoxes
- Adds all items from worksheet list, in ListBox at the left
Back to Menu Sheet
On the CreateRpt sheet, there is another navigation button, “Menu”, at the top left of the sheet.
Click that button, and a macro runs, to take you back to the Menu sheet.
Navigation Button Macros
The two navigation buttons run simple macros, and the VBA code is shown below.
First, here is the code that the Menu button runs:
Sub GoMenu()
Worksheets("Menu").Activate
End Sub
Next, here is the code that the Select Report Items button runs:
Sub GoRpt()
Worksheets("CreateRpt").Activate
End Sub
Read the Detailed Instructions
Thanks to Dave Peterson, who sent me the instructions and sample code for moving listbox items.
To see the details on how this technique works, visit the Excel VBA Move Listbox Items page on the Contextures website.
The tutorial shows, step by step, how to set up the worksheets, add the ListBoxes, and create the named ranges.
It also shows all of Dave’s sample code, for moving the items between the ListBoxes.
Download the Move Listbox Items Sample File
To see the code, and test the Listbox move items code, you can download the Listbox Move Items sample workbook.
The file is in Excel 2007 format, and is zipped. It contains macros, so enable them if you want to test the code.
Video: Move Listbox Items on Worksheet
To see the steps to create the Listbox example, you can watch this Excel video tutorial.
______________
Last Row Incorrect With Excel Table
When you’re working with Excel VBA, you might want find the last row with data, so you can paste new data in the row below that.
The following code works up from the last row on the worksheet, until it hits a cell with data. It’s like using the End key and Up arrow, to manually move from the bottom of the worksheet.
Sub GetLastRow()
Dim ws As Worksheet
Dim lRow As Long
Set ws = ActiveSheet
lRow = ws.Cells(Rows.Count, 1).End(xlUp).Row
MsgBox lRow
End Sub
In the sample sheet, the last data in column A is in row 10, and that’s the result when running the code.

Unexpected Result
This week, I was using similar code in a client’s workbook, to find the last row of data. The data was in a named Excel table, and the last couple of rows in the table were blank. I wanted to find the last row with data, so I could change the table definition, to end at that last row.
When I used the same Excel VBA code, the last row wasn’t what I expected – it found the last row in the named table, even though that row was empty.

I’m sure that information is helpful in some situations, but it sure wasn’t going to help me resize the table!
My Last Row Workaround
There might be a more sophisticated solution to this problem, but I added a line of code to resize the table, so it ends at row 2.
Then, the code found the correct last row of data, and resize the table to end at that row.
Sub ResizeTheTable()
Dim ws As Worksheet
Dim lRow As Long
Set ws = ActiveSheet
ws.ListObjects(1).Resize ws.Range("$A$1:$H$2")
lRow = ws.Cells(Rows.Count, 1).End(xlUp).Row
ws.ListObjects(1).Resize ws.Range("$A$1:$H$" & lRow)
MsgBox lRow
End Sub
That fixed the problem, and the table resized correctly.

A Better Solution?
Have you run into this problem with named Excel tables? How did you solve it?
Video: Create an Excel Named Table
When you work with lists in Excel, use the built-in Table feature, to make it easy to sort and filter your data. This short video shows the simple steps
____________
Prevent Invalid Entries in Excel UserForm
In an Excel UserForm, you can use combo boxes, to show users a drop down list of items. If all goes well, the users will select an item from the list, and life will be good.
However, the occasional user likes to get creative, and types an entry that isn’t in the drop down list. And that can cause problems!
To restrict those creative users, you can set the MatchRequired property for the combo box to True.

Add a Select Item
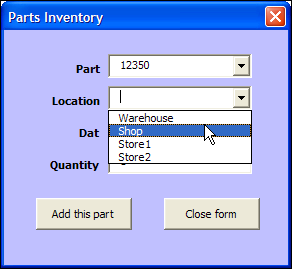
Changing that MatchRequired property can cause problems though. In this example, the Excel VBA code also tries to clear out the combo boxes, after adding an order to the parts database sheet.
Because an empty string isn’t a valid entry, an error message appears — “Invalid Property Value”.

To prevent that error from appearing, you can add “Select” as the first item in the drop down list, and reset the combo boxes to that item, instead of clearing them out.

Download the Sample Combo Box Workbook
To download the sample file, go to the Excel Templates page on my Contextures site. In the UserForms section, look for UF0026 – Prevent Invalid Entries in UserForm.
The file is in Excel 2003 format, and zipped. Enable macros after opening the workbook.
Watch the Excel UserForm Combo Box Match Video
To see the steps for changing the MatchRequired setting, and editing the code, you can watch this short Excel video tutorial.
_________________
Show UserForm When Excel File Opens
To help users enter data in a workbook, you can create an Excel UserForm, with text boxes and combo boxes. Then, with a quick bit of code, you can show UserForm when Excel file opens, so the form is easy to find and use.
Worksheet Data Entry or Excel UserForm
If you’re building an Excel workbook, in which users with basic Excel skills will enter data, would you create a worksheet data entry form?
In the screen shot below, you can see an example.

Excel UserForm
Or, do you prefer to build an Excel UserForm?
In the screen shot below, you can see a simple UserForm.

Worksheet Data Entry
With the worksheet method, you can
- hide the data sheets, and protect the data entry sheets, so users can only enter data in the unlocked cells.
- add a few navigation and function buttons, to help users with basic Excel skills.
An advantage is that you’re using built-in Excel features, like data validation and formulas, so you can reduce the development time.
Excel UserForm
The UserForm method takes longer to develop, because you’re adding another layer to the project. Advantages to this method include:
- combo boxes, which can be formatted, and have autocomplete (unlike data validation drop downs)
- tab order control, which isn’t available on the worksheet, where pressing the Tab key simply takes you to the next unlocked cell.
Which Would You Pick?
Both methods work well, and can be customized to be user-friendly and fool-resistant (nothing in Excel is fool-proof!) Programming would be required in both versions, to help with navigation, and to move data to the storage worksheets.
- The worksheet method is quicker and easier to create and maintain, and a project might take 4-5 hours to complete.
- The UserForm method is more sophisticated, and takes longer to build and maintain. The UserForm version of the same project might take 8-10 hours.
Which method would you use?
____________
Show Excel Scenarios With Excel VBA
Previously, we looked at using Excel Scenarios to compare high, low and medium budgets, all in the same worksheet cells.
To make Excel Scenarios easier to use, you can add a bit of Excel Scenario programming.
Make a List of Scenarios
First, create a list of scenario names, using the ScenarioList code shown below.
Next, add a data validation drop down list, so users can select one of the scenarios.

Excel Scenario Selection Code
Add the following code to the worksheet module, to change the scenario, when a selection is made in the data validation drop down list.
Private Sub Worksheet_Change(ByVal Target As Range)
On Error GoTo errHandler
If ActiveSheet.Name = Me.Name Then
  If Target.Address = Range("Dept").Address Then
    ActiveSheet.Scenarios(Target.Value).Show
  End If
End If
Exit Sub
errHandler:
  If Err.Number = 1004 Then
    MsgBox "That Scenario is not available"
  Else
    MsgBox Err.Number & ": " & Err.Description
  End If
End Sub
Create a List of Excel Scenarios
To automatically create a list of scenarios, to use in the data validation drop down list, you can use Excel VBA.
This procedure creates a list of scenarios from the Budget worksheet, and sorts the list alphabetically.
Sub ScenarioList()
Dim sc As Scenario
Dim wsBudget As Worksheet
Dim wsLists As Worksheet
Dim iRow As Integer
iRow = 2  'leave row 1 for heading
Set wsBudget = Worksheets("Budget")
Set wsLists = Worksheets("Lists")
wsLists.Columns(1).ClearContents
wsLists.Cells(1, 1).Value = "Scenarios"
For Each sc In wsBudget.Scenarios
  wsLists.Cells(iRow, 1).Value = sc.Name
  iRow = iRow + 1
Next sc
With wsLists
  .Range(.Cells(1, 1), .Cells(iRow - 1, 1)) _
  .Sort Key1:=.Cells(1, 1), _
      Order1:=xlAscending, Header:=xlYes
End With
End Sub
More Excel Scenario Programming
Visit the Contextures website for more examples of Excel Scenario programming.
For example, if you want users to add more scenarios, turn off the error alert in the data validation cell.
Then, add a worksheet button that they can click, to add new scenarios.

___________________
Fix Blank Excel Cells Copied From Database
When you copy data to Excel, from another application, blank cells in the data can cause problems. Everything looks okay, at first glance, but the database blank cells don’t behave like other blank cells in the workbook. See how to fix blank Excel cells copied from a database, or created within Excel.
Continue reading “Fix Blank Excel Cells Copied From Database”