When you click that command, your web browser opens, and takes you to the PowerPivot Help forums on the Microsoft website.
That’s a nice feature, if you’re struggling with PowerPivot.
Ask Questions command on PowerPivot Ribbon
Where Do You Ask Excel Questions?
Why doesn’t Excel have an Ask Questions command? We have questions too! (A moment of silence for the old Excel newsgroups.)
The closest thing that I could find is a Contact Us command, which leads to the Microsoft website.
Contact Us command in Excel
Microsoft Answers Forum
At the bottom of that page is a link that leads to the general Answers form – not to an Excel related forum. It takes a couple more clicks to get to the Excel section.
Ask Excel Questions
Maybe that Ask Questions command will be in the next version of Excel. Until then, here are links to the Excel help forums on the Microsoft site.
Last week, Seth Godin recommended hiring a geek to help you save an hour a day.
Well, you’re a geek, so you don’t have to hire one! Just pay attention as you run through your morning office routine, and answer this question:
What can you change about your Excel habits, to save an hour a day, or even a few minutes?
Then, make the change.
Doing Steps Manually
Every morning, I follow these steps:
download some website statistics to Excel,
crunch the numbers, and
save the raw data file.
Fortunately, I have a macro that does the first 2 steps. For some reason, I was doing the last step manually. Don’t ask me why.
Excel is a bit slow when opening the Save As dialog box, so that final step was taking 30-60 seconds. Not a huge productivity drain, but why do something manually, if it can be easily automated?
Make It Automated
To get rid of that manual step, I added a few lines of code to the existing macro. The Excel VBA code saves a copy of the active workbook, into the Backup folder, and adds the previous day’s date to the file name.
It only took me a couple of minutes to add the code, so the time invested was quickly repaid. Now I just have another 59 minutes to trim!
Macro Code to Save Daily File
'------
Sub SaveDailyData()
Dim wbData As Workbook
Dim strDir As String
Dim strName As String
Dim strExt As String
Set wbData = ActiveWorkbook
strDir = "C:\Backups"
strName = "DailyData_" & Format(Date - 1, "yyyymmdd")
strExt = ".xls"
wbData.SaveCopyAs strDir & strName & strExt
wbData.Close SaveChanges:=False
End Sub
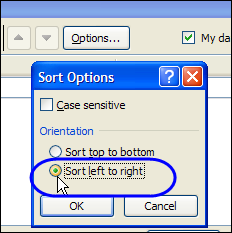
Most of the time when you’re sorting in Excel, you sort based on the values in one or more columns.
If your workbooks are like mine, it’s rare that you sort horizontally, based on the values in a row. But if you need to do that, here’s how to sort a row in Excel.
If you have been using the Ribbon in Excel 2007 or Excel 2010 for a while, you can probably find most of the commands that you need. It’s those infrequently used commands that cause the problems. You knew where they were on the old menu bar, but where the heck are they on the Ribbon?
[Update: This Microsoft download is no longer available]
The Office Labs people at Microsoft have taken pity on our poor, fumbling fingers, and come up with a solution – the Search Commands add-in. This free tool lets you type the name of a command, and magically find it. Think of all the time that you’ll save!
For now, at least, the add-in is only available in English, and works in Word, Excel and PowerPoint. It requires Windows XP, or later, operating system.
Download the Search Commands Add-In
To install the Search Commands add-in, go to the download page on the Microsoft site.
Optional – Click on the plus signs, to see
Details
System Requirements
Install Instructions
Then, click on the Download button, to get the file. Next, run the downloaded file, to install the add-in.
Search for Commands
After you run the setup program, to install the add-in, a Search Commands tab automatically appears on the Ribbon.
In the Search box, at the left end of the Ribbon, type the name of the command that you want to use. For example, if you can’t find the command to protect the worksheet, type “Protect” or “Protect Sheet”.
Click the magnifying glass symbol, to start the search
One or more commands that match your search term will appear in the search results section, to the right of the search box.
If there are several commands that match your search words, you might need to use the Previous and Next buttons to scroll through the list of commands.
For example, if you type “Protect”, instead of “Protect Sheet”, there are 16 commands found, shown on 2 pages.
Use the Search Results
If the search results include the command that you were looking for, just click on it, to run that command. Quick and easy!
And to find out where that command lives on the Ribbon, point to the command, before you click it. The popup description shows the location of the command, by listing the Tab, command group, and command name.
It’s funny – I didn’t realize that the Protect Sheet command was also on the Home tab. I expected it to point to the command on the Review tab. It must look for the first instance of the command in the Ribbon tabs.
Also, the location description doesn’t mention that you have to click the Format command, to see the Protect Sheet command, so you might need to do a bit of searching, to find the exact location.
Commands Not in the Ribbon
Another nice feature of the Search Commands add-in is that it even finds some commands that aren’t in the Ribbon.
For example, if you type Pivot, it shows the PivotTable and PivotChart Wizard command.
Room for Improvement
The Search Commands add-in is a work in progress, so it’s not perfect yet.
It should have full descriptions of the location, as mentioned in the Protect Sheet example above.
The Search Commands tab doesn’t shrink, when you make the Excel window narrower, like other tabs do.
Include settings that are in the Excel Options window, like hiding zeros on the worksheet, or changing to R1C1 Reference Style.
What features would you like to see in the add-in?
Customize Excel Ribbon Tab
You can also customize the Excel Ribbon, by moving or removing the groups on a default Ribbon tab. In this video, see how to move groups on the Data tab, so the tools that are used most often are in the middle of the tab, and easier to reach.
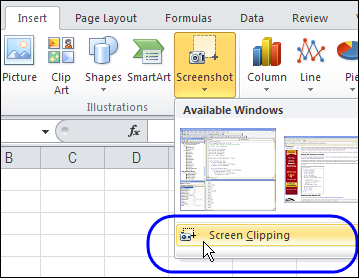
After all the fun with SmartArt charts last week, I finally noticed the Screenshot command, that’s right beside SmartArt. With the Screenshot command, you can capture an image of an entire window, or use Screen Clipping for a smaller image.
If you work with data in Excel, you know what a mess it can be. I help my customers clean up data that they’ve imported from another computer system, or from reports received from another department or group.
Those files can be filled with spelling mistakes, strange abbreviations, extra spaces or missing punctuation.
Over the past few days, I’ve been without my desktop computer, which is on its way back to the repair shop.
Fortunately, most of my files were available on the external hard drive, and online storage, so there were no major catastrophes. Well, none that I’ve discovered yet!
Personal Macro File
Unfortunately, my personal Excel macros add-in file wasn’t backed up, so I had to work without it for a while.
You don’t realize how often you use something, until it’s missing!
Your Desert Island Excel Files
My Excel tip for you today is – Remember to back up ALL your Excel files, including the add-ins, toolbars, and other key files.
Imagine that you and your laptop will be abandoned on a desert island.
Do you have everything installed that you’ll need for Excel survival?
Or will you be voted off the island?
Check Your Backup System
Make sure your backup system is copying files from the C:Documents and Settings/YourName/Application Data/Microsoft folder, such as the Addins and Excel files.
Check Your Backup System
Island Internet Access
And let’s hope that desert island has internet access, so you can send email to your clients, and use the files that you have stored in your online storage folders!
What are your desert island backup plans?
__________
You probably use defined names in some of your Excel workbooks. We’ll look at a built-in way to list the names in a workbook, and see some Excel VBA code that creates a more detailed list of names.
For example, if you have entered a list of the products that you sell, you could select the list, and name the range reference as ProdList.
Then, that product list could be used in an order form.
Table Names
If you created Excel Tables, in Excel 2007 or Excel 2010, they are automatically named.
Later, you can change the names to something meaningful, such as ProdTable, for a list of products and their prices.
Create a List of Names
If you’re working on a complex Excel workbook, it’s easy to lose track of what you’ve named, and where the named ranges are located.
For reference, you can print out a list of names, using a built-in feature in Excel.
To paste a list of workbook level names in Excel:
Insert a blank worksheet
On the Excel Ribbon, click the Formulas tab
In the Defined Names group, click Use in Formula, and click Paste Names (the keyboard shortcut is F3)
paste a list of workbook level names in Excel
Paste Name Dialog Box
Next, in the Paste Name window, click the Paste List button.
Paste Name Dialog Box
Names List on Worksheet
A list of defined names and their formulas is pasted into the worksheet.
Note: To see worksheet level names, use the Paste List feature on the worksheet where those names are defined.
Create Names List with Excel VBA Macro
The built-in names list feature is helpful, but if you need more details, you can create your own list, by using Excel VBA.
This macro adds a new sheet to the active workbook, with a list of the non-hidden defined names, with details for each name, if available.
A – Name;
B – Refers To formula;
C – Number of cells in the range;
D – Sheet name where range is located;
E – Address on worksheet;
F – Scope (workbook or worksheet)
Sub ListAllNames()
Dim lRow As Long
Dim nm As Name
Dim wb As Workbook
Dim ws As Worksheet
Dim wsL As Worksheet
Dim wsName As String
Dim shName As String
Dim myName As String
Dim nmRef As String
Dim nmAddr As String
Dim nmRng As Range
Dim nmSc As String
Dim lCells As Long
Set wb = ActiveWorkbook
Set ws = ActiveSheet
Set wsL = Worksheets.Add

wsName = ws.Name

With wsL
    .Range("A1:F1").Value = Array("Name", _
        "Refers To", "Cells", "Sheet", "Address", "Scope")
    lRow = 2
End With

On Error Resume Next
  For Each nm In wb.Names
    If nm.Visible Then
      Set nmRng = nm.RefersToRange
      myName = nm.Name
      nmRef = "'" & nm.RefersTo
      lCells = nmRng.Cells.Count
      shName = nm.RefersToRange.Parent.Name
      nmAddr = nm.RefersToRange.Address
      If TypeOf nm.Parent Is Workbook Then
        nmSc = "Wb"
      Else
        nmSc = "Ws"
      End If
      wsL.Range(wsL.Cells(lRow, 1), wsL.Cells(lRow, 6)).Value _
         = Array(myName, nmRef, lCells, shName, nmAddr, nmSc)
      lRow = lRow + 1
      Set nmRng = Nothing
      myName = ""
      nmRef = ""
      lCells = 0
      shName = ""
      nmAddr = ""
      nmSc = ""
    End If
  Next nm

With wsL
  .Rows("1:1").Font.Bold = True
  .Columns("A:F").EntireColumn.AutoFit
End With

End Sub
Download the Names List Sample File
To get the sample workbook, and the Names List code, go to the Excel Names Macros page on my Contextures site.
The file is zipped, and in Excel xlsm file format, and it contains macros.
___________


 Over the past few days, I’ve been without my desktop computer, which is on its way back to the repair shop.


