
 Male or female? English or French? Yes, No or Maybe? Those are just a few of the choices that you can make with Option Buttons in Excel. When people select answers with Excel Option Buttons, you can provide a list of possible answers to a questions, and users can only select one answer from the list.
Option Button Questions
You can use Option Buttons instead of Data Validation drop down lists, or instead of allowing free form answers. Do you use Option Buttons? Love them? Hate them?

Get Ready to Add Excel Option Buttons
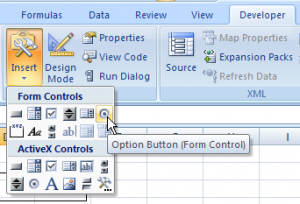
To add Option Buttons in Excel 2007, you’ll use commands on the Ribbon’s Developer tab.
If you don’t see that tab on your Excel Ribbon, follow the instructions here: Show the Developer Tab on Excel Ribbon
Add a Group Box
To connect a set of Option Buttons to one another, you can enclose them in a Group Box control on the worksheet. By using Group Boxes, we could have one set of Option Buttons that show Language choices, and another set of Options Buttons for Age Group.
Without Group Boxes, all the Option Buttons on the worksheet would be connected, and you’d only be able to select one at a time. So, if we want users to answer two different questions, we’d create two Group Boxes for the Option Buttons.
To add a Group Box:
- On the Excel Ribbon, click the Developer tab
- In the Control group, click Insert
- In the Form Controls section, click the Group Box command, to activate that tool.

- Click on the Excel worksheet, where you’d like the top left of the Group Box to appear.
A Group Box is created, with the default name of Group Box 1.

Modify the Group Box
You can change the Caption and size of the Group Box, to suit your needs.
To change the Group Box Caption:
- With the Group Box selected, drag over the Caption text, to select it.
- Type a new Caption for the Group Box.
In the screenshot below, I’ve changed the Caption from Group Box 1 to Language.

To change the Group Box size:
- With the Group Box selected, point to one of the round white handles on its border.
- Drag the handle in or out, to change the size of the Group Box.
- You’ll see an outline as you drag the handle, so release the mouse button when the outline is the size that you want,
In the screenshot below, I’ve dragged the bottom right handle up and to the right, to make the Group Box shorter and wider.

Add the Option Buttons
Now that the Group Box is created, you can add the Option Buttons inside the Group Box.
- On the Excel Ribbon’s Developer tab, in the Controls group, click Insert
- In the Form Controls section, click the Option Button command, to activate that tool.
-
- Click inside the Group Box, where you want the top left of the Option Button to appear.
- The entire Option Button and its Caption must be within the Group Box, so adjust the Group Box size, if necessary.
In the screenshot below, I had to make the Group Box a bit taller, to fit the Option Button 2.

Modify the Option Buttons
Add as many Option Buttons as you need in the Group Box, so there’s one for each possible answer. Then, you can change the Option Button captions.
To change the Option Button Caption:
- Right-click on the Option Button, and click Edit Text.
- Select the existing Caption text, and type the new text for that Option Button
In the screenshot below, I’ve changed the Option Button Captions to English and French.

Test the Option Buttons
After you’ve created the Group Box, and added the Option Buttons, you can test the Option Buttons.
- When you click a button, a black circle should appear in it.
- All the other Option Buttons should change to white circles.
- If one or more of the Options Buttons don’t work correctly, adjust the Group Box size to enclose the entire Option Button and its label.

Store the Option Button Selection
On the worksheet, you can see which option has been selected in each Group Box. If you want to use that selection in a formula, or store it in a list, you can link the results to a worksheet cell.
To link the Option Box to a cell:
- Right-click on any one of the Option Boxes in the Group Box.
- In the popup menu, click Format Control

- In the Format Control dialog box, click in the Cell link box
- On the worksheet, click the cell where you want to store the Group Box selection number.
- Click OK
In the screenshot below, the Option Box is linked to cell C3 on a sheet named Results.

Now, when you click on one of the Option Boxes in the Group Box, the Option Box’s number will appear in the linked cell. The number is based on the order in which you created the Option Boxes.

You could use that result in a formula, such as, =IF(Results!C3=2,”Bonjour”,”Hello”)
Creating a Survey Form
To see an example of Option Boxes in a survey form, take a look at Dave Peterson’s Excel Survey Template. It uses programming to create the Group Boxes and Option Boxes.
Watch the Option Button Video
To see the steps for creating a Group Box with Option Boxes, watch this short Excel Option Buttons video.
_____________
You rock Debra! Finally someone does exist in this world who can explain option buttons to a novice. I had trouble creating multiple option buttons on one form and I was not aware of group box command. Thank you.
Dear Sir,
I rally appreciate and very thankful for this web help. I made company CSI format which appreciated by everyone.
Really thankful of you.
Regards
Atul
Question: I am completing a report form. I did not create the form, which is password protected. When I select an answer using the radio buttons, they become skewed on the page. Is there a way I can stabilize the radio buttons? Thanks for your assistance.
Could you please advise if it is possible to extract the caption text based on selection in option group which consists of 3 option buttons?
Thank you very much.
Excel 2010: I have a group box with 3 option buttons. All the option buttons are inside the border of the group box (including the text for the option button). Only 2 of the 3 buttons function properly. I have a yes, no and n/a. Instead of only being able to choose one of those three, it allows for both yes or no AND n/a to be selected at the same How do I copy a group of buttons to a new cell and rename the group (I want to have several group sets on same worksheet and don’t want to have to create every time.
Unfortunately this does not work when your using more than 2 buttons with different values or text on them as the (=IF) only knows “true” and “false”. So you can not ad a value to your 3rd, 4th, 5th etc buttons. Any help to make this work would be much appreciated. Cheers
Unfortunately this does not work when your using more than 2 buttons with different values or text on them as the (=IF) only knows “true” and “false”. So you can not ad a value to your 3rd, 4th, 5th etc buttons. Any help to make this work would be much appreciated. Cheers
Yeeha I figured it out I think. Here’s my formula for using more than 2 buttons. =IF(S12=1,”9″)+IF(S12=2,”6″,”0″)
Use only the true value in first command. False value not placed. You can continue to do this for as many buttons you like.
I think, it seems to work!!