
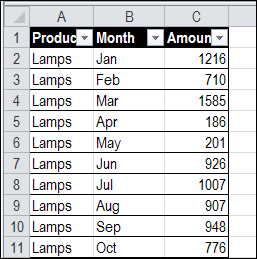
If your Excel data is in monthly columns, like the worksheet shown below, you’ll have trouble setting up a flexible pivot table. Instead of leaving the data like this, see how to normalize data for Excel pivot table setup.
Author: Debra Dalgleish
Find Last Row With Excel VBA
 Recently, I complained about having trouble getting Excel VBA to correctly find the last row with data in a column, when using Excel tables. Thanks for the suggestions on solving that problem!
Jim Cone was intrigued by the find last row challenge, and from previous Excel adventures, Jim knew that Excel tables aren’t the only obstacle to finding the last row.
Universal Last Row Function
Jim decided to write a universal LastRow function for a…
- Worksheet
- Range (selection)
- Specific column – in a worksheet or range.
- List/Table
- Filtered data
Last Row in Selection
For example, the LastRow function shows that row 40 has the last value in column E, even though that row is hidden by a filter.

How to Find the Last Row
Covered with dust, and bits of Excel VBA code, Jim has finally emerged from his basement workshop. He sent me his Find Last Row sample workbook, which you can download at the link below.
Here’s what Jim had to say about writing the code:
- The (A) Find function and (B) Iteration of each column have advantages and disadvantages.
- The find function is faster, works on List/Tables but fails on a filtered range and occasionally throws up an unexpected error.
- The iteration method seems to be generally reliable but fails on both Lists/Tables and filtered ranges.
And Jim added more details:
- In the past, I’ve used different pieces of code to find the last row as different circumstances dictate, but finally decided to put together a one size fits all answer. The following code is what I came up with.
- Note that it is actually two functions (both are required).
- Use of the second function avoids a compile error in Excel versions prior to the 2003 version.
- The approach is to search using find and switch to iteration if an error occurs.
Thanks Jim!
Download the Sample Workbook
To see Jim Cone’s Excel VBA code, you can download the Find Last Row in a Column sample workbook. The file is in Excel 2003 format, and zipped. Enable macros when opening the file, if you want to test the code.
Jim has added a few Excel tables to the worksheet, which you’ll see in Excel 2007 and Excel 2010. In Excel 2003, those will appear as lists.
Click the button on the worksheet, to find the last row with data in the current selection.
Or, you can modify the “DoesItWork” sub, so it will find the last row on a worksheet or specific column.
________________
Save Time When Saving Excel Files
Last week, Seth Godin recommended hiring a geek to help you save an hour a day.
Well, you’re a geek, so you don’t have to hire one! Just pay attention as you run through your morning office routine, and answer this question:
- What can you change about your Excel habits, to save an hour a day, or even a few minutes?
Then, make the change.
Doing Steps Manually
Every morning, I follow these steps:
- download some website statistics to Excel,
- crunch the numbers, and
- save the raw data file.
Fortunately, I have a macro that does the first 2 steps. For some reason, I was doing the last step manually. Don’t ask me why.
Excel is a bit slow when opening the Save As dialog box, so that final step was taking 30-60 seconds. Not a huge productivity drain, but why do something manually, if it can be easily automated?
Make It Automated
To get rid of that manual step, I added a few lines of code to the existing macro. The Excel VBA code saves a copy of the active workbook, into the Backup folder, and adds the previous day’s date to the file name.
It only took me a couple of minutes to add the code, so the time invested was quickly repaid. Now I just have another 59 minutes to trim!
Macro Code to Save Daily File
'------
Sub SaveDailyData()
Dim wbData As Workbook
Dim strDir As String
Dim strName As String
Dim strExt As String
Set wbData = ActiveWorkbook
strDir = "C:\Backups"
strName = "DailyData_" & Format(Date - 1, "yyyymmdd")
strExt = ".xls"
wbData.SaveCopyAs strDir & strName & strExt
wbData.Close SaveChanges:=False
End Sub

___________
Excel CONVERT Function Made Easy
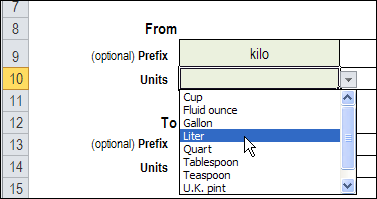
Do you ever use the Excel CONVERT function? Or, do you avoid that function, because you can’t remember all the measurement unit codes?
For example, the formula =CONVERT(10,”klt”,”gal”) will convert 10 kilolitres to 2,641.7205 gallons – if you get those codes right.
You might be able to remember lt and gal, but probably not many of the other codes.
Sort a Row in Excel Worksheet
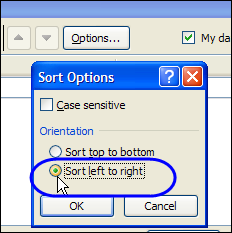
Most of the time when you’re sorting in Excel, you sort based on the values in one or more columns.
If your workbooks are like mine, it’s rare that you sort horizontally, based on the values in a row. But if you need to do that, here’s how to sort a row in Excel.
Excel Drop Down Multi-Select Update
I’ve done another update to the Data Validation Multiple Selection sample, thanks to a question from Pat, in a blog comment. He has 3 columns with different drop down lists, and wants to add new items to the applicable lists.
Pocket Price Waterfall Chart in Excel
I’m working on some pricing reports for a client, and one of the requests was for a Pocket Price Waterfall chart. I hadn’t made one of those before, and fortunately the client sent me a sketch of the chart that they wanted.
Move ListBox Items In Excel UserForm
Last week, we saw how to move items from one listbox to another on an Excel worksheet.
Now I’ve added a page on the Contextures website, with similar instructions for listboxes on an Excel UserForm.
Thanks to Dave Peterson, who provided both sets of sample code.
ListBoxes in Excel UserForm
In the screen shot below, there is an Excel UserForm with two ListBoxes, and four command buttons, down the centre.
- The buttons with 2 arrows move ALL items from one list to the other, in the direction that the arrows are pointing
- The buttons with 1 arrow move the SELECTED items from one list to the other, in the direction that the arrow is pointing

Download the Move Listbox Items Sample File
To see the code, and test the ListBox move items code for a UserForm, you can download the ListBox UserForm Move Items sample workbook.
The file is in Excel 2007 format, and is zipped. It contains macros, so enable them if you want to test the code.
Related Excel VBA Tutorials
If you’re looking for a fun and exciting way to fill your holiday Monday, here are links to a few other UserForm and Excel VBA tutorials on my Contextures website:
Create an Excel UserForm Video
Excel VBA Edit Your Recorded Macro
______________________
Holiday Weekend Flags in Excel

Happy Canada Day! I made a couple of holiday weekend flags in Excel, to help you celebrate.
Move Excel Listbox Items
To select specific items from a long list, you can create 2 ListBoxes on a worksheet.
Then, use arrow buttons to move all the items from one list to the other, or move selected items only.
ListBoxes on Worksheet
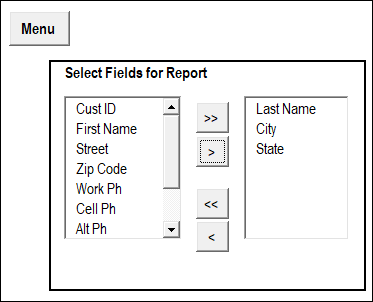
In the screen shot below, there are 2 ListBoxes, and 4 buttons with arrows, on a worksheet named CreateRpt.
- In the ListBox at the left, you can select one or more items that you’d like in a report.
- Then, click the 2nd button, with one arrow that point to the right.
- The selected items will move to the ListBox on the right.
OR
- You could click the. top button, to move all the items to the right-hand ListBox.
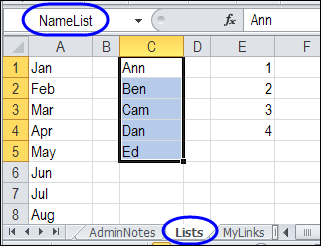
Items List on Worksheet
When you get started, the list at the left is filled with items. Those items come from a named range, on a worksheet named Admin.
You could modify that list, to include the items that you need in your ListBox.

Use the ListBoxes
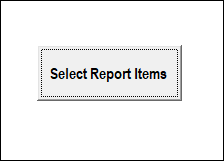
In the sample file that you can download, there is a Menu worksheet, with a navigation button, “Select Report Items”.
Click that button to go to the CreateRpt worksheet, where the ListBoxes are located.
Macro Runs Automatically
When the CreateRpt sheet is activated, an event procedure (macro) runs automatically.
The VBA code in that event procedure does the following steps:
- Clears both ListBoxes
- Adds all items from worksheet list, in ListBox at the left
Back to Menu Sheet
On the CreateRpt sheet, there is another navigation button, “Menu”, at the top left of the sheet.
Click that button, and a macro runs, to take you back to the Menu sheet.
Navigation Button Macros
The two navigation buttons run simple macros, and the VBA code is shown below.
First, here is the code that the Menu button runs:
Sub GoMenu()
Worksheets("Menu").Activate
End Sub
Next, here is the code that the Select Report Items button runs:
Sub GoRpt()
Worksheets("CreateRpt").Activate
End Sub
Read the Detailed Instructions
Thanks to Dave Peterson, who sent me the instructions and sample code for moving listbox items.
To see the details on how this technique works, visit the Excel VBA Move Listbox Items page on the Contextures website.
The tutorial shows, step by step, how to set up the worksheets, add the ListBoxes, and create the named ranges.
It also shows all of Dave’s sample code, for moving the items between the ListBoxes.
Download the Move Listbox Items Sample File
To see the code, and test the Listbox move items code, you can download the Listbox Move Items sample workbook.
The file is in Excel 2007 format, and is zipped. It contains macros, so enable them if you want to test the code.
Video: Move Listbox Items on Worksheet
To see the steps to create the Listbox example, you can watch this Excel video tutorial.
______________