Do you ever accidentally close a tab in Firefox, then want to get back to a website that you were exploring in that tab?
It happens to me a couple of times every day – I click on a link, and when I’m finished reading that page, I close the tab. Oops! That link hadn’t opened in a new tab, and now I’ve lost the original page that I was reading.
Re-open a Closed Tab From the History Menu
Fortunately, Firefox remembers what you’ve had open, and stores those tabs in its History.
To re-open a closed tab:
Click the History Menu
Click Recently Closed Tabs, to see a list of web page names.
Click the name of the web page that you want to re-open.
Re-open the Last Closed Tab From the Shortcut Menu
You can also re-open the last closed tab by using a shortcut menu:
Double-click in an empty area of the tab strip, for example, to the right of the last tab.
In the shortcut menu that appears, click Undo Close Tab.
Recently, I’ve made some progress in clearing out my office, and organizing my files and bookshelves. This week, after I was stabbed by a push pin, while trying to dig out a paper clip, I realized that my desk drawer could use some improvement.
At some point, I had good intentions, because you can see the boxes and clear container with storage compartments, that were meant to organize things. Somewhere, though, things got off track.
Buried under the top layer are the paper clips, in assorted sizes, that I need occasionally.
The glue sticks and Scotch tape are easily accessible, but I don’t use them too often.
Stamps, that I use about once a month, are easy to find.
A nice eraser, for those paper-based mistakes
Hand cream and nail clippers, because good grooming is important
The rest of it, I should toss out, or at least move to a different part of the office, so I can find those paper clips when I need them.
That desk drawer is prime office real estate, and I’m cleaning it up.
How about you?
Is your desk drawer better organized than mine? Or are you risking injury every time you reach for a paper clip?
______________
I started on a Mac, where the mouse had one big button. Later, I moved to a PC, with a two button mouse. For the past few years I’ve used a mouse with two buttons and a scroll wheel.
Scroll Through Excel
At first, I completely ignored the scroll wheel, and found it faster to drag the scroll bar, than to move the scroll wheel. Now I use the wheel occasionally, but more often in Firefox or Word, than in Excel.
Use the Scroll Wheel With Outlines
AlexJ, who shared his technique to hide Excel rows with outlining a few days ago, also uses the scroll wheel to show and hide outline levels.
Point to a cell within the outlined range
Press the Shift key, then roll the scroll wheel down, to hide the outline levels for that cell.
Or, press the Shift key, then roll the scroll wheel up, to show the outline levels for that cell.
Use the Scroll Wheel to Zoom
He also reminded me that you can use the scroll wheel to zoom in or out on the worksheet.
Point to a cell within the outlined range
Press the Ctrl key, then roll the scroll wheel down, to hide the outline levels for that cell.
Or, press the Shift key, then roll the scroll wheel up, to show the outline levels for that cell.
Use the Scroll Wheel to Scroll
And yes, you can even use the scroll wheel to scroll. Really fast!
Click the scroll wheel, and a four-headed arrow appears
Move the mouse up, down, left or right, and a single arrow appears, pointing in the direction that the mouse is moving.
The Excel sheet scrolls very quickly, increasing in speed as you move the single arrow toward the edge of the worksheet.
To stop the scrolling, tap the scroll wheel, or click a mouse button.
Other Scroll Wheel Shortcuts?
Do you use the scroll wheel? Do you have any other shortcuts for it?
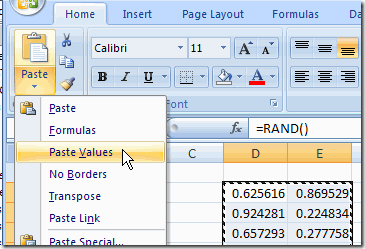
After I create formulas in Excel, sometimes I want to lock in the results of those formulas, so I use the Paste Values command.
For example, I might use the RAND function to create a set of random numbers. After creating them, I don’t want them to change every time the sheet calculates.
Ever since I started my blog, I’ve subscribed to the RSS feed. That lets me know if everything is working as expected with the feed, and I can investigate any problems as early as possible.
It’s also a good check when I upload an article with a delayed posting time. Sometimes I forget to set the posting time as AM, instead of PM, so the delay is much longer than I intended.
If I notice that the feed hasn’t been updated, I can go to the blog and change the publishing time.
Subscribe By Email Too
However, I also have an email subscription option on my blog, and hadn’t tested that.
I finally subscribed last week, which gave me the chance to see how the subscription process works (seemed pretty easy).
Now I get an email every morning, with the latest Contextures blog entry, and can follow up if there’s any problem with that delivery method.
___________
Last week I described how I use X entries in hidden columns, so I can easily hide specific rows in an Excel worksheet. In the comments for that article, AlexJ mentioned that he uses outlining in his workbooks, to show and hide the rows and columns.
I’ve been using Microsoft Word since 1985, starting with Word for Mac and eventually moving to the Windows version for Word 6.0. As with other Office programs, some great new features have been added, and other features, that were working just fine, have been removed or changed. Don’t get me started on Word’s numbering.
Most of my Word documents are currently in Word 2003, but I’m experimenting with Word 2007, in case some of my clients decide to switch. One of the new features that I’ve discovered is the automatic Cover Sheet.
Insert a Cover Page
To automatically add a cover page to the front of the Word document:
On Word’s Ribbon, click the Inert tab.
Click the Cover Page command, to open the list of cover page options.
Click on one of the options to select it.
Add Details to the Cover Page
On the cover page that’s inserted, there are fields that you can customize with your name, document title, and other information.
Click on a field (indicated with square brackets), and the name of the field will appear, such as Subtitle.
Type the text you want in that field.
Change the Cover Page
Many of the cover pages use fonts or colours from the documents Theme. You can:
select an element and change its font, colour or other properties.
select a different Theme, and those fonts and colours will replace the existing Theme’s fonts and colours.
select a different cover page from the drop down list (maybe not this one!)
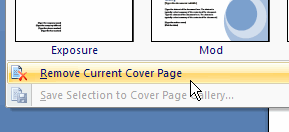
Remove the Cover Page
If you change your mind, and no longer want a cover page, click the Cover Page command on the Ribbon.
Then click Remove Current Cover Page.
The cover page is deleted immediately, with no confirmation message. However, you could click Undo to restore it.
Or, insert a cover page later, and the data that you entered previously (Title, Subtitle, etc.) should appear in the new cover.
One of the new features in Excel 2007 is live preview when you select a different font or theme on the Ribbon.
For example, here’s how my worksheet looks now:
The default font for the cells is Calibri, and I’ve added bold in the first row.
I’m not sure if the Calibri font is the best choice, so I’d like to see how the data would look in a different font.
Select a Different Font
I select column H, then click the drop down arrow for Fonts on the Ribbon’s Home tab. The live preview shows the selected cells in each font as I point to it in the list.
If I find a font that I like better, I can click on it to change the font for the selected cells. None of the other cells are affected.
Excel Formatting Live Preview Font Selection
Select a Different Theme or Theme Font
In most cases, I wouldn’t just change the font in one column or a few cells. To keep the workbook from looking like a ransom note, I’d usually change the font for the entire workbook.
In Excel 2007 I can do this by choosing a new Theme or by selecting a different Theme Font.
On the Ribbon’s Page Layout tab, click the drop down arrow for Themes or for Fonts, then point to one of the options.
The live preview affects all the cells that use the Calibri font, instead of just the selected cells.
Click on one of the options and all the cells with Calibri font are changed.
Formatting Converted Workbooks
Slowly, I’m converting some of my old Excel files, like the price list shown below, to Excel 2007 format.
When I use the Theme or Theme Fonts drop down list, the live preview doesn’t work. The data is still shown in Arial Narrow, which was the default font in Excel 2003.
To make this worksheet fit the current theme, I’ll change the fonts to Calibri and Cambria:
Click the Select all button at the top left of the worksheet, to select all the cells on this worksheet.
Then, on the Ribbon’s Home tab, select the Calibri font.
To format the first row as Headings, select Row 1 and apply the Cambria font.
Now, any cells that are formatted with one of the Theme fonts will show a live preview when selecting a different Theme or Theme Font.
Merge Styles Tip
John Walkenbach added this formatting tip in the comments below:
“Here’s a way to quickly make an XLS workbook look like an 2007 workbook:
Open your XLS workbook, then press Ctrl+N to open a new workbook. Go back to your XLS window and activate the Merge Styles dialog (click the bottom of the scroll bar in the Styles group, then choose Merge Styles). Select the new workbook you opened, click OK, and confirm your choice.
All cells that have the “Normal” style will now be formatted in the default style for Excel 2007. In addition, the cells will respond to theme changes.”