
Make it easy to enter valid data in an Excel workbook. Choose “Fastener” in one combo box drop down. The next combo box shows a list of fastener parts, with part ID and part name.
This video shows how to use this simple data entry tool, and you’ll get a peek behind the scenes, on how it works.
Video Timeline
Here’s the video timeline, and the full video transcript is at the end of this post:
- 0:00 UserForm Demo
- 0:53 Lookup Lists Sheet
- 1:25 See How Macro Works
- 1:48 Named Range for Parts List
- 2:02 UserForm Macro Code
Dependent Combo Box Drop Downs
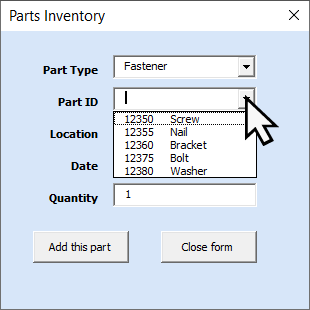
In the screen shot below, you can see the Excel UserForm from my video.
- From the Part Type combo box drop down list, I selected Fastener
- That affects the Part ID combo box, which is dependent on the Part Type selection
- Instead of showing all the parts, the Part ID drop down only shows a list of Fastener parts.
- When you select a part, only its Part ID is stored in the combo box
That makes it quick and easy to enter data.

Add to Parts Inventory
After you fill in the Parts Inventory boxes, click the Add This Part button.
That button runs Excel VBA code, which puts your data into a worksheet Excel table, for storage.
Later, you can filter that table, to find specific entries. Or, build a pivot table from the data, to get an inventory summary.

Get the Sample File
To learn more about Excel UserForms, and dependent combo boxes, go to the Excel UserForm Dependent Combo Boxes page on my Contextures website, and download the sample file.
__________________
More UserForm Tutorials
Create an Excel UserForm with Combo Boxes
__________________
Video Transcript: Excel UserForm With Dependent Combo Boxes
Custom Tab on Excel Ribbon
This workbook is set up so you can enter parts data, using an Excel UserForm.
On the Ribbon, there’s a special tab for this workbook, called DB macros.
If you click that, you’ll see the buttons along the Ribbon, and to open the form you click Data Entry Form.
Excel UserForm Opens
In the UserForm, you can select from the drop-down list.
It automatically fills in the current date, and a quantity of 1, and you can change those fields if you need to.
The first field is a Part Type, and the second is a Part ID
Right now, there’s nothing showing this Part ID list, because first you have to choose a part type.
- There are 2 types, so we’ll select Fastener
- Once I select that, then there’s a list of the fasteners
- Select one of those, and its part number shows up here
- Then you can select a location, and then add that part.
Add Part Order
Once you click Add Part, it clears out the top 3 combo boxes, and resets the date and quantity.
To see how this works, I’m going to go to a different sheet in this workbook, which is Lookup Lists.
See Lists Sheet
And here’s a list of all the parts with their ID, which category they’re in, and then a
description of the part.
We also have lists for the location. That’s another combo box, and the categories — we’ve got two categories.
Over here, there’s a setup for a filter. Whenever you select a part category, that name goes into this cell, and it’s a criteria range for an Advanced filter.
See How Macro Works
I’ll reopen the data entry form.
- When I select a part type, fastener, nothing happens right away.
- But when I leave that combo box, I’ll click in Part ID.
- Now you can see that it’s put fastener into the criteria range
- It ran an advanced filter, and gave me a list of all the fastener parts.
I’ll click the part ID, and I can now see that list that’s on the worksheet.
I’m going to close the form again, and this works with names.
Named Range for Parts List
Whenever it creates this list, it gives it a name. You can see here: PartSelList
That is used for the combo box for the parts
To see the code, we can go into Visual Basic, and here’s the UserForm
UserForm Macro Code
The part type, if I double click on that, you can see that after the update, this code runs.
- It clears out any existing value in the part drop down
- Then it sets the row source, which is that named range
- It sets it to nothing, so that combo part won’t have any items in it
- Then it puts a current category value into the criteria range, runs the filter, and it redefines that list
- So if it’s longer or shorter, it adjusts that, and then it sets the part combo box to have
that range as its source.
__________________