Every morning, I use Excel to keep track of the projects I’m working on, and organize my tasks for the day. Of course, things don’t always go as planned, but it helps to know where I’m headed!
Project Work List
In my project workbook, I record the time spent on yesterday’s tasks, and then plan today’s tasks.
One column has dates, so:
- I move some tasks a day forward, if they weren’t finished.
- I move weekly tasks 7 days ahead, so they’re in the plan for next week.
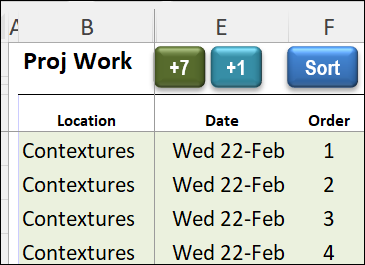
To save time, instead of typing the revised dates, I use those little macro buttons at the top of column E:
- Select a date cell
- Click the +7 macro button to add 7 days
- or click +1 macro button to add 1 day
Then, after everything is moved forward, I click the Sort button, to put things in the updated order.
Choose Number of Days to Add
If you do anything similar, you can get my macros to add numbers to worksheet cell values.
There’s a macro that adds a specific number, like my +1 and +7 macro buttons do
Or, use my macro that prompts you to enter a number, and the value in each selected cell is increased by that amount.
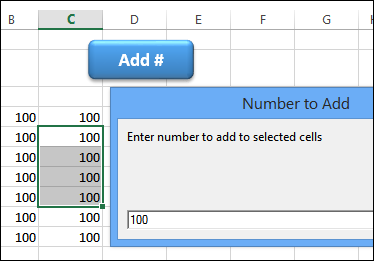
This screen shot shows the sample file’s macro button, and the input box.
The four selected cells will increase by 100, and all the other cells will stay the same.
Video: Add Numbers to Multiple Cells in Excel
To see how my macros work, and how you can modify the code slightly, watch this 5-minute video.
- The video starts by showing how to change multiple cells manually, with the Paste Special command.
- After that, you’ll see how the macros work, and how to change a couple of lines in the macro code.
The full transcript is below the video.
Video Timeline
- 00:00 Introduction
- 00:33 Manually Add Number
- 01:23 Macro 1: Add Specific Number
- 02:07 Macro 2: Prompt for Number
- 02:44 See the Macro 2 Code
- 03:22 Modify the Macro Code
- 04:14 See the Macro 1 Code
- 04:34 Macro Buttons
- 04:52 Get the Sample File
Download the Sample File
To see how the macros work, and get the code to use in your own Microsoft Excel worksheet, you can visit my Contextures website.
You’ll find the instructions and sample file on the Add Number to Multiple Cells page.
The zipped file is in xlsm format, and contains macros. Enable macros when you open the file, if you want to test the code.
Video Transcript: Add Number to Cells
In Excel, you might have a group of numbers or dates that you want to add a set amount to. For example, you might have a group of numbers and you want to add a hundred to everything or a group of dates, and you want to add a week so that you’re moving everything to next week.
Manually Add Number
We’re going to look at how you can do that manually. And I’ll show you a couple of macros that you can download from my website that will let you click a button and automatically add a number to selected range of cells.
So first the manual option is Paste Special.
So I’ve got these cells and I’d like to add 10 to everything on this worksheet.
- So in a blank cell, I’ll type the number 10 and press enter, and then I’ll copy that cell.
- So I’ve selected it. And on the Home tab, I’ll click Copy.
- Then I’ll select all the cells where I want to add that number.
- Now, click this arrow below the Paste button and go to Paste Special
- Under Operation, click Add, and OK.
And now everything has increased by 10.
Once I’ve finished, I can go back and just clear that cell – just select and press the Delete key.
Macro 1: Add Specific Number
If this is something you do frequently, it might be easier to do with macro. So I’ve got a couple of examples here.
In this example, I’ve got a button that runs a macro, which adds a set number to the selected cells
And in the sample file, I’ve got it set up so it will add 7.
- So if I select all of these days right now, it’s from the first to the 7th of July
- Click Add 7, and it just adds seven to every date.
- So you’ve automatically moved everything to next week.
It will also add 7 to numbers.
- So if I select these cells and click Add 7, it does it very quickly.
- There’s no cell where you have to go and type a number and then clear it out later
Macro 2: Prompt for Number
And the other macro asks you what number you’d like to add, so it’s a little more flexible.
- So here, if I select all of these cells and I’d like to add a hundred to them, I click this button.
- The input box appears and asks me which number I’d like to add.
- The default I’ve got set up is seven because usually I’m working with dates and I want to add a week,
- But I can type any number here. So I’ll type 100, click OK.
- And it changed us those cells, but left everything else as is
Do the same thing with dates — I can add seven and it didn’t change anything else.
See the Macro 2 Code
And we’ll take a look at those macros.
- So to see one, I’ll right- click on this, click Assign Macro, and it shows the macros in this workbook
- And the one that we’re using on this button, when I click Edit, it takes me into the code for that button.
So we’ve got some variables set up
- The range that it’s going to work on is the selection.
- So only the cells that you have selected will be changed.
- Then we figure out how many rows and columns are in that selection.
Modify the Macro Code
And it’s going to prompt you to put in a number and there’s a string that will show up in that input box.
- There’s also a default number 7.
- So if you usually add 10 to things, you could change that default to 10
- And then you just have to click OK, or change the number for those times when you want to add a different number
- Then we create an array that’s based on the size of the selection.
- So going by the number of rows and columns in your selection, it loops through everything.
- So it loops through each row and each column in that row and picks up the number that’s there
- and adds seven to that, or whatever number you’ve put in that input box.
- And then it takes all of those new numbers and puts them into the selected range.
- So the selected range value becomes that array that we created with the increased numbers.
See the Macro 1 Code
The other macro is very similar, but it doesn’t have an input box, it just has a set number.
- So you could change that if you’re not usually working with dates and want to add a week
- If you like to add a hundred to things or 10.5, whatever number makes sense for you, you can put here as the value for that variable.
Macro Buttons
And then these macro buttons, just click them to run the macro.
Or you could add those macros to a workbook that you have open all the time, like your personal workbook, and then make an icon up in the quick access toolbar or on the ribbon to run that macro
______________________________
Excel Macro to Increase Amount in Multiple Cells
______________________________


