When you create an Excel Table, or a Pivot Table, a default style is applied. You can change to a different built-in style, or create custom styles, with your own formatting. There are details below, and an Excel custom styles problem that you might run into.
Create a Custom Style
The easiest way to create a custom style is to make a duplicate of a built-in style, that’s similar to what you need.
Here are the steps for a pivot table, and you can do the same thing for a named Excel table.
- Select a cell in any pivot table, and on the Ribbon, click the Design tab.
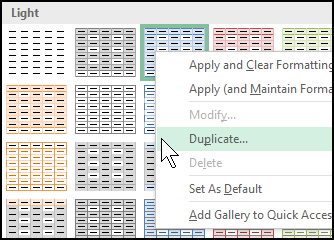
- In the PivotTable Styles gallery, right-click the style you want to duplicate.
- In the context menu, click Duplicate.
Modify the New Custom Style
After you duplicate an existing built-in style, type a name for your custom style. Then, change the formatting for one or more of the table elements.
This video shows how to create a custom style, and modify it.
Custom Style Problem
Usually, things go smoothly if you try to modify a custom style, or delete a custom style.
There’s one situation when you’ll run into a custom style problem though, and thanks to UniMord for letting me know about this!
If any sheet in the workbook is protected, you can’t modify or delete a Custom Style.
- When you choose the Modify command, nothing happens
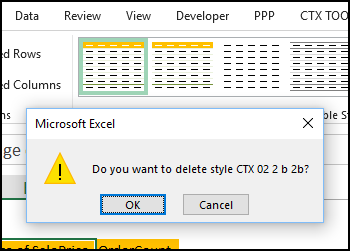
- When you choose Delete, a confirmation message appears, but if you click OK, nothing happens
To modify or delete any custom styles, you’ll need to unprotect all the sheets first.
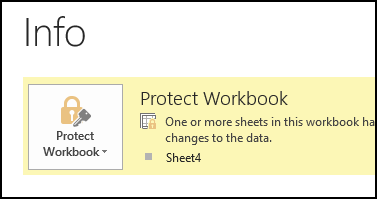
To see which sheets are protected, click the Ribbon’s File tab, and click Info.
NOTE: Using the Protect Workbook command does not prevent the custom styles from being modified or deleted. Only the Protect Worksheet command blocks these actions.
Copy Custom Style to Other Workbook
After you create custom styles, you might want to use them in other workbooks. There’s no built-in command that lets you do that.
- In Excel 2013 and earlier, you can copy a pivot table that is formatted with a custom style, and paste it into a different workbook. That automatically creates a copy of the custom style in the other workbook.
- In Excel 2016 and later, that trick doesn’t work. Instead, you can copy the pivot table’s worksheet into the other workbook, and the custom style will be copied. (see warning in next section)
This video shows the steps in Excel 2013 and earlier.
Sheet Copy Warning
Unfortunately, copying the pivot table sheet can also copy defined names from the original workbook. If the original file has lots of define names, use these extra steps:
- First, copy the pivot table sheet into a new blank workbook
- On the Excel Ribbon’s Formulas tab, click Name Manager
- To select all the names, click the first name, then press Shift and click the last name
- Click the Delete button, to delete all the names
- Close the Name Manager
- Move the pivot table sheet into the other workbook, where you want to add the custom style.
More PivotTable Style Tips
There are more PivotTable Style and formatting tips on my Contextures site.
If you’d like to see what styles are currently in use, download my PivotTable styles macros, to create a list for your workbook.
_________________
Excel Custom Styles Problem
______________


Very interesting
If you create/duplicate a style it goes in as custom style by default. Can you change it to one of the predefined categories eg Data and Model?