
Happy Halloween! Some people think that Excel is a bit scary, so I made an interactive workbook that lets you show the friendly side of Excel. Download my sample workbook, to see all the Excel Halloween tricks, and share it with your spreadsheet-fearing friends too!
No Macros Just Formulas
This Halloween project was designed for fun, but it has Excel tricks that you can use in serious projects too.
There are no macros in the sample file, just formulas, and a few other other built-in Excel features.
Here’s a screen shot of the main page, with a skull and a friendly pumpkin.

Click the Spin Button
At the top of the Halloween page, there is a spin button that you can click up or down. That changes the number in the yellow cell – it goes from zero to 5.
The spin button is from the Developer

Skull Eye Colour
When the number changes in the yellow cell, the skull’s eye colour also changes.
- At zero, the eyes are black
- At 1, they change to white
- The colour keeps changing, and at 5, they’re bright red

Spin Button Message
The message in the text box beside the spin button also changes, as the number changes.
- At zero, the message is “Click the spinner to change skull eyes”
- For 1-4, the message is “Happy Halloween!”
- At 5, the message is “Type a zero in $G$5 to start over”

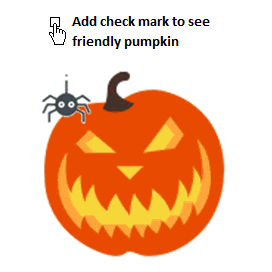
Click the Check Box
The other interactive feature on the Halloween sheet is the check box.
Click the check box, to select a friendly or scary pumpkin picture. The message beside the check box changes too, when you click.
- If the check box is empty, the scary pumpkin is showing, and the message is “Add check mark to see friendly pumpkin”
- If the check box is checked, the friendly pumpkin is showing, and the message is “Remove check mark to see scary pumpkin”

Behind the Scenes
On the Halloween sheet, the spin button and check box are from the Form Controls, which are found on the Ribbon’s Developer tab. Click the Insert command to see the controls.

Form Control Settings
To adjust the settings for the spin button or check box, right-click it, and click Format Control.
I used these settings for the Spin Button:
- Minimum: 0
- Maximum: 5
- Incremental change: 1
- Cell Link: $G$5
I used this setting for the Check Box:
- Cell Link: Lists!$B$2
Lists Sheet
To make the interactive features work, there is a Lists sheet in the workbook. It has a couple of lookup tables for the messages, and a cell that is linked to the check box.

Pumpkin Pictures
On the Lists sheet, there are two pumpkin pictures – Friendly and Scary. Don’t move those pictures, or the picture on the Halloween page won’t work correctly.
I found those pictures in my Stencil graphics account, and inserted them on the worksheet.
There is a dynamic name in the workbook – PictureRange, based on this formula:
=IF(Lists!$B$2=TRUE, Lists!$G$4:$I$12, Lists!$K$4:$M$12)

If the check box on the Halloween sheet is checked, cell B2 on the Lists sheet will be TRUE, otherwise cell B2 is FALSE.
- If B2 is TRUE, the PictureRange will be Lists!$G$4:$I$12, where the friendly pumpkin is located.
- If B2 is FALSE, the dynamic range will be Lists!$K$4:$M$12, where the scary pumpkin is located

Note: I added borders for this screen shot, but you won’t see borders in the workbook. I wanted a clean look for the pictures.
Linked Picture
To get the interactive picture on the Halloween sheet, I followed these steps, to create a linked picture.
- On the Lists sheet, select range G4:I12, and copy it
- Go to the Halloween sheet, and click the cell where you want the top left corner of the picture
- On the Home tab, click the arrow for Paste, to see the options
- In the Other Paste Options section, click on Linked Picture, to add the picture

- Then, with the picture still selected, click in the Formula bar
- Change the address from =Lists!$G$4:$I$12 to =PictureRange

Now, when you change the check box, the picture will change too.
Spin Button Message
The message beside the spin button is in a text box. If you click on that text box, the formula bar shows that it is linked to cell C5.

Cell C5 looks empty, but it contains a formula, and is formatted with white font.
=VLOOKUP(G5,MsgList,2,TRUE)
In the next screen shot, I’ve changed the font to black, so you can see the result of the formula.

The VLOOKUP formula looks for the number from the yellow cell, in the MsgList range on the Lists sheet, using an approximate match.

Check Box Message
In the cell beside the check box, there is another VLOOKUP formula.
=VLOOKUP(Lists!B2, Lists!B4:C5,2,FALSE)
It returns a message from the lookup range on the Lists sheet, based on the TRUE or FALSE in the linked cell for the check box.

Skull Picture
The final bit of Halloween magic in the workbook are the cells that colour the skull’s eyes.
First, I found a skull icon in my Stencil graphics account, and inserted it on the worksheet.
To make the white colour transparent, I followed these steps:
- Select the image, and on the Excel Ribbon, click the Format tab
- Click the Color command, then click Set Transparent Color
- Click on a white part of the picture to change that colour to transparent
Skull Eyes
Next, I added conditional formatting to cells H11 and L11, behind the skull’s eyes.
The conditional formatting formula checks the number in cell G5, which is linked to the spin button.
The cells have black fill colour, and the five rules change the colour when the spin button changes the number in G5.

One More Trick
There’s one final trick in the Halloween workbook.
On the Lists sheet, the ADDRESS function in cell C10 shows the address for the spin button’s linked cell ($G$5).
=”Type a zero in “& ADDRESS(ROW(Halloween!$G$5), COLUMN(Halloween!$G$5)) & ” to start over”
I moved things around on the main sheet a few times, and that formula kept track of the spin button’s linked cell!
Get the Excel Halloween Tricks File
If you’d like to download the Halloween Tricks Excel file, go to the Excel Sample Files page on my Contextures site.
In the Conditional Formatting section, look for CF0009 – Halloween Pictures.
The zipped Excel file is in xlsx format, and there are no macros in the workbook.
_______________
Excel Halloween Tricks
