
I add lots of screen shots to my Excel tutorials, so it’s easier to follow the steps. And if I’m explaining a formula, it’s helpful to show that on the worksheet too.
However, some Excel formulas can get pretty long, and I found a way to fix that problem! You can see all the solutions that I tried, or skip to the end, to see the final solution.
Show Excel Formulas
To show an Excel formula on the worksheet, you can use the FORMULATEXT function.
In the screen shot below, I put this formula in cell D4:
- =FORMULATEXT(D3)
It shows the COUNTIFS formula that’s in cell D3, to count the number of orders that meet the 2 criteria.
- =COUNTIFS(A2:A6,D1,B2:B6, D2)

Too Wide for Screen Shot
The formula isn’t extra long, but it makes the screen shot wider than I’d like.
To make it narrower, I could select cell D4, and turn on Wrap Text.
Now I can grab a narrower screen shot, but that formula is hard to read.

Add Line Breaks in Formula
To make a long formula easier to read, you can add line breaks to it, in the formula bar.
In the screen shot below, cell D3 is selected, and I’ve added 2 line breaks:
- Click after the open bracket, and press the line break shortcut — Alt + Enter
- Click after the second comma, and press Alt + Enter
That changes the formula so it’s on 3 short lines, instead of one long line.
However, row 4 is too tall now, so the item list looks strange.

Bad Choice – Merge Cells
To fix the row height problem, I could select cells D4:D6, and merge them.
Now I can make row 4 the correct height, but using merged cells can cause problems.
I don’t want my sample files to set a bad example!

Better Choice – TEXTSPLIT Function
Fortunately, there’s another option, if you’re using Excel 365 – the TEXTSPLIT function.
With TEXTSPLIT, you can separate text into separate rows or columns, based on a delimiter, with no merged cells.
- I’d like to split the formula at each line break character that I added
- A line break (line feed) is character 10 in the ASCII character set
- For the TEXTSPLIT delimiter, I’ll use the CHAR function: CHAR(10)
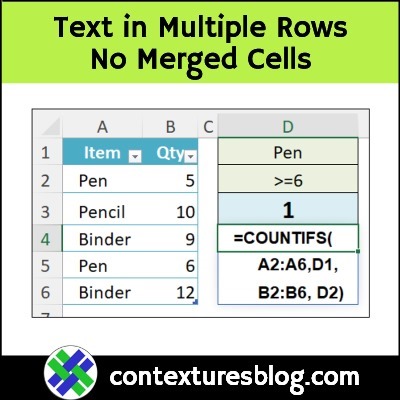
Formula Separated Into 3 Rows
Here’s the formula in cell D4, that separates the formula into 3 rows of cells:
- =TEXTSPLIT(FORMULATEXT(D3),,CHAR(10))
In the screen shot below, cell D4 is selected, and the results spill down to cell D6. The blue border outlines the spill range.
And now I can finally get the nicely-sized screen shot that I wanted!

Video: Split Text into Columns – TEXTSPLIT
In this short video, I show a simple example of using the Excel TEXTSPLIT function, to separate text into 3 separate columns. Also, you’ll see how to avoid the #SPILL! error, if you use TEXTSPLIT in a named Excel table.
More TEXTSPLIT Examples
To get more Excel TEXTSPLIT examples, go to the Excel TEXTSPLIT Function Examples page on my Contextures site.
For text that has more than one type of separator, you can use the TEXTBEFORE and TEXTAFTER functions, to separate the items.
And if you want to see how to join text from multiple cells together, instead of splitting it apart, go to the TEXTJOIN Function Examples page.
Video: FORMULATEXT Examples
If you’d like to learn more about the Excel FORMULATEXT function, watch my short video below.
_______________________
Excel Text in Multiple Rows – No Merged Cells

_______________________