You know that merged cells are evil, and should be avoided at any cost. Those merged cells can make it almost impossible to do simple tasks on a worksheet, such as sorting or filtering. Merged cells can even make it difficult to select a range of cells – and that’s annoying, as you probably know! Here’s how you can center headings without merging cells.
Don’t Merge Those Cells!
But sometimes it’s tempting to merge cells, and Excel makes it easy to merge cells, with a big “Merge & Center” button on the Excel Ribbon.
I often see merged cells used to center headings across several columns. Sure, it might look pretty when you’re done, but those merged cells can come back to haunt you, with sorting, filtering and selection problems.
Instead, let’s create the multi-column headings without merging cells. It takes a couple of extra clicks, but it’s well worth the effort.
Enter the Heading Text
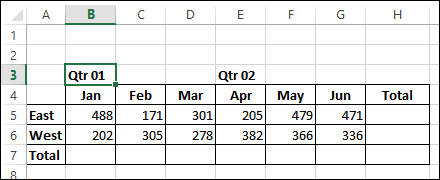
In this example, we’ll add “Qtr 01” and “Qtr 02” headings over the monthly columns.
First, type the headings in row 3, above the monthly headings.
- Qtr 01 is in cell B3
- Qtr 02 is in cell E3
Center the First Heading
To center the Qtr 01 heading over the first 3 months:
- Select cells B3:D3 – these are the cells where the heading should be centered.
- Then, click the Alignment Settings button on the Ribbon,
OR press Ctrl + 1, then click the Alignment tab
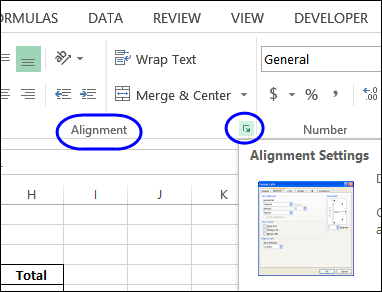
- In the Horizontal setting, click the arrow, and select Center Across Selection
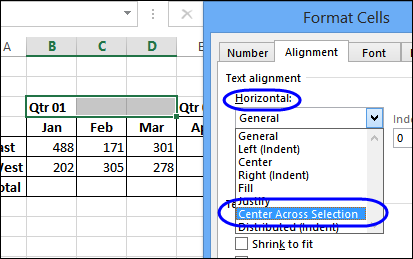
- Click OK
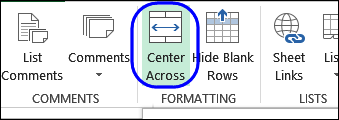
NOTE: If you have a copy of my Contextures Excel Tools Add-in, there is a Center Across command on the CTX TOOLS tab.
Centered But Not Merged
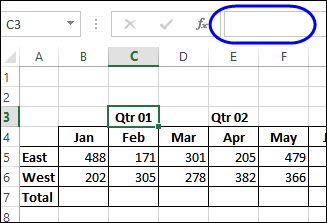
The heading is centered over the Jan, Feb and Mar columns. The cells aren’t merged though – I can still click on cell C3 individually.
And even though it looks like that’s the cell where the heading is, the formula bar shows that there’s nothing in that cell.
Finish the Formatting
To finish the formatting:
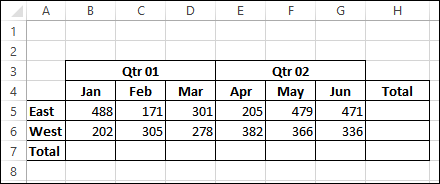
- Select cells B3:D3 and apply an outside border.
- Then, with those cells still selected, click the Format Painter on the Home tab, to copy the formatting
- Click on cell E3, to apply the formatting to the Qtr 02 heading cells.
Add Grand Totals
To add SUM formulas in all the Total cells:
- Select cells B5:H7 – the values and the blank cells for totals
- On the Ribbon’s Home tab, click the AutoSum button
The Total cells are automatically filled with SUM formulas for the row and column totals.
Download the Sample File
To download the sample file, go to the Worksheet Tips page on my Contextures site, and look for the Download section.
Video: Center Without Merging
To see the steps for formatting the headings, and adding totals, please watch this short video tutorial.
_________________

Merged cells are one of my “I know I’m not supposed to but I do anyway”s. I don’t use them within data tables (and really never find the need), but I otherwise use them ALL THE TIME. It’s just so much more convenient and easy to understand than the “center across cells”. Also if I do it the “proper” way, and someone else needs to try to update my sheet, they might not be able to figure it out.
Thanks Bryan! Center Across does have its drawbacks too, and sometimes we do have to merge cells, to get a worksheet set up. The key is to avoid them in tables, as you mentioned.
If someone isn’t fortunate enough to have your Add-in, adding Center Across Selection to the quick access toolbar is a real time saver and increases the likelihood that you’ll use it over Merge & Center.
@Jared, thanks! Yes, you could write your own macro for Center Across Selection, and add that to the QAT.
Hi Debra-
Center Across, in combination with Wrap Text, acquired a cosmetic bug in Excel 2010 (retained in 2013) that has my users complaining a bit now that we’re “upgrading” from 2007 to 2013. I trust this will repro for you:
-In a new sheet select say E6:J6 and assign it Center Across and Word Wrap.
-Type in text long enough to cause the text to wrap and row height to double.
-Scroll to the right far enough for all the text to disappear to the left.
-Scroll back to bring the text into view again.
-Note that a portion of the text has disappeared.
A page down / page up will refresh it, as will an F2 Enter, but still it makes it pretty hard to focus on your work.
Jim
@Jim, thanks for the details on that bug — I hadn’t heard about it before.
Center across cells is fine but how do you aling your text then e.g. left, right or centre?
@Beyers, when you use Center Across, the only option is center alignment